Showing posts with label json. Show all posts

How to Post JSON Data with PHP cURL & Receive It?

On 2/05/2018 1 Comment so far

Hi! Here let's see how to post json data with php curl and receive the raw json sent. You can simply use PHP file_get_contents() to send HTTP GET request. But it's not the same case with HTTP POST. Fortunately PHP cURL makes the process very simple. With curl you can easily send HTTP requests. In case you don't know, 'cURL' is a library that let you communicate with web servers using different protocols such as http, https, ftp, telnet, file etc.

To use curl, you must install libcurl package on your server according to the version of PHP you use.

send http post json in php

In case you are not sure if curl is enabled on your machine or not, use this code to check it.

<?php echo (is_callable('curl_init') ? 'cURL is enabled' : 'cURL is disabled'); ?>

How to Post JSON with PHP cURL?

In order to send HTTP POST request with JSON data, you have to follow some steps and they are,

  1. Format JSON data correctly
  2. Attach JSON to the body of the POST request
  3. Set the right content type with HTTP headers
  4. Send the request.

The following is the PHP code to send json through POST request.

<?php
// url
$url = 'http://mydomain.com/api/users/create';

// json data
$data = array(
    'site' => 'mydomain.com',
    'account' => 'admin',
    'status' => 'true'
);
$json = json_encode($data);

// send post request
$ch = curl_init($url);
curl_setopt($ch, CURLOPT_POSTFIELDS, $json);
curl_setopt($ch, CURLOPT_HTTPHEADER, array('Content-Type: application/json')); 
curl_setopt($ch, CURLOPT_RETURNTRANSFER, true);
$result = curl_exec($ch);
curl_close($ch);
echo $result;
?>

Here is the explanation for the functions & curl options we have used in the above script:

  • curl_init() - Initialize a curl session, takes up a parameter URL to send post request.
  • curl_setopt() - Set the curl options.
  • CURLOPT_POSTFIELDS - This option will set the data to the body of the http request.
  • CURLOPT_HTTPHEADER - Option to set http headers. It is important to define the right content type here, so that the remote server understands what we sent. To send json, the content type should be set to 'application/json'.
  • CURLOPT_RETURNTRANSFER - Setting this to TRUE will place the response from the remote server on $result variable instead of outputting it.
  • curl_exec() - Send the HTTP request.
  • curl_close() - Close the curl session.

Retrieve the Posted JSON:

Okay! We have sent json data via http post request. But what will happen at the receiving end? How should we retrieve the incoming json?

Well! In our example we have sent raw json data. This can be accessed through php's input stream. Below is the code to receive the json posted,

<?php
$output = file_get_contents("php://input");
echo $output;
?>

You can decode the json and process it as you want. Pretty simple!

Read Also:

That explains about posting json data and receiving it using PHP cURL. This is not very different from sending a regular POST request. However, we are doing it over HTTP here. Hopefully, this tutorial is useful for you. Please don't forget to share it with your friends.

How to Export MySQL Table to JSON File in CodeIgniter

On 1/25/2018 Be the first to comment!

Hi! In this tutorial, we will see how to export mysql table to json file in codeigniter. Data portability has become more important than ever and a necessary requirement for modern applications. Almost all web services uses JSON format to migrate data from one location to another. So, as a Web Developer, you must know to handle json and various types of applications like Web, Mobile etc.

Exporting mysql into json allows you to easily port data to different platforms. The whole process is quite simple. Just fetch the data from mysql database, covert the query result to json and then write it in a file.

codeigniter export mysql table to json file

CodeIgniter - Export MySQL Table to JSON File:

Let's create a demo for exporting the database as json. The steps are easy to follow and we possibly need two files, a model and a controller.

Step-1) Create Database

We need a dummy database to use in the example, a database, a table and some sample records.

Run the below sql file in the mysql environment and create them.

CREATE DATABASE `my_demo`;
USE `my_demo`;

CREATE TABLE IF NOT EXISTS `users` (
  `id` int(10) NOT NULL AUTO_INCREMENT,
  `fname` varchar(30) NOT NULL,
  `lname` varchar(30) NOT NULL,
  `email` varchar(60) NOT NULL,
  `city` varchar(50) NOT NULL,
  PRIMARY KEY (`id`)
) ENGINE=MyISAM  DEFAULT CHARSET=latin1 AUTO_INCREMENT=6;

INSERT INTO `users` (`id`, `fname`, `lname`, `email`, `city`) VALUES
(1, 'Jim', 'Connor', 'jimconnor@yahoo.com', 'Las Vegas'),
(2, 'Taylor', 'Fox', 'taylorfox@hotmail.com', 'San Francisco'),
(3, 'Daniel', 'Greyson', 'danielgreyson@hotmail.com', 'New York'),
(4, 'Julia', 'Brown', 'juliabrown@gmail.com', 'Los Angeles'),
(5, 'Rose', 'Harris', 'roseharris@gmail.com', 'New York');

Step-2) Create Model

In this step, create a model file in the 'application/models' folder. This will fetch data from the 'users' table, encode and return it as json to the controller.

UserModel.php

<?php
class UserModel extends CI_Model
{
    function __construct()
    {
        parent::__construct();
    }
    
    function toJSON()
    {
          $query = $this->db->get('users');
          return json_encode($query->result(), JSON_PRETTY_PRINT);
    }
}
?>

Step-3) Create Controller

Finally, create a controller file in the 'application/controllers' folder. This will communicate with the model, retrieve the json data and write in into a file.

UserController.php

<?php
class UserController extends CI_Controller
{
    public function __construct()
    {
        parent::__construct();
        $this->load->helper('file');
        $this->load->database();
    }
    
    public function index()
    {
        $this->load->model('UserModel');
        $result = $this->UserModel->toJSON();
        if(write_file('user_data.json', $result))
             echo 'Successfully exported to json file!';
        else
             echo 'Error exporting mysql data...';
    }
}
?>

Now we have all the required files in place. Run the controller, this will export the mysql data to a json file and show you a success message if all goes well.

You can check for the file 'user_data.json' inside the root directory. This is the exported file I received.

user_data.json

[
    {
        "id": "1",
        "fname": "Jim",
        "lname": "Connor",
        "email": "jimconnor@yahoo.com",
        "city": "Las Vegas"
    },
    {
        "id": "2",
        "fname": "Taylor",
        "lname": "Fox",
        "email": "taylorfox@hotmail.com",
        "city": "San Francisco"
    },
    {
        "id": "3",
        "fname": "Daniel",
        "lname": "Greyson",
        "email": "danielgreyson@hotmail.com",
        "city": "New York"
    },
    {
        "id": "4",
        "fname": "Julia",
        "lname": "Brown",
        "email": "juliabrown@gmail.com",
        "city": "Los Angeles"
    },
    {
        "id": "5",
        "fname": "Rose",
        "lname": "Harris",
        "email": "roseharris@gmail.com",
        "city": "New York"
    }
]
Read Also:

Likewise you can export the mysql table to the json file using codeigniter. The entire process is same as what you do with core php, but some may find it difficult to shift the code to fit with mvc pattern. And I hope this tutorial has clarified it. Please don't forget to share the post in social media if you like it.

How to Merge Two JSON Strings into One with PHP

On 1/19/2018 Be the first to comment!

Hi! In this tutorial we will see how to merge two json strings into one in php. People often mistakes JSON for object or array but it's the string representation of a JavaScript object. In a recent project, I wanted to combine two jsons. That is, I have to make two API calls and combine their results into one. It is a rest api and returns the response as json. The task is simpler than I thought. It employs a similar technique I used here earlier when dealing with json. Let me show you how to do it.

php merge two json strings

PHP - Merging Two JSON into One:

If you are new to working with JSON, don't worry. PHP offers native functions to handle it easily. The idea is to decode the json data, write it to an array and encode it back to json.

Below are the steps involved in the process.

STEP-1) Let's take two different jsons containing couple of employee details.

<?php
$json1 = '{"id": "GD01", "name": "Garrett Davidson", "position": "System Administrator", "location": "New York"}';
$json2 = '{"id": "DW02", "name": "Donna Winters", "position": "Senior Programmer", "location": "Seattle"}';
?>

STEP-2) Next we should convert the json strings into an array and join them into a single array.

<?php
$array[] = json_decode($json1, true);
$array[] = json_decode($json2, true);
?>

Keep in mind the function json_decode() will return stdObject by default. To make it return associative array, we have to set the second parameter as 'true'.

STEP-3) Then convert the merged array to json. For this we have to use the function json_encode(). While encoding, I have included the token 'JSON_PRETTY_PRINT' to add proper indentation so that it's easy on the eyes.

<?php
$result = json_encode($array, JSON_PRETTY_PRINT);
?>

STEP-4) Finally print the merged json. You can simply echo it, but the output will look messy and difficult to read. So be sure to set the headers with right content type to display indents and blank spaces between the texts.

<?php
header('Content-type: text/javascript');
echo $result;
?>

This will produce the below output,

// output
[
    {
        "id": "GD01",
        "name": "Garrett Davidson",
        "position": "System Administrator",
        "location": "New York"
    },
    {
        "id": "DW02",
        "name": "Donna Winters",
        "position": "Senior Programmer",
        "location": "Seattle"
    }
]

As you can see, the output consists of a nested json combining the data from $json1 and $json2.

Here is the complete php script for json merging process.

index.php

<?php
$json1 = '{"id": "GD01", "name": "Garrett Davidson", "position": "System Administrator", "location": "New York"}';
$json2 = '{"id": "DW02", "name": "Donna Winters", "position": "Senior Programmer", "location": "Seattle"}';

// decode json to array
$array[] = json_decode($json1, true);
$array[] = json_decode($json2, true);

// encode array to json
$result = json_encode($array, JSON_PRETTY_PRINT);

// print merged json
header('Content-type: text/javascript');
echo $result;
?>

You can also store the json output in a file instead of displaying it in the browser window.

Read Also:

That explains about combining two or more json strings in php. The process can be easily done with core php alone and doesn't require any external tool. I hope you like this tutorial. Please share it on social media if you find it useful.

How to Get Country Name from IP Address with PHP

On 1/15/2018 Be the first to comment!

Hi! In this post, let's see how to get country name from ip address using php. When working on multilingual web applications, it is mandatory to find the geographic location of the visitors, so that you can provide the contents that match the specific location. Some websites even change country flags and themes accordingly.

With PHP, you can get the visitor's IP easily, but unfortunately there's no way to get the country details from it. Hence, you have to rely on external web services to provide the location details. Here I'm going to show you how to find the country of visitors with the help of GeoPlugin API and PHP.

php get country name from ip address

Getting Country Name from IP Address with GeoPlugin:

GeoPlugin is a free web service that provides geographical location of site visitors from IP. It offers various types of services like PHP, JSON etc., and in this tutorial, I'm going to use the JSON API to find the country name.

You have to access the service with this url,

http://www.geoplugin.net/json.gp?ip=IP_ADDRESS

The API will return the name of the country along with other details related to the location, such as city, currency, latitude, longitude, etc.

Below I have created a PHP function getIP(). It accepts the IP Address as a parameter, communicates with the geoPlugin api and returns the country name for that IP.

PHP Function:

<?php
function getIP($ipadr) {
    if(isset($ipadr)) {
        $details = file_get_contents('http://www.geoplugin.net/json.gp?ip=' . $ipadr);
        $json = json_decode($details);
        if($json->geoplugin_status == '200')
            return $json->geoplugin_countryName;
        else
            return 'Error getting country name.';
    } else {
        return 'IP is empty.';
    }
}
?>

Usage:

You must call the function like this,

<?php
echo getIP('17.142.180.78');

// output
// United States 
?>

What the function does is, take the ip address and send the http request to the api using file_get_contents() method. The api returns the json response, which it decodes with json_decode(), parses for the country name and returns it.

Finding Visitor Country Location:

In case you want to find the visitor's location, you must pass the client ip address to the function in this way,

<?php echo getIP($_SERVER['REMOTE_ADDR']); ?>

Keep in mind to use this on live server, because REMOTE_ADDR will return the default ip '127.0.0.1' when you run it from localhost.

Read Also:

That explains about getting country name from IP address using geoplugin api and php. The good thing about this API is you do not need to register or obtain an API key to use the web service. It's totally free and simple to use. I hope you like this. Please share this on social networks if you find it useful.

Get JSON from URL in PHP

On 1/09/2018 8 Comments so far

In this tutorial, I’m going to show you how to get json from url in php script. JSON has become a popular way to exchange data and web services outputs in json format. To send a HTTP request and parse JSON response from URL is fairly simple in php but newbies may find how to parse json difficult.

Let's see how to build a php json parser script. For this script, I’m going to access Google MAP web service via API and get latitude and longitude co-ordinates for a location. Google map api produces both json/xml output. But for this example I’m going to get the json response and show you how to parse json object to retrieve the geo-metric details.

php-get-json-from-url

How to Read and Parse JSON String in jQuery and Display in HTML Table

On 12/11/2017 4 Comments so far

Hi, in today’s post we’ll see How to Read and Parse JSON String in jQuery. JSON is a human readable data exchange format used among web services and it's a necessary skill for modern day web developers (frontend/backend) to deal with JSON data received from various third-party APIs. Keeping that in mind we have discussed about parsing json data using php script sometime back. And now we have come up with this jquery tutorial which walks you through the process of parsing json string using jquery library, convert and display it into an html table.

how-to-read-and-parse-json-string-in-jquery

How to Read and Parse JSON String in jQuery?

jQuery provides several JSON methods like “getJSON”, “parseJSON”, “stringify” and for this post we’ll pickout and use the method “parseJSON”, which parses through well formed json string and returns javascript object.

JSON.parseJSON(JSON STRING)

The function parseJSON() takes the string parameter and returns String, Number, Object, Array or Boolean.

Using this jQuery method we can easily convert the json string to object and display it in a table. Let’s see how to do it.

Step-1: First create a <div> block as a placeholder for the html table.

<div id="datalist"></div>

Step-2: Next add some table formatting with css styles.

<style type="text/css">
    table {
        border: 1px solid #777;
        border-collapse: collapse;
    } 

    table tr th,
    table tr td {
        border: 1px solid #777;
    }
</style>

Step-3: Next load the javascript jQuery library above the closing body tag of the html file.

<script src="/path/to/jquery-1.10.2.min.js"></script>

Step-4: Next add the jquery method to parse a json string and iterate over the collection to display it as a list in a html table element.

<script>
$(document).ready(function() {
    var data = '[{ "firstName": "John", "lastName": "Smith" }, { "firstName": "Peter", "lastName": "Jason" }, { "firstName": "Alice", "lastName": "Ray" }]';
    var table = '<table><thead><th>First Name</th><th>Last Name</th></thead><tbody>';
    var obj = $.parseJSON(data);
    $.each(obj, function() {
        table += '<tr><td>' + this['firstName'] + '</td><td>' + this['lastName'] + '</td></tr>';
    });
    table += '</tbody></table>';
    document.getElementById("datalist").innerHTML = table;
});
</script>

The variable “data” holds a valid JSON string with first and last names for three different persons and the jquery function “$.parseJSON(data)” converts that json string to java script object. And using the jQuery’s $.each() method we seamlessly iterates over the collection of object and display in a table view.

Now open the file in the browser and you will get the list of names neatly displayed in the html table.

parse-json-and-convert-to-html-table-jquery
JSON Data Displayed in the HTML Table using jQuery

Here is the complete html and javascript for parsing JSON string in jQuery.

index.html

<!DOCTYPE html>
<html>
<head>
    <meta charset="utf-8" />
    <title>Read and Parse JSON String in jQuery | Example</title>
    <style type="text/css">
    table {
        border: 1px solid #777;
        border-collapse: collapse;
    } 

    table tr th,
    table tr td {
        border: 1px solid #777;
    }
    </style>
</head>
<body>
    <div id="datalist"></div>

    <script src="/path/to/js/jquery-1.10.2.min.js"></script>
    <script>
    $(document).ready(function() {
        var data = '[{ "firstName": "John", "lastName": "Smith" }, { "firstName": "Peter", "lastName": "Jason" }, { "firstName": "Alice", "lastName": "Ray" }]';
        var table = '<table><thead><th>First Name</th><th>Last Name</th></thead><tbody>';
        var obj = $.parseJSON(data);
        $.each(obj, function() {
            table += '<tr><td>' + this['firstName'] + '</td><td>' + this['lastName'] + '</td></tr>';
        });
        table += '</tbody></table>';
        document.getElementById("datalist").innerHTML = table;
    });
    </script>
</body>
</html>
Read Also:

And that was all about reading and parsing json string using jQuery.

How to Convert JSON Data to HTML Table using jQuery DataTables Plug-in

On 12/11/2017 17 Comments so far

Hi, this time I have come up with a jquery basics tutorial which discusses about how to convert json to html table. In simple terms we are going to use jquery to display data from a json file in neat table format with added pagination and search options to it. To make our life easier there is an excellent jquery plug-in called ‘DataTables’ which we will use for this task. DataTables is a flexible jquery tool which adds up advanced interaction controls to any HTML table. Using this we can easily add pagination, instant search or multi-column ordering to the html table. Moreover it supports all modern day data sources like DOM, JavaScript, Ajax and server-side processing.

Convert JSON Data to HTML Table using jQuery

As an example let’s take the below sample json file which contains an array of objects and display it in html table using datatables.

Don't Miss: How to Create Responsive Carousel Image Slider

Also Read: How to Create Image Lightbox Effect with jQuery

empdata.json

{
  "data": [
    {
      "name": "Garrett Winters",
      "designation": "Accountant",
      "salary": "$170,750",
      "joining_date": "2011/07/25",
      "office": "Tokyo",
      "extension": "8422"
    },
    {
      "name": "Brielle Williamson",
      "designation": "Integration Specialist",
      "salary": "$372,000",
      "joining_date": "2012/12/02",
      "office": "New York",
      "extension": "4804"
    },
    {
      "name": "Ashton Cox",
      "designation": "Junior Technical Author",
      "salary": "$86,000",
      "joining_date": "2009/01/12",
      "office": "San Francisco",
      "extension": "1562"
    },
    {
      "name": "Airi Satou",
      "designation": "Accountant",
      "salary": "$162,700",
      "joining_date": "2008/11/28",
      "office": "Tokyo",
      "extension": "5407"
    },
    {
      "name": "Caesar Vance",
      "designation": "Pre-Sales Support",
      "salary": "$106,450",
      "joining_date": "2011/12/12",
      "office": "New York",
      "extension": "8330"
    },
    {
      "name": "Shad Decker",
      "designation": "Regional Director",
      "salary": "$183,000",
      "joining_date": "2008/11/13",
      "office": "Edinburgh",
      "extension": "6373"
    },
    {
      "name": "Cedric Kelly",
      "designation": "Senior Javascript Developer",
      "salary": "$433,060",
      "joining_date": "2012/03/29",
      "office": "Edinburgh",
      "extension": "6224"
    },
    {
      "name": "Haley Kennedy",
      "designation": "Senior Marketing Designer",
      "salary": "$313,500",
      "joining_date": "2012/12/18",
      "office": "London",
      "extension": "3597"
    },
    {
      "name": "Colleen Hurst",
      "designation": "Javascript Developer",
      "salary": "$205,500",
      "joining_date": "2009/09/15",
      "office": "San Francisco",
      "extension": "2360"
    },
    {
      "name": "Dai Rios",
      "designation": "Personnel Lead",
      "salary": "$217,500",
      "joining_date": "2012/09/26",
      "office": "Edinburgh",
      "extension": "2290"
    },
    {
      "name": "Herrod Chandler",
      "designation": "Sales Assistant",
      "salary": "$137,500",
      "joining_date": "2012/08/06",
      "office": "San Francisco",
      "extension": "9608"
    },
    {
      "name": "Rhona Davidson",
      "designation": "Integration Specialist",
      "salary": "$327,900",
      "joining_date": "2010/10/14",
      "office": "Tokyo",
      "extension": "6200"
    },
    {
      "name": "Sonya Frost",
      "designation": "Software Engineer",
      "salary": "$103,600",
      "joining_date": "2008/12/13",
      "office": "Edinburgh",
      "extension": "1667"
    },
    {
      "name": "Jena Gaines",
      "designation": "Office Manager",
      "salary": "$90,560",
      "joining_date": "2008/12/19",
      "office": "London",
      "extension": "3814"
    },
    {
      "name": "Quinn Flynn",
      "designation": "Support Lead",
      "salary": "$342,000",
      "joining_date": "2013/03/03",
      "office": "Edinburgh",
      "extension": "9497"
    }
  ]
}

Now let's see about converting this json data to html table.

Step 1: First you need the datatables plug-in in place to start working. So download datatables plug-in here and extract its contents and move ‘media’ directory to your working folder.

Step 2: Having the required datatables files in place, now we have to link them to the html file. Create a file ‘index.html’ and link the datatables ‘css’ and ‘js’ files like this.

<html>
<head>
    <!-- link datatables css -->
    <link rel="stylesheet" type="text/css" href="/path/to/jquery.dataTables.css">
</head>
<body>

    ...

    <!-- load jquery -->
    <script type="text/javascript" src="/path/to/jquery-1.10.2.js"></script>
    <!-- load datatables js library -->
    <script type="text/javascript" src="/path/to/jquery.dataTables.js"></script>
</body>
</html>

Remember to include the jquery library before datatables ‘js’ file as the plug in is built over jquery.

Step 3: Now it's time to create a html table structure which we will map to our json data source later. We should determine what are the columns we want to appear on the table and create the table's header and footer with appropriate column names.

<table id="empTable" class="display" width="100%" cellspacing="0">
    <thead>
        <tr>
            <th>Name</th>
            <th>Designation</th>
            <th>Office</th>
            <th>Extension</th>
            <th>Joining Date</th>
            <th>Salary</th>
        </tr>
    </thead>

    <tfoot>
        <tr>
            <th>Name</th>
            <th>Designation</th>
            <th>Office</th>
            <th>Extension</th>
            <th>Joining Date</th>
            <th>Salary</th>
        </tr>
    </tfoot>
</table>

Using the css class ‘.display’ will create the table with alternative striped rows (zebra cross style).

Step 4: Finally we should populate the html table with the data from json source by mapping to the right table columns.

<script type="text/javascript">
$( document ).ready(function() {
    $('#empTable').dataTable({
        "ajax": "empdata.json",
        "columns": [
            {"data": "name"},
            {"data": "designation"},
            {"data": "office"},
            {"data": "extension"},
            {"data": "joining_date"},
            {"data": "salary"}
        ]
    });   
});
</script>

- The dataTable() method will initialize the datatables. Its behavior can be controlled by passing parameters for various options and we have used two options in the above code. (I planned to keep the code as simple as possible and used only the basic options required but you can try out more).

- The ajax option will load the data from the given ajax source. Here in our case it’s the path to the json file.

- The columns option will map the table columns to the data source keys.

Now run the index.html file and you can see a nicely designed html table with added enhancements like instant-search at the top and pagination links at the bottom. You can also sort the table columns like you prefer.

display-json-data-in-html-table-datatables-jquery-example
JSON Data Displayed in HTML Table using jQuery Datatables Plug-in

Complete Code for index.html

<!DOCTYPE html>
<html>
<head>
    <title>Display JSON File Data in Datatables | Example</title>
    <!-- link datatables css -->
    <link rel="stylesheet" type="text/css" href="/path/to/jquery.dataTables.css">
</head>
<body>
    <table id="empTable" class="display" width="100%" cellspacing="0">
        <thead>
            <tr>
                <th>Name</th>
                <th>Designation</th>
                <th>Office</th>
                <th>Extension</th>
                <th>Joining Date</th>
                <th>Salary</th>
            </tr>
        </thead>
        <tfoot>
            <tr>
                <th>Name</th>
                <th>Designation</th>
                <th>Office</th>
                <th>Extension</th>
                <th>Joining Date</th>
                <th>Salary</th>
            </tr>
        </tfoot>
    </table>
    
    <!-- load jquery -->
    <script type="text/javascript" src="/path/to/jquery-1.10.2.js"></script>
    <!-- load datatables js library -->
    <script type="text/javascript" src="/path/to/jquery.dataTables.js"></script>
    
    <script type="text/javascript">
    $(document).ready(function() {
        $('#empTable').dataTable({
            "ajax": "empdata.json",
            "columns": [
                {"data": "name"},
                {"data": "designation"},
                {"data": "office"},
                {"data": "extension"},
                {"data": "joining_date"},
                {"data": "salary"}
            ]
        });   
    });
    </script>
</body>
</html>

I hope this basic jquery tutorial gives you a good idea about converting json data to html table using datatables jquery plugin.

Read Also:

As said earlier it's a highly flexible tool and provides wide range of options to completely customize the looks and behavior of the html tables to meet your requirements. Don't hesitate to try out :-)

How to Validate JSON String in PHP

On 12/11/2017 15 Comments so far

Hi, we'll see how to validate json string in this PHP tutorial. JSON is a light-weight data exchange format among web services and it is very human readable. At times it is required to check if the json output you received is a valid one. PHP programming language does not provide any direct method to validate a json string but sure there is some workaround to determine if a string is a valid json format or not. You need PHP version 5.3 or above for this to work out.

php-validate-json-string-format

There are 4 built-in functions provided by PHP to deal with json format namely json_encode(), json_decode(), json_last_error_msg() and json_last_error().

The methods json_encode() and json_decode() are used to encode and decode json format and the working example of them are already covered in this blog.

The other two methods json_last_error_msg() and json_last_error() should be used in conjunction with the json encode or decode methods.

How to Validate JSON String in PHP?

The php function json_last_error() takes no parameters and returns the error (in case) encountered during the last json encoding/decoding process. If there is no error then it returns an integer constant "JSON_ERROR_NONE". Check here for the complete list of error constants returned by this method.

So by decoding the given string and checking it for errors, we can determine if it's a valid json string or not.

Here is the php code to validate json string.

PHP Function to Validate JSON

<?php
function validate_json($str=NULL) {
    if (is_string($str)) {
        @json_decode($str);
        return (json_last_error() === JSON_ERROR_NONE);
    }
    return false;
}
?>

Function Usage

You can use the above function validate_json() like below to determine a valid json string.

<?php
    echo (validate_json('{"format": "json"}') ? "Valid JSON" : "Invalid JSON");
    // prints 'Valid JSON'
    echo (validate_json('{format: json}') ? "Valid JSON" : "Invalid JSON");
    // prints 'Invalid JSON'
    echo (validate_json(array()) ? "Valid JSON" : "Invalid JSON");
    // prints 'Invalid JSON'
    echo (validate_json() ? "Valid JSON" : "Invalid JSON");
    // prints 'Invalid JSON'
?>
Read:

Thus with a small workaround you can validate a json string easily in php.

How to Merge Two JSON Objects into One using jQuery

On 12/10/2017 Be the first to comment!

Hi, at times you may want to merge multiple json objects into a single entity when working with different APIs. Recently I also found myself in such situation and came across a very simple and effective solution with jQuery. In this tutorial, I'll show you how to merge two json objects into one using jQuery library. jQuery provides several utility functions and the extend() method is one among them. It merges two or more objects together into the first object (i.e., first parameter passed to the function).

merge two json objects in jquery

Merging Two JSON Objects using jQuery

In order to merge the json objects we have to use jQuery's extend() function which takes up multiple parameters. Here is the syntax for the method.

jQuery.extend([deep], target, object1 [, objectN])
  • Where 'deep' when set as TRUE, makes the merging process recursive (optional).
  • 'target' is the object which consists of the merged contents.
  • 'object1' is the first object to be merged.
  • 'objectN' is the additional objects to be merged.

Both 'deep' & 'target' parameters are optional and if the target object is not provided, then the subsequent object(s) contents will be merged and added to the first given object.

Here is the simple example of merging two json objects in jquery and displaying the result in a <div> block.

<!DOCTYPE html>
<html lang="en">
<head>
    <meta charset="utf-8" />
    <title>Merge Two JSON Objects in jQuery Example</title>
    <script src="js/jquery-1.10.2.js"></script>
</head>
<body>
    <div id="output"></div>
    <script>
    $(document).ready(function() {
        var obj1 = {"name": "Garrett Davidson", "gender": "male", "dob": "1990/04/20"};
        var obj2 = {"position": "System Administrator", "location": "New York"};

        $.extend(obj1, obj2);
        $('#output').text(JSON.stringify(obj1));
    });
    </script>
</body>
</html>

// produces output:

// obj1
// {"name":"Garrett Davidson","gender":"male","dob":"1990/04/20","position":"System Administrator","location":"New York"}

// obj2
// {"position": "System Administrator", "location": "New York"}

In the above script, we have two objects, 'obj1' and 'obj2' that contains personal and professional details of an employee.

$.extend(obj1, obj2); statement merges the contents of obj2 with obj1 as we haven't provided target object. In order to display the merged contents in a readable format, we have used JSON.stringify(obj1); statement to convert the object into json string.

Alternatively you can also preserve the original objects by passing an empty object as 'target' parameter like this,

<script>
$(document).ready(function() {
    var obj1 = {"name": "Garrett Davidson", "gender": "male", "dob": "1990/04/20"};
    var obj2 = {"position": "System Administrator", "location": "New York"};

    var obj = $.extend({}, obj1, obj2);
    $('#output').text(JSON.stringify(obj));
});
</script>

// produces output: 

// obj1
// {"name": "Garrett Davidson", "gender": "male", "dob": "1990/04/20"}

// obj2
// {"position": "System Administrator", "location": "New York"}

// obj
// {"name":"Garrett Davidson","gender":"male","dob":"1990/04/20","position":"System Administrator","location":"New York"}

If you want to just only verify if the object contents are properly merged, then you can log and check it in the browser console like this,

var obj = $.extend({}, obj1, obj2);
console.log(obj);

And that was all about merging two json objects into one using jquery.

Recommended Read: How to Read and Parse JSON String in jQuery

Don't Miss: Display JSON in HTML Table using jQuery DataTables Plug-in

How to Remove a Property from an Object in JavaScript

On 12/07/2017 Be the first to comment!

JSON alias 'JavaScript Object Notation' is the string representation of JavaScript Object and is a popular data-exchange format among web-services. Manipulating those data received from various source is an essential skill required for every developer. With that in mind we have published several json tutorials in the past which discusses about working with json data. And today in this tutorial, we'll see how to remove a property from an object in javascript.

how to remove a property from an object in javascript

Removing a Property from JavaScript Object

Let's say we have a Java Script Object that contains three properties (details) of an employee namely 'name', 'gender' & 'position'.

{"name": "Garrett Winters","gender": "Male","position": "Javascript Developer"}

Now we want to remove one of the properties from the above object and to do this, we have to use java script's delete method. Here's the code snippet for removing the 'gender' property.

<script type="text/javascript">
    var obj = {"name": "Garrett Winters","gender": "Male","position": "Javascript Developer"};

    delete obj.gender;
    console.log(JSON.stringify(obj));
</script>

// produces output

// {"name":"Garrett Winters","position":"Javascript Developer"}

delete obj.gender statement will remove the property 'gender' from the object 'obj'. Alternatively using delete obj['gender'] will also produce the same result.

JSON.stringify will convert the javascript object to string format.

Removing a Property from Array of Objects

The above method works well for a single object, but that would not be the case always. What if you want to remove a particular property from an array of objects like this?

[{"name":"Garrett Winters","gender":"Male","position":"Javascript Developer"},{"name":"Colleen Hurst","gender":"Female","position":"System Architect"},{"name":"Michael Frost","gender":"Male","position":"Marketing Designer"}]

In this case, you should tweak the previous code a little bit to loop through the array and delete the properties one by one. Here's the script for doing it.

<script type="text/javascript">
    var obj = [{"name": "Garrett Winters", "gender": "Male", "position": "Javascript Developer"}, {"name": "Colleen Hurst", "gender": "Female",  "position": "System Architect"}, {"name": "Michael Frost", "gender": "Male", "position": "Marketing Designer"}];

    for (var i = 0; i < obj.length; i++) {
        delete obj[i].gender;
    }
    console.log(JSON.stringify(obj));
</script>

// produces output

// [{"name":"Garrett Winters","position":"Javascript Developer"},{"name":"Colleen Hurst","position":"System Architect"},{"name":"Michael Frost","position":"Marketing Designer"}]
Read Also:

That was all about removing the property from javascript object. You can easily remove properties from complex & nested java script objects similarly with this method.

How to Insert Multiple JSON Data into MySQL Database in PHP

On 11/20/2017 21 Comments so far

Hi! I have discussed about inserting json into mysql using php a while back. And I got several queries from readers about inserting multiple json objects into DB using the exact method. Inserting multiple objects involves multiple database transactions. There are less elegant ways to do this but using mysqli library’s Prepared Statement is the effective and secure way for this type of job. Prepared Statements has several advantages like utilizing fewer resources, preventing sql injection etc. I’ll show you here with an example, how to use mysqli prepared statement to insert multiple json data into mysql database in php.

Create MySQL Database & Table

First we need to create mysql database required for our example. Run this below sql command to create it.

CREATE DATABASE `employee`;
USE `employee`;
CREATE TABLE IF NOT EXISTS `emp` (
  `id` int(8) NOT NULL AUTO_INCREMENT,
  `name` varchar(30) NOT NULL,
  `gender` varchar(10) NOT NULL,
  `designation` varchar(30) NOT NULL,
  PRIMARY KEY (`id`)
) ENGINE=InnoDB  DEFAULT CHARSET=latin1 AUTO_INCREMENT=1;

Sample JSON File with Multiple Objects

We also need a json file to use for our example. Below is the file ‘empdata.json’ with multiple json objects containing some employee details.

File Name: empdata.json
[
    {
        "name": "Michael Bruce",
        "gender": "Male",
        "designation": "System Architect"
    },
    {
        "name": "Jennifer Winters",
        "gender": "Female",
        "designation": "Senior Programmer"
    },
    {
        "name": "Donna Fox",
        "gender": "Female",
        "designation": "Office Manager"
    },
    {
        "name": "Howard Hatfield",
        "gender": "Male",
        "designation": "Customer Support"
    }
]

We have to read through the above json file and insert the objects (i.e., employee details) one by one into mysql database.

Inserting Multiple JSON Data into MySQL Database in PHP

This is the php code snippet for inserting multiple json objects into mysql database.

<?php
    // open mysql connection
    $host = "localhost";
    $username = "mysql_username";
    $password = "mysql_password";
    $dbname = "employee";
    $con = mysqli_connect($host, $username, $password, $dbname) or die('Error in Connecting: ' . mysqli_error($con));

    // use prepare statement for insert query
    $st = mysqli_prepare($con, 'INSERT INTO emp(name, gender, designation) VALUES (?, ?, ?)');

    // bind variables to insert query params
    mysqli_stmt_bind_param($st, 'sss', $name, $gender, $designation);

    // read json file
    $filename = 'empdata.json';
    $json = file_get_contents($filename);   

    //convert json object to php associative array
    $data = json_decode($json, true);

    // loop through the array
    foreach ($data as $row) {
        // get the employee details
        $name = $row['name'];
        $gender = $row['gender'];
        $designation = $row['designation'];
        
        // execute insert query
        mysqli_stmt_execute($st);
    }
    
    //close connection
    mysqli_close($con);
?>

As you can see, first we connect to the mysql database using the statement mysqli_connect().

Next we use prepare statement mysqli_prepare() to prepare the insert query. Since we have to do multiple insertions into the database, preparing the query is quite effective and consumes less database resources.

The ? (question mark) in the INSERT query indicates that there are three parameters to be inserted into the database.

Next using the statement mysqli_stmt_bind_param(), we bind the insert query parameters to the upcoming variables that hold the json data. The function’s second param, ‘sss’ resembles the data type of the parameters. ‘s’ stands for string values. (Check here for rest of the type options)

Next we read the json file and convert the data into php associative array. The method file_get_contents($filename); returns the contents of the file into a variable. And this in turn is converted into array using json_decode() function.

Since there are multiple json data to be inserted into the db, we have to loop through the array using foreach statement. And store the employee details into variables and insert them into database using the mysqli_stmt_execute($st); statement. This will execute the insert query we have prepared earlier.

Once the database insertion is complete, we have to release the database handle we created at the beginning. The statement mysqli_close($con); will close the opened mysql database connection and empty the handle.

Also Read:

That was all about inserting multiple json data into mysql database using php. You can run the above given php snippet and it will insert the json file contents into the database. I hope you like this post. If you like it, please share it in your social circle.

How to Convert Data from MySQL to JSON using PHP

On 11/20/2017 121 Comments so far

In PHP, Converting Data from MySQL to JSON Format is one of the prominent tasks in Web Development. JSON has gained popularity over the years and is preferred over xml as data exchange format between web applications.

Using json format has its own advantages like being light weight, ability to store complex data structures in plain text and very human readable. Earlier we have discussed about converting json to mysql data here. Now let us see how to convert mysql result set to json in php.

Create MySQL Database

Here is the MySQL Database I'm going to use as an example. Run these sql commands to create the Database.

Read Also:
CREATE TABLE IF NOT EXISTS `tbl_employee` (
  `employee_id` int(4) NOT NULL AUTO_INCREMENT,
  `employee_name` varchar(60) NOT NULL,
  `designation` varchar(30) NOT NULL,
  `hired_date` date NOT NULL,
  `salary` int(10) NOT NULL,
  PRIMARY KEY (`employee_id`)
) ENGINE=MyISAM  DEFAULT CHARSET=latin1 AUTO_INCREMENT=1 ;

INSERT INTO `tbl_employee` (`employee_id`, `employee_name`, `designation`, `hired_date`, `salary`) VALUES
(1, 'Steve', 'VP', '2013-08-01', 60000),
(2, 'Robert', 'Executive', '2014-10-09', 20000),
(3, 'Luci', 'Manager', '2013-08-20', 40000),
(4, 'Joe', 'Executive', '2013-06-01', 25000),
(5, 'Julia', 'Trainee', '2014-10-01', 10000);

Convert MySQL to JSON String in PHP

Here are the steps in converting mysql to json string with php.

Step 1: Open MySQL Database Connection in PHP

First establish connection to mysql database using mysqli_connect() function.

<?php
    //open connection to mysql db
    $connection = mysqli_connect("hostname","username","password","db_employee") or die("Error " . mysqli_error($connection));
?>

Step 2: Fetch Data from MySQL Database

After opening the connection, fetch the required table data from mysql db. Using the php function mysqli_query(), I'm going to fetch all the rows from the table 'tbl_employee'.

<?php
    //fetch table rows from mysql db
    $sql = "select * from tbl_employee";
    $result = mysqli_query($connection, $sql) or die("Error in Selecting " . mysqli_error($connection));
?>

Step 3: Convert MySQL Result Set to PHP Array

Next loop through the mysql result set we got from step-2 and convert it to php array.

<?php
    //create an array
    $emparray = array();
    while($row =mysqli_fetch_assoc($result))
    {
        $emparray[] = $row;
    }
?>

Step 4: Convert PHP Array to JSON String

Next use the PHP function json_encode() to convert the php array to json string. Learn about using php json_decode() function here.

<?php 
    echo json_encode($emparray);
?>

That's it! We have successfully converted mysql to json using php. Here is the complete PHP code for it.

<?php
    //open connection to mysql db
    $connection = mysqli_connect("hostname","username","password","db_employee") or die("Error " . mysqli_error($connection));

    //fetch table rows from mysql db
    $sql = "select * from tbl_employee";
    $result = mysqli_query($connection, $sql) or die("Error in Selecting " . mysqli_error($connection));

    //create an array
    $emparray = array();
    while($row =mysqli_fetch_assoc($result))
    {
        $emparray[] = $row;
    }
    echo json_encode($emparray);

    //close the db connection
    mysqli_close($connection);
?>

Run the code and you get an output something like this.

php-mysql-to-json-response

Convert MySQL to JSON File in PHP

If you want to write the data from mysql to json file, use this piece of code at the end instead of 'echo' statement.

<?php
    //write to json file
    $fp = fopen('empdata.json', 'w');
    fwrite($fp, json_encode($emparray));
    fclose($fp);
?>
Read Also:

Find this PHP MySQL to JSON conversion tutorial useful? Like us on Facebook and never miss any of our tutorials.

Insert Array into MySQL Database using PHP

On 11/13/2017 Be the first to comment!

Hi! Today let's see how to insert array into mysql database using php. A frequently asked question by budding developers but not without reason. Since databases don't support array data types, there is no direct way to store them in db. But you can convert array as string and insert into mysql. There are two ways you can do it, one is by serializing the array and the other is saving it as json string.

But before going into the process, I must warn you it's a bad idea to store array in database as it is against the normalization theory of relational database and you cannot easily query the data later. Nevertheless, sometimes I used to store array in database for temporary log and you can also do it.

insert php array into mysql database

How to Insert Array into MySQL with PHP?

The first method we are going to see is about serializing php array to string. In PHP, we have two methods, serialize() and unserialize(), the first one converts array to string and the latter reverts back the string to array.

To Convert Array to String:
<?php
$array = array("name"=>"johnson", "code"=>"12345", "status"=>"true");
$string = serialize($array);
echo $string;

// output
// a:3:{s:4:"name";s:7:"johnson";s:4:"code";s:5:"12345";s:6:"status";s:4:"true";}
?>
To Convert Serialized String to Array:
<?php
$array = unserialize($string);
echo "<pre>";
print_r($array);

// output
// Array
// (
//     [name] => johnson
//     [code] => 12345
//     [status] => true
// )
?>

Method 1) Serialize Array and Save into MySQL

Now let's see about storing array in mysql with the above method. First we should convert the given array to string with serialize() function and then insert into database. Here's the php code to do it.

<?php
$con = mysqli_connect("localhost", "username", "password", "db_demo");
$user_data = array("name"=>"johnson", "code"=>"12345", "status"=>"true");
$serialized_data = serialize($user_data);

$sql = "insert into user_logs (details, created) value ('{$serialized_data}', NOW())";
mysqli_query($con, $sql);
?>

Retrieve Array Data from MySQL:

<?php
$con = mysqli_connect("localhost", "username", "password", "db_demo");
$sql = "select details from user_logs";
$result = mysqli_query($con, $sql);
while($row = mysqli_fetch_array($result))
{
   $array = unserialize($row["details"]);
   print_r($array);
}
?>

After fetching the serialized string from database, you have to use unserialize() function to turn them back into the original array. Simple as that!

Method 2) Store Array as JSON String in MySQL

The second method is to convert the array into a json string and insert into mysql. I mostly prefer this than the previous one, as json is more portable and compatible with javascript and other languages.

Basically, you have to encode the array as JSON string with json_encode() function and store it in database. Here's how to do it.

<?php
$con = mysqli_connect("localhost", "username", "password", "db_demo");
$data = array("name"=>"johnson", "code"=>"12345", "status"=>"true");
$json = json_encode($data);
$sql = "insert into user_logs (details, created) value ('{$json}', NOW())";
mysqli_query($con, $sql);
?>

Fetch JSON from DB:

<?php
$con = mysqli_connect("localhost", "username", "password", "db_demo");
$result = mysqli_query($con, "select details from user_logs");
while($row = mysqli_fetch_array($result))
{
   $arr = json_decode($row["details"], true);
   var_dump($arr);
}
?>

Here we fetch the json string which we have stored previously in the database and decode it into an array using json_decode() function.

Read:

That explains about inserting array into mysql database in php. Between the two methods, going with json is much more preferred and can be easily read by other languages. Also MySQL5.7.8 and above has native JSON support, so you can save json string directly in the table column. I hope you like this tutorial. If you find this useful, please share it with your friends.

Convert JSON to CSV using PHP (JSON Keys as Column Headers)

On 11/08/2017 1 Comment so far

Hi! Here's how to convert json to csv in php by using json keys as column headers for csv file. Even though json format is immensely popular for data exchange over web, there are times you may need to work with csv data and have to convert json to csv. Being a modern language, php doesn't have trouble handling both data formats but unfortunately there's no one step solution to convert json to csv using php. But don't worry! I have created a simple php script for json to csv conversion.

In case you don't know, json stores data as 'key:value' pairs. And the function I have created will take valid json keys and use it as column headers for the csv file during conversion.

I have already discussed about converting csv to json in php and below we'll see about converting json to csv in php.

But keep in mind there are so many things can go wrong during this conversion so you need to do proper error handling in the script.

How to Convert JSON to CSV in PHP?

We'll need a sample json file for converting to csv. So let's take this below one as example.

data.json

[
    {
        "Id": "1",
        "Name": "Suki Burks",
        "Position": "Developer",
        "Salary": "$114500"
    },
    {
        "Id": "2",
        "Name": "Fred Zupers",
        "Position": "Technical Author",
        "Salary": "$145000"
    },
    {
        "Id": "3",
        "Name": "Gavin Cortez",
        "Position": "Team Leader",
        "Salary": "$235500"
    }
]

PHP Function to Convert JSON to CSV:

Here's the php conversion function. The function has two parameters 1. $jfilename - which is the path of the json file to be converted and 2. $cfilename - and this is the csv filename where the converted data will be stored.

The script reads the json file contents, decodes json string into an array, remove the keys from the array and write it as column headers and parse through the array one by one and write down the data into csv file.

<?php
function jsonToCSV($jfilename, $cfilename)
{
    if (($json = file_get_contents($jfilename)) == false)
        die('Error reading json file...');
    $data = json_decode($json, true);
    $fp = fopen($cfilename, 'w');
    $header = false;
    foreach ($data as $row)
    {
        if (empty($header))
        {
            $header = array_keys($row);
            fputcsv($fp, $header);
            $header = array_flip($header);
        }
        fputcsv($fp, array_merge($header, $row));
    }
    fclose($fp);
    return;
}
?>
  • The function file_get_contents($jfilename) returns the content of the json file.
  • Next json_decode($json, true) decodes the json string into an associative array.
  • The function array_keys($row) will return the keys from an associative array.
  • And array_merge($header, $row) will keep the order of elements according to csv column headers.

Function Usage:

To convert json to csv file,

$json_filename = 'data.json';
$csv_filename = 'data.csv';
jsonToCSV($json_filename, $csv_filename);
echo 'Successfully converted json to csv file. <a href="' . $csv_filename . '" target="_blank">Click here to open it.</a>';

If everything goes right, this will convert the given json file into csv and display the csv file link like this on browser,

php json to csv conversion

Clicking on the link will open the csv file in Microsoft Excel.

Here's the complete script for your reference.

<?php
function jsonToCSV($jfilename, $cfilename)
{
    if (($json = file_get_contents($jfilename)) == false)
        die('Error reading json file...');
    $data = json_decode($json, true);
    $fp = fopen($cfilename, 'w');
    $header = false;
    foreach ($data as $row)
    {
        if (empty($header))
        {
            $header = array_keys($row);
            fputcsv($fp, $header);
            $header = array_flip($header);
        }
        fputcsv($fp, array_merge($header, $row));
    }
    fclose($fp);
    return;
}

$json_filename = 'data.json';
$csv_filename = 'data.csv';

jsonToCSV($json_filename, $csv_filename);
echo 'Successfully converted json to csv file. <a href="' . $csv_filename . '" target="_blank">Click here to open it.</a>';
?>

Related Read: How to Convert CSV to JSON using PHP

That explains about converting csv to json in php. I hope you find this php script useful. Meet you in another interesting tutorial.

Convert CSV To JSON Using PHP (With Header Row As Keys)

On 11/08/2017 4 Comments so far

Hi! Here is the php script to convert csv to json with header row as keys. Both csv and json are used to store data but json is little more verbose and human readable and has become popular data exchange format among modern web services. Converting csv data into json format is little tricky especially if you want your json to be properly formatted as key:value pairs. The csv header row should be used as keys and the subsequent rows as values to form json string.

Unfortunately there is no direct way to do this but likely there is a workaround to bring out the desired result. The method used here is by far the most effective solution to convert csv to json with header row as keys.

Converting CSV to JSON using PHP

Let's take a sample csv file with header and some rows and convert it to json using php script.

Data.csv

Id,Name,Position,Salary
1,Suki Burks,Developer,$114500
2,Fred Zupers,Technical Author,$145000
3,Gavin Cortez,Team Leader,$235500

PHP Function to Convert CSV to JSON

This is the php function to convert csv to json representation. The function takes up a csv file as parameter, stores the headers as a separate key array and read the subsequent rows one by one into an array and finally combine both key and data array to form a proper key-value pair representation.

<?php
// php function to convert csv to json format
function csvToJson($fname) {
    // open csv file
    if (!($fp = fopen($fname, 'r'))) {
        die("Can't open file...");
    }
    
    //read csv headers
    $key = fgetcsv($fp,"1024",",");
    
    // parse csv rows into array
    $json = array();
        while ($row = fgetcsv($fp,"1024",",")) {
        $json[] = array_combine($key, $row);
    }
    
    // release file handle
    fclose($fp);
    
    // encode array to json
    return json_encode($json);
}
?>
  • The function fgetcsv($fp,"1024",",") reads a row from the csv file into an array. The second parameter "1024" is the maximum character length of the csv row and the third parameter "," represents the column delimiter.
  • The function json_encode() encodes the php array into json string.

Function Usage

Call the above php function like this to convert csv to json.

<?php
print_r(csvToJson("data.csv"));

// output

// [{"Id":"1","Name":"Suki Burks","Position":"Developer","Salary":"$114500"},{"Id":"2","Name":"Fred Zupers","Position":"Technical Author","Salary":"$145000"},{"Id":"3","Name":"Gavin Cortez","Position":"Team Leader","Salary":"$235500"}]
?>

If you want json to be stored in a separate file, then open a file and write to it. Check this tutorial to know how to write to a json file.

Thus with this small php utility function you can very easily convert csv to json string.

Also Read: How to Import CSV to MySQL Database in PHP

Add, Update, Delete and Read JSON Data/File in PHP

On 5/29/2017 1 Comment so far

Hi! Today let's see about JSON CRUD with PHP. Yep! Manipulating json data - add, update (edit), delete and read json file using php script. JSON is everywhere these days. With increasing popularity of APIs it's a must for a developer to know how to read, parse and manipulate json data. If you wonder what the connection between API and JSON is, almost all modern APIs lean towards REST and they provide response as JSON. (In KodingMadeSimple.com I have covered json topics a lot earlier and you can visit our JSON Tutorials section to learn more about working with JSON format.)

php add edit delete read json file

JSON is the string notation of JavaScript object. It takes up simple to complex forms and stores data as (key, value) pairs.

This is the example of a json file.

Read Also:

results.json

[
    {
        "Code": "1",
        "Name": "June Zupers",
        "Sports": "Base Ball"
    },
    {
        "Code": "2",
        "Name": "Fred Cortez",
        "Sports": "Soccer"
    },
    {
        "Code": "3",
        "Name": "Kevin Burks",
        "Sports": "Tennis"
    }
]

Now let me show you how to read and parse through above json file using php.

Read JSON File in PHP:

To read json file with php, you must first get the json data stored in the file, decode json and finally parse through the array or object.

For that you'll need two php functions - one is file_get_contents() and the other is json_decode().

<?php
// load file
$data = file_get_contents('results.json');

// decode json to associative array
$json_arr = json_decode($data, true);

foreach ($json_arr as $key => $value) {
    echo  $json_arr[$key] . " - " .  $json_arr[$value] . "<br/>";
}
?>

If you know the specific key name, then you can simply access it like this,

echo $json_arr[0]['Code'];

Note: The function json_decode() decodes the given json string into an array or object. For example the statement json_decode($data, true); in above code will return associative array. You can ignore the second parameter 'true' to make it return as an object.

Add to JSON File in PHP:

To add additional records to json file you have to simply append it to the end of file. Here let's see an example for adding new data. The following php snippet takes up a json file, decode it, add extra records and again encode to json and save it into a new file.

<?php
// read json file
$data = file_get_contents('results.json');

// decode json
$json_arr = json_decode($data, true);

// add data
$json_arr[] = array('Code'=>4, 'Name'=>'Jeff Darwin', 'Sports'=>'Cricket');

// encode json and save to file
file_put_contents('results_new.json', json_encode($json_arr));
?>

results_new.json

[
    {
        "Code":"1",
        "Name":"June Zupers",
        "Sports":"Base Ball"
    },
    {
        "Code":"2",
        "Name":"Fred Cortez",
        "Sports":"Soccer"
    },
    {
        "Code":"3",
        "Name":"Kevin Burks",
        "Sports":"Tennis"
    },
    {
        "Code":4,
        "Name":"Jeff Darwin",
        "Sports":"Cricket"
    }
]

Update JSON File PHP:

As for updating json file you can either modify single value or in bulk. Here's an example for modifying value for a specific json attribute.

<?php
// read file
$data = file_get_contents('results.json');

// decode json to array
$json_arr = json_decode($data, true);

foreach ($json_arr as $key => $value) {
    if ($value['Code'] == '2') {
        $json_arr[$key]['Sports'] = "Foot Ball";
    }
}

// encode array to json and save to file
file_put_contents('results_new.json', json_encode($json_arr));
?>

Here's what the script does.

  • Load results.json file to a variable
  • Decode json data to array
  • Loop through the array and check if key 'Code' is '2'
  • And edit the corresponding 'Sports' value to 'Foot Ball'

results_new.json

[
    {
        "Code":"1",
        "Name":"June Zupers",
        "Sports":"Base Ball"
    },
    {
        "Code":"2",
        "Name":"Fred Cortez",
        "Sports":"Foot Ball"
    },
    {
        "Code":"3",
        "Name":"Kevin Burks",
        "Sports":"Tennis"
    }
]

Delete JSON Data from File:

JSON deletion is little complex since it is easy to mess up doing the process. You must be clear what you need to delete first, a specific key pair from all rows or a complete row.

For example this php script will delete entire record from json containing key 'Code' as '2'.

<?php
// read json file
$data = file_get_contents('results.json');

// decode json to associative array
$json_arr = json_decode($data, true);

// get array index to delete
$arr_index = array();
foreach ($json_arr as $key => $value)
{
    if ($value['Code'] == "2")
    {
        $arr_index[] = $key;
    }
}

// delete data
foreach ($arr_index as $i)
{
    unset($json_arr[$i]);
}

// rebase array
$json_arr = array_values($json_arr);

// encode array to json and save to file
file_put_contents('results_new.json', json_encode($json_arr));
?>

And this is the file we get after deletion.

[
    {
        "Code":"1",
        "Name":"June Zupers",
        "Sports":"Base Ball"
    },
    {
        "Code":"3",
        "Name":"Kevin Burks",
        "Sports":"Tennis"
    }
]

The deletion script uses two foreach loops. The first one is for determining the array index we need to delete from json.

And the second is what actually deletes from array using unset() function.

Finally it rebases the array, encode it to json and store it in a new file.

Read Also:

Likewise you can add, edit, delete and read json file in php. It's easy to mess up with json and so many newbies confuses json and actual javascript object. JSON can get complex if it uses nested structure and you'll have real trouble manipulating it. Only constant practice will get you there and it's easy to master it in my opinion.

I hope you like this tutorial. Please don't forget to share it with your friends.

Add/Remove Key Value Pairs (Attributes) from JSON Data using JavaScript

On 4/10/2017 Be the first to comment!

Hi! Let's see how to add and remove key value pairs from json data using javascript. JSON is the string representation of java script object and cross-platform compatible. Using AJAX you can communicate with numerous web services and grab API data in JSON format. Considering the increased popularity of API's, it goes without saying that the ability to read, process and manipulate JSON is a must have skill for developers. In JSON, data is stored as key - value pairs and wrapped within quotes since it's a string. Sometimes the key-value pairs are also referred to as attributes, items or elements. Here I'm going to show you how to append or remove key value pairs from existing json data.

add remove key value pair from json javascript

JSON Attributes - Key Value Pairs:

JSON attributes are represented as key value pairs something similar to associative arrays. The key-value pairs look something like this,

{ "name": "Barbie" }

Here "name" is the key and "Barbie" is the value of that key.

Also Read:

Plus JSON comes in all sorts of representation - simple, nested or arrays. The simple format contains a set of attributes like this.

{
    "fruit": "apple",
    "color": "red"
}

And as for array of items it will look like this,

[
    {
        "name": "Fredie",
        "department": "Finance"
    },
    {
        "name": "Rolland",
        "department": "Sales"
    },
    {
        "name": "Gina",
        "department": "Customer Service"
    }
]

At times json data can be complicated with nested attributes.

{
    "empid": "ABC001X",
    "personal": {
        "name": "Paula Thompson",
        "gender": "Female",
        "age": "34",
        "address": {
            "streetaddress": "12 117th Street",
            "city": "New York",
            "state": "NY",
            "zipcode": "10038"
        }
    },
    "official": {
        "designation": "Vice President",
        "department": "Operations"
    }
}

However it is you can manipulate json easily with native java script. The same can be handled with jquery but unless necessary just the plain old javascript will do. By this way you can reduce server load.

Add Key Value Pair to JSON with JavaScript:

Adding key value pair to json will append the new attribute to the end of the json string. Following is the simplest way to add attributes to existing json data.

var data = {
    "id": "XYZ123",
    "name": "Greg",
    "gender": "Male"
};

data.country = "United States";
console.log(JSON.stringify(data));

// Produce Output
{
    "id":"XYZ123",
    "name":"Greg",
    "gender":"Male",
    "country":"United States"
}

If json has array of items, then you can add key value pairs to each subset like this,

var data = [
    {
        "name": "John Smith",
        "age": "45"
    },
    {
        "name": "Peter Jason",
        "age": "26"
    },
    {
        "name": "Alice Ray",
        "age": "34"
    }
];

for (var i=0; i<data.length; i++) {
    data[i].department = "Administration";
    data[i].company = "ABC Corp";
}
console.log(JSON.stringify(data));

// Produce Output
var data = [
    {
        "name":"John Smith",
        "age":"45",
        "department":"Administration",
        "company":"ABC Corp"
    },
    {
        "name":"Peter Jason",
        "age":"26",
        "department":"Administration",
        "company":"ABC Corp"
    },
    {
        "name":"Alice Ray",
        "age":"34",
        "department":"Administration",
        "company":"ABC Corp"
    }
];

You have to loop through the array of items and add attributes to each one of it.

Remove Key Value Pair from JSON:

Let's say you have the following JSON data,

var data = {
    "id":"XYZ123",
    "name":"Greg",
    "gender":"Male",
    "country":"United States"
};

In order to remove an attribute from json you have to use JS delete method. This will delete the json attribute with the specific key.

delete data.gender;
console.log(JSON.stringify(data));

// Produce Output
{
    "id":"XYZ123",
    "name":"Greg",
    "country":"United States"
}

Likewise you can remove the occurrence of particular attribute from json array.

var data = [
    {
        "name":"John Smith",
        "age":"45",
        "department":"Administration",
        "company":"ABC Corp"
    },
    {
        "name":"Peter Jason",
        "age":"26",
        "department":"Administration",
        "company":"ABC Corp"
    },
    {
        "name":"Alice Ray",
        "age":"34",
        "department":"Administration",
        "company":"ABC Corp"
    }
];

for (var i=0; i<data.length; i++) {
    delete data[i].age;
}
console.log(JSON.stringify(data));

// Produce Output
[
    {
        "name":"John Smith",
        "department":"Administration",
        "company":"ABC Corp"
    },
    {
        "name":"Peter Jason",
        "department":"Administration",
        "company":"ABC Corp"
    },
    {
        "name":"Alice Ray",
        "department":"Administration",
        "company":"ABC Corp"
    }
]

That explains about add and remove key value pairs in json using javascript. Please note that the json you use should be of valid one for the above methods to work. I hope you find this tutorial useful. Meet you in another interesting one.

How to Insert JSON Data into MySQL using PHP

On 2/21/2017 61 Comments so far

Hi, in this PHP TUTORIAL, we'll see How to insert JSON Data into MySQL using PHP. Check out its reverse process of Converting Data from MySQL to JSON Format in PHP here. Converting json to mysql using php includes several steps and you will learn things like how to read json file, convert json to array and insert that json array into mysql database in this tutorial. For those who wonder what is JSON, let me give a brief introduction.

What is JSON File Format?

JSON file contains information stored in JSON format and has the extension of "*.json". JSON stands for JavaScript Object Notation and is a light weight data exchange format. Being less cluttered and more readable than XML, it has become an easy alternative format to store and exchange data. All modern browsers supports JSON format.

Example of a JSON File

Read Also:

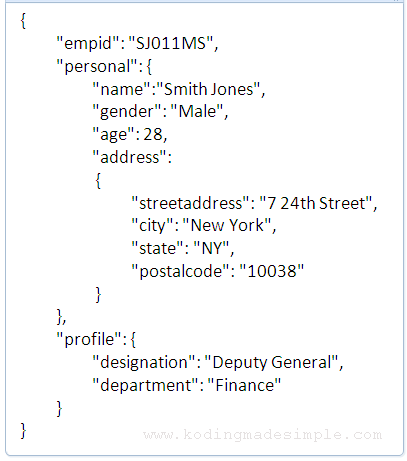
Do you want to know how a JSON file looks like? Well here is the sample.

json-file-example

As you can see by yourself, the JSON format is very human readable and the above file contains some employee details. I'm going to use this file as an example for this tutorial and show you how to insert this JSON object into MySQL database in PHP step by step.

Step 1: Connect PHP to MySQL Database

As the first and foremost step we have to connect PHP to the MySQL database in order to insert JSON data into MySQL DB. For that we use mysql_connect() function to connect PHP with MySQL.

<?php
    $con = mysql_connect("username","password","") or die('Could not connect: ' . mysql_error());
    mysql_select_db("employee", $con);
?>

Here "employee" is the MySQL Database name we want to store the JSON object. Learn more about using mysqli library for php and mysql database connection here.

Step 2: Read the JSON file in PHP

Next we have to read the JSON file and store its contents to a PHP variable. But how to read json file in php? Well! PHP supports the function file_get_contents() which will read an entire file and returns it as a string. Let’s use it to read our JSON file.

<?php
    //read the json file contents
    $jsondata = file_get_contents('empdetails.json');
?>

Here "empdetails.json" is the JSON file name we want to read.

Step 3: Convert JSON String into PHP Array

The next step for us is to convert json to array. Which is likely we have to convert the JSON string we got from the above step to PHP associative array. Again we use the PHP json decode function which decodes JSON string into PHP array.

<?php
    //convert json object to php associative array
    $data = json_decode($jsondata, true);
?>

The first parameter $jsondata contains the JSON file contents.

The second parameter true will convert the string into php associative array.

Step 4: Extract the Array Values

Next we have to parse the above JSON array element one by one and store them into PHP variables.

<?php
    //get the employee details
    $id = $data['empid'];
    $name = $data['personal']['name'];
    $gender = $data['personal']['gender'];
    $age = $data['personal']['age'];
    $streetaddress = $data['personal']['address']['streetaddress'];
    $city = $data['personal']['address']['city'];
    $state = $data['personal']['address']['state'];
    $postalcode = $data['personal']['address']['postalcode'];
    $designation = $data['profile']['designation'];
    $department = $data['profile']['department'];
?>

Step 5: Insert JSON to MySQL Database with PHP Code

Using the above steps, we have extracted all the values from the JSON file. Finally let's insert the extracted JSON object values into the MySQL table.

<?php
    //insert into mysql table
    $sql = "INSERT INTO tbl_emp(empid, empname, gender, age, streetaddress, city, state, postalcode, designation, department)
    VALUES('$id', '$name', '$gender', '$age', '$streetaddress', '$city', '$state', '$postalcode', '$designation', '$department')";
    if(!mysql_query($sql,$con))
    {
        die('Error : ' . mysql_error());
    }
?>

We are done!!! Now we have successfully imported JSON data into MySQL database.

Here is the complete php code snippet I have used to insert JSON to MySQL using PHP.

Complete PHP Script

<?php
    //connect to mysql db
    $con = mysql_connect("username","password","") or die('Could not connect: ' . mysql_error());
    //connect to the employee database
    mysql_select_db("employee", $con);

    //read the json file contents
    $jsondata = file_get_contents('empdetails.json');
    
    //convert json object to php associative array
    $data = json_decode($jsondata, true);
    
    //get the employee details
    $id = $data['empid'];
    $name = $data['personal']['name'];
    $gender = $data['personal']['gender'];
    $age = $data['personal']['age'];
    $streetaddress = $data['personal']['address']['streetaddress'];
    $city = $data['personal']['address']['city'];
    $state = $data['personal']['address']['state'];
    $postalcode = $data['personal']['address']['postalcode'];
    $designation = $data['profile']['designation'];
    $department = $data['profile']['department'];
    
    //insert into mysql table
    $sql = "INSERT INTO tbl_emp(empid, empname, gender, age, streetaddress, city, state, postalcode, designation, department)
    VALUES('$id', '$name', '$gender', '$age', '$streetaddress', '$city', '$state', '$postalcode', '$designation', '$department')";
    if(!mysql_query($sql,$con))
    {
        die('Error : ' . mysql_error());
    }
?>

empdetails.json

{
    "empid": "SJ011MS",
    "personal": {
        "name": "Smith Jones",
        "gender": "Male",
        "age": "28",
        "address": {
            "streetaddress": "7 24th Street",
            "city": "New York",
            "state": "NY",
            "postalcode": "10038"
        }
    },
    "profile": {
        "designation": "Deputy General",
        "department": "Finance"
    }
}

Read:

Hope this tutorial helps you to understand how to insert JSON data into MySQL using PHP.

Last Modified: Feb-21-2017

Contact Form

Name

Email *

Message *