Showing posts with label CodeIgniter. Show all posts

How to Create Custom Library in CodeIgniter

On 4/25/2018 Be the first to comment!

Hi, today let's see how to create custom library in codeigniter. CodeIgniter offers a rich set of libraries and helpers for robust application development. In general, a library is a class file used to group similar functionalities into a single file. Now we can do the same with helper but the libraries have their own object to store relevant data.

Below I'll show you how to create your own class libraries in CI. You must store these library files inside the 'application/libraries' folder. This will keep them separate from the native libraries of the framework.

create custom library in codeigniter

CodeIgniter - Create Custom Library:

CodeIgniter is a flexible MVC framework and allows you to,

  1. Create new custom libraries.
  2. Extend existing libraries to include additional functionalities to them.
  3. Replace native libraries completely with your own version.

I'm going to show you an example where I create a custom library to export the database table as a json string.

STEP-1) Create a library named 'Mylib.php' inside the 'application/libraries' folder. Make sure the file name matches the class name.

Mylib.php

<?php if (! defined('BASEPATH')) exit('No direct script access allowed');

class Mylib
{
    public function to_json($tblname)
    {
        $CI =& get_instance();
        $CI->load->database();
        $query = $CI->db->get($tblname);
        return json_encode($query->result(), JSON_PRETTY_PRINT);
    }
}
?>

In the 'Mylib' class, I have added a member function to_json() which takes up a database table name as a parameter, fetch and return the data as json.

STEP-2) Next we need a controller file to test the library. So create a controller 'TestController.php' within 'application/controllers' folder.

TestController.php

<?php if (! defined('BASEPATH')) exit('No direct script access allowed');

class TestController extends CI_Controller
{
    function __construct()
    {
        parent::__construct();
    }
    
    function index()
    {
        // code
    }
}
?>

STEP-3) Now load the library within the controller's index() function.

$this->load->library('mylib');

You can also auto load the library inside 'application/config/autoload.php' file. Just look for the line, $autoload['libraries'] and add the library name. Auto loading will make it available for the entire application.

STEP-4) Then call the to_json() function to export the database table as json.

$json = $this->mylib->to_json('customers');
print '<pre>' . $json . '</pre>';

Now running the 'TestController' will output the data from the given table as a json string on the browser.

This is just a simple example of what a custom library can do.

Extending a Native Library:

Sometimes you may want to include some additional functions to a native library. In such case you can just extend the library like this,

class MY_Email extends CI_Email
{

    public function __construct()
    {
        parent::__construct();
    }
    
    public function my_function()
    {
        // code goes here
    }
}

Please note that while extending a library you must set the prefix 'MY_' before the class name.

And you can change this prefix inside 'application/config/config.php' file. Just search for the below line and replace it with your choice of prefix.

$config['subclass_prefix'] = 'MY_';

To use my_function() in your application, load the 'email' library like you always do and access the function like this,

$this->load->library('email');
$this->email->my_function();

Replacing the Native Library:

In case you want to rewrite an entire native library, you can simply replace it with your own version. For example, to replace the 'Email' library, create a file 'Email.php' inside 'application/libraries' folder and declare the class like this,

class CI_Email
{
    // code
}

And to use the class, you can simply load it on your controller or view like this,

$this->load->library('email');
Also Read:

That explains about creating custom libraries in codeigniter. I have also discussed about other ways of working with libraries. Just make sure to place all your library files inside 'application' > 'libraries' path and you are good to go. I hope you find this tutorial useful. Please share it on social media if you like it.

Generate PDF from View using DomPDF in CodeIgniter 3

On 3/19/2018 Be the first to comment!

Hi, in this post let's see how to generate pdf from view using dompdf in codeigniter 3. When it comes to generating reports, the pdf format is the most popular in use. In addition, many websites offer downloadable documents, forms and files in pdf format by converting from html to pdf. There are several add-ons and libraries to aid with the process, such as DOMPDF, MPDF, FPDF, TCPDF, Html2Pdf etc. In this case, I will use the DomPDF library to generate PDF documents in code igniter.

DomPDF renders the html layout to a PDF file and supports the loading of external style sheets and inline css styles when creating pdf.

codeigniter generate pdf from view dompdf

How to Generate PDF from CodeIgniter View?

Here we are going to see how to generate pdf document from a codeigniter view file. Basically dompdf reads the html content, create pdf from html and writes it to the output stream.

The following are the steps to implement PDF generation in code igniter.

STEP-1) First download dompdf library, then extract and move the folder to codeigniter's 'application/library' folder.

STEP-2) Next create a custom code igniter library to create pdf using the dompdf class. Create the file 'pdf.php' inside 'application/library' and copy the below contents into the file.

Pdf.php

<?php
defined('BASEPATH') OR exit('No direct script access allowed');

require_once(dirname(__FILE__) . '/dompdf/autoload.inc.php');

class Pdf
{
    function createPDF($html, $filename='', $download=TRUE, $paper='A4', $orientation='portrait'){
        $dompdf = new Dompdf\DOMPDF();
        $dompdf->load_html($html);
        $dompdf->set_paper($paper, $orientation);
        $dompdf->render();
        if($download)
            $dompdf->stream($filename.'.pdf', array('Attachment' => 1));
        else
            $dompdf->stream($filename.'.pdf', array('Attachment' => 0));
    }
}
?>

In the above class, the function createPDF() converts raw html data into pdf document. It allows you to pass five different parameters to control the way in which the pdf is generated. The first parameter is mandatory and the rest are optional.

By default, the function will create downloadable pdf. If you want to preview the file before downloading it, you must set $download=FALSE.

STEP-3) Then you need the codeigniter view file. This view contains a simple html table which has to be converted into a pdf document.

Create 'GeneratePdfView.php' inside 'application/views' folder and copy the contents below into it.

GeneratePdfView.php

<!DOCTYPE html>
<html>
<head>
    <meta content="width=device-width, initial-scale=1.0" name="viewport">
    <meta charset="utf-8">
    <title>Create PDF from View in CodeIgniter Example</title>
    <link href="https://maxcdn.bootstrapcdn.com/bootstrap/3.3.7/css/bootstrap.min.css" type="text/css" rel="stylesheet" />
</head>
<body>
<h1 class="text-center bg-info">Generate PDF from View using DomPDF</h1>
<table class="table table-striped table-hover">
    <thead>
        <tr>
            <th>#</th>
            <th>Book Name</th>
            <th>Author</th>
        </tr>
    </thead>
    <tbody>
        <tr>
            <td>1</td>
            <td>PHP and MySQL for Dynamic Web Sites</td>
            <td>Larry Ullman</td>
        </tr>
        <tr>
            <td>2</td>
            <td>Pro MEAN Stack Development</td>
            <td>Elad Elrom</td>
        </tr>
        <tr>
            <td>3</td>
            <td>Restful API Design</td>
            <td>Matthias Biehl</td>
        </tr>
        <tr>
            <td>4</td>
            <td>Pro PHP MVC</td>
            <td>Chris Pitt</td>
        </tr>
        <tr>
            <td>5</td>
            <td>Mastering Spring MVC 4</td>
            <td>Geoffroy Warin</td>
        </tr>
        <tbody>
</table>
</body>
</html>

STEP-4) Finally you need a code igniter controller file. Create 'GeneratePdfController.php' inside 'application/controllers'. In the index() function, load the 'pdf' library and convert the view into a pdf file.

GeneratePdfController.php

<?php
defined('BASEPATH') OR exit('No direct script access allowed');

class GeneratePdfController extends CI_Controller {

    function index()
    {
        $this->load->library('pdf');
        $html = $this->load->view('GeneratePdfView', [], true);
        $this->pdf->createPDF($html, 'mypdf', false);
    }
}
?>

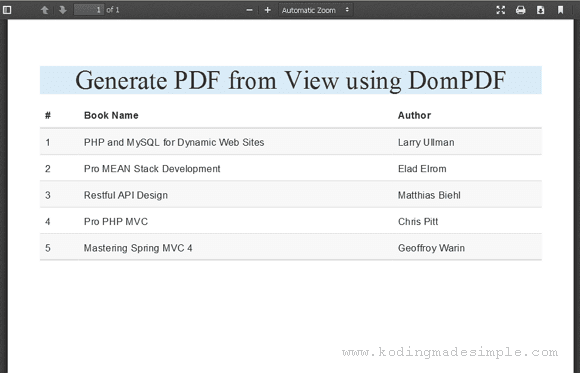
That's it. We have all the required files in place. Run the controller and you can see the preview of the newly created pdf document on the browser.

convert html to pdf codeigniter

To simply download the pdf file on load use,

$this->pdf->createPDF($html, 'mypdf');
Read Also:

I hope you now understand better the generation of PDF from the codeigniter view. If you are using composer, just auto load the './vendor/autoload.php' file and you are good to go from there. Hope you find this tutorial useful. Please share it on your social circle if you like it.

AJAX Pagination in CodeIgniter Tutorial

On 3/09/2018 Be the first to comment!

Hi! In this post, we will see how to make ajax pagination in codeigniter using codeigniter pagination library. The Pagination class offers feature rich functions to paginate the query results in view. Although the usage of pagination library is well-documented, paginating the results with jquery ajax is somewhat a mystery. The solutions available around the web are too complicated for beginners. Hence I decided to write a tutorial on the topic that is easy enough for anyone to implement codeigniter pagination with ajax.

For this example, we'll need two libraries which are jQuery and Bootstrap. The jQuery.js is for making ajax call and bootstrap is for designing the user interface.

ajax pagination codeigniter tutorial

CodeIgniter AJAX Pagination Example:

To create ajax pagination, I'm going to use the default pagination library of the code igniter framework. Simply follow the below steps to implement the same.

STEP-1) Create Database

First create the required database, table and the records to use in our example. I'm going to use MySQL here. Just run the following sql queries in mysql and it will take care of DB creation.

CREATE DATABASE `my_demo`;
USE `my_demo`;

CREATE TABLE IF NOT EXISTS `Employees` (
  `EmpID` int(8) NOT NULL AUTO_INCREMENT,
  `EmpName` varchar(50) NOT NULL,
  `DeptName` varchar(30) NOT NULL,
  `Designation` varchar(25) NOT NULL,
  `DOJ` date NOT NULL,
  `Salary` int(10) NOT NULL,
  PRIMARY KEY (`EmpID`)
) ENGINE=MyISAM  DEFAULT CHARSET=latin1 AUTO_INCREMENT=9 ;

INSERT INTO `Employees` (`EmpID`, `EmpName`, `DeptName`, `Designation`, `DOJ`, `Salary`) VALUES
(1, 'Colleen Hurst', 'HQ', 'Regional Director', '2009-09-15', 205500),
(2, 'Brielle Williamson', 'Software', 'Integration Specialist', '2012-12-02', 372000),
(3, 'Garrett Winters', 'Finance', 'Accountant', '2011-07-25', 170750),
(4, 'Caesar Vance', 'Sales', 'Assistant Manager', '2011-12-12', 106450),
(5, 'Sonya Frost', 'Software', 'Software Engineer', '2008-12-13', 133600),
(6, 'Herrod Chandler', 'Sales', 'Sales Executive', '2012-08-06', 127500),
(7, 'Jena Gaines', 'HQ', 'Manager', '2008-12-19', 112560),
(8, 'Quinn Flynn', 'Software', 'Support Lead', '2013-03-03', 342000);

STEP-2) Create Model

Next, create the codeigniter model to handle database requests. Place this file inside 'application' > 'models' folder. The file contains getEmployees() function to fetch a portion of employees records from the database using the limit condition.

AjaxPaginationModel.php
<?php
class AjaxPaginationModel extends CI_Model {
    function __construct() {
        // Call the Model constructor
        parent::__construct();
    }

    function getEmployees($limit, $start) {
        $query = $this->db->get('Employees', $limit, $start);
        return $query->result();
    }
}
?>

STEP-3) Create Controller

Next we need a controller file to regulate the interaction between the front-end and the back-end. Create this file inside 'application' > 'controllers' folder.

It contains the default index() function which creates paging links and obtain the employee records from the model function and passes them to the view file.

AjaxPaginationController.php
<?php
class AjaxPaginationController extends CI_Controller {
    function __construct() {
        parent::__construct();
        $this->load->helper('url');
        $this->load->database();
        $this->load->library('pagination');
        $this->load->model('AjaxPaginationModel');
    }

    function index() {
        //pagination settings
        $config['base_url'] = site_url('AjaxPaginationController/index');
        $config['total_rows'] = $this->db->count_all('Employees');
        $config['per_page'] = '5';
        $config['uri_segment'] = 3;
        $choice = $config['total_rows'] / $config['per_page'];
        $config['num_links'] = floor($choice);
        $this->pagination->initialize($config);

        $data['page'] = ($this->uri->segment(3)) ? $this->uri->segment(3) : 0;

        // fetch employees list
        $data['results'] = $this->AjaxPaginationModel->getEmployees($config['per_page'], $data['page']);       
        // create pagination links
        $data['links'] = $this->pagination->create_links();

        if($this->input->post('ajax')) {
            $this->load->view('Data', $data);
        } else {
            $this->load->view('AjaxPaginationView', $data);
        }
    }
}
?>

STEP-4) Create View

Finally we need to create the view file. This is the user interface where the results from the database will be displayed in a neatly organized table along with pagination links at the bottom.

Please note that to keep this tutorial simple, I haven't styled the pagination links. You can check here to apply bootstrap styles to codeigniter pagination links.

The special thing about the view is that we have split it into two files. One is the main view named 'AjaxPaginationView.php' and the other 'Data.php' that contains the markup to display the ajax data.

AjaxPaginationView.php
<!DOCTYPE html>
<html>
<head>
    <meta charset="utf-8">
    <meta content="width=device-width, initial-scale=1.0" name="viewport">
    <title>CodeIgniter Pagination with AJAX Example</title>
    <link href="https://maxcdn.bootstrapcdn.com/bootstrap/3.3.7/css/bootstrap.min.css" type="text/css" rel="stylesheet" />
</head>
<body>
    <div class="container">
        <div class="row">
            <h3 class="text-center bg-success">AJAX Pagination in CodeIgniter</h3>
            <div id="ajax_content">
                <?php $this->load->view('Data', $results); ?>
            </div>
        </div>
    </div>
    <script src="https://code.jquery.com/jquery-2.1.1.min.js" type="text/javascript"></script>
    <script type="text/javascript">
    $(function() {
        paginate();
        function paginate() {
            $('#ajax_links a').click(function() {
                var url = $(this).attr('href');
                $.ajax({
                    url: url,
                    type: 'POST',
                    data: 'ajax=true',
                    success: function(data) {
                        $('#ajax_content').html(data);
                    }
                });
                return false;
            });
        }
    });
</script>
</body>
</html>
Data.php
<table class="table table-striped table-hover">
    <thead>
        <tr>
        <th>#</th>
        <th>Emp Name</th>
        <th>Department</th>
        <th>Designation</th>
        <th>Joining Date</th>
        <th>Salary</th>
        </tr>
    </thead>
    <tbody>
    <?php for ($i = 0; $i < count($results); ++$i) { ?>
    <tr>
        <td><?php echo ($page+$i+1); ?></td>
        <td><?php echo $results[$i]->EmpName; ?></td>
        <td><?php echo $results[$i]->DeptName; ?></td>
        <td><?php echo $results[$i]->Designation; ?></td>
        <td><?php echo $results[$i]->DOJ; ?></td>
        <td><?php echo $results[$i]->Salary; ?></td>
    </tr>
    <?php } ?>
    </tbody>
</table>
<div id="ajax_links" class="text-center">
    <?php echo $links; ?>
</div>

In the view file, we have included the java script function to make ajax call and update the data received on the view container.

codeigniter ajax pagination example
Read Also:

Likewise, you can create ajax pagination in codeigniter using the regular pagination class itself. You can also try the 'Ajax Pagination' library offered in the code igniter site. The entire concept is simple and easy to implement. I hope you find this tutorial useful. Please share it on social media if you like it.

Upload Multiple Images & Files in CodeIgniter Example

On 2/24/2018 4 Comments so far

Hi! In this post, we'll see how to upload multiple images and files in codeigniter. Kodingmadesimple has a nice tutorial about codeigniter file upload process. Normal file uploading has a limitation which is you can only upload a single file/image at a time. What if you want to upload multiple files or images in codeigniter in one go? Is it possible to do that? The answer is YES! You can! Here I'll show you an example about multiple file upload in codeigniter.

CodeIgniter Upload Multiple Files/Images:

For this file uploading process you'll need a folder in the server to store all your uploaded files. Just create a folder named 'uploads' inside the application root and make sure to enable 'write' access to it.

Next you need to create user interface to upload files. So create a code igniter view with a form and add file control & submit button to it. Set the name of the file field as array and add 'multiple' attribute to enable multi-select. Without this setting, you'll only be able to select single file at a time to upload.

Also set form type to 'multipart' for the uploading process to work. Here is the view I have created for the demo.

View (multiple_upload_view.php):

<div class="container">
    <div class="row">
        <div class="col-xs-8 col-xs-offset-2 well">
            <?php echo form_open_multipart('multiple_upload/upload');?>
                <legend>Select Files to Upload:</legend>
                <div class="form-group">
                    <input name="usr_files[]" type="file" multiple="" />
                    <span class="text-danger"><?php if (isset($error)) { echo $error; } ?></span>
                </div>
                <div class="form-group">
                    <input type="submit" value="Upload" class="btn btn-primary btn-block"/>
                </div>
            <?php echo form_close(); ?>
            <?php if (isset($success_msg)) { echo $success_msg; } ?>
        </div>
    </div>
</div>

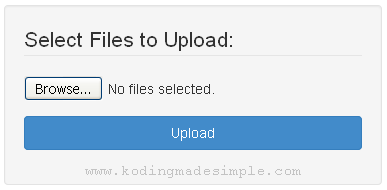
This view would create a html form similar to this,

upload-multiple-images-files-codeigniter-example

Next you need to create a controller where you receive the files from the file control and loop through the $_FILES array one by one and upload them to server using $this->upload->do_upload() function. By default this function read & uploads the file from the form field with name 'userfile'. If you want to use some other name then you should pass it as function parameter to do_upload().

Controller (multiple_upload.php):

<?php
class multiple_upload extends CI_Controller {

    function __construct()
    {
        parent::__construct();
        $this->load->helper(array('form', 'url'));
    }

    function index()
    {
        //load file upload form
        $this->load->view('multiple_upload_view');
    }

    function upload()
    {
        // set upload preferences
        $config['upload_path'] = './uploads/';
        $config['allowed_types'] = 'txt|pdf';
        $config['max_size']    = '150';

        //initialize upload class
        $this->load->library('upload', $config);
        
        $upload_error = array();
        
        for($i=0; $i<count($_FILES['usr_files']['name']); $i++)
        {
            $_FILES['userfile']['name']= $_FILES['usr_files']['name'][$i];
            $_FILES['userfile']['type']= $_FILES['usr_files']['type'][$i];
            $_FILES['userfile']['tmp_name']= $_FILES['usr_files']['tmp_name'][$i];
            $_FILES['userfile']['error']= $_FILES['usr_files']['error'][$i];
            $_FILES['userfile']['size']= $_FILES['usr_files']['size'][$i];
            
            if (!$this->upload->do_upload())
            {
                // fail
                $upload_error = array('error' => $this->upload->display_errors());
                $this->load->view('multiple_upload_view', $upload_error);
                break;
            }
        }
        
        // success
        if ($upload_error == NULL)
        {
            $data['success_msg'] = '<div class="alert alert-success text-center">Finished uploading...</div>';
            $this->load->view('multiple_upload_view', $data);
        }
    }
}
?>

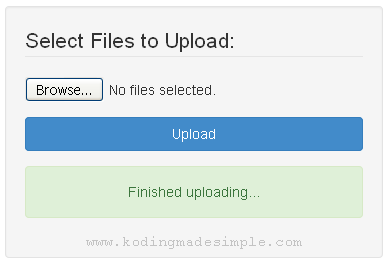
In the above controller I have added a function upload() to loop through the file array, upload files one by one and display a success message once the process is complete.

codeigniter-upload-multiple-files-success

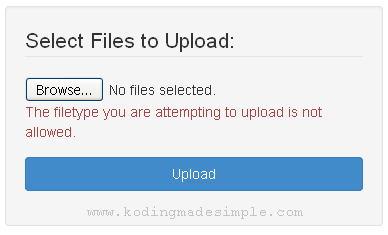
If anything goes wrong at the time of uploading, then error message will be shown to the user.

codeigniter-multiple-image-upload-error

If you want to restrict uploading to images alone, then set the configuration to accept only image file types like this,

$config['allowed_types'] = 'png|gif|jpg|jpeg';

To accept all sorts of file types use '*' instead (default),

$config['allowed_types'] = '*';
Read Also:

That explains about uploading multiple images and files in php codeigniter. I have given the logic. Just customize it to suit your needs. Meet you another interesting tutorial :)

Simple Image and File Upload in CodeIgniter with Validations & Examples

On 2/24/2018 11 Comments so far

Codeigniter provides a wide number of helper class and libraries for rapid application development. Upload library is one among them that makes file uploading process in Codeigniter a breeze. We'll see how to do file and image upload in codeigniter in this tutorial. File and Image uploading are similar since images are themselves files. But there are options for you to restrict the uploading process specific to images files alone and we'll see it below.

File Upload in CodeIgniter

First of all, we need a destination folder to store all the uploaded files. So create a folder named 'uploads' in the root folder. Make sure it is writable for the uploading process to work.

Read Also:

Create Controller

Create a controller file 'uploadfile.php' inside 'application\controllers' folder in codeigniter.

<?php
class uploadfile extends CI_Controller {

    function __construct()
    {
        parent::__construct();
        $this->load->helper(array('form', 'url'));
    }

    //index function
    function index()
    {
        //load file upload form
        $this->load->view('upload_file_view');
    }

    //file upload function
    function upload()
    {
        //set preferences
        $config['upload_path'] = './uploads/';
        $config['allowed_types'] = 'txt|pdf';
        $config['max_size']    = '100';

        //load upload class library
        $this->load->library('upload', $config);

        if (!$this->upload->do_upload('filename'))
        {
            // case - failure
            $upload_error = array('error' => $this->upload->display_errors());
            $this->load->view('upload_file_view', $upload_error);
        }
        else
        {
            // case - success
            $upload_data = $this->upload->data();
            $data['success_msg'] = '<div class="alert alert-success text-center">Your file <strong>' . $upload_data['file_name'] . '</strong> was successfully uploaded!</div>';
            $this->load->view('upload_file_view', $data);
        }
    }
}
?>

The upload() method in the codeigniter controller is where the actual file upload process takes place. Here we load the 'upload' library with the statement $this->load->library('upload', $config); . The $config is the array where we set preferences to control the uploading process. This is where we define the file uploading path, allowed file extensions, maximum file size etc.

This controller upload() method will be invoked on form submission, and the file will be validated and shows the validation error in case it fails. Else it will upload the file to the destination folder.

We have used some of the important methods of the 'upload' class library in our controller.

  • The callback, $this->upload->do_upload() will upload the file selected in the given field name to the destination folder. Note that the parameter to this method is optional and if it is not mentioned, then it expects the file from the input field with name 'userfile'. So if you set the file input with name other than 'userfile' make sure you pass the field name as parameter to the do_upload() function.
  • The callback $this->upload->display_errors() returns the error message if the do_upload() method returns false.
  • And the callback $this->upload->data() returns an array of data related to the uploaded file like the file name, path, size etc.

Create View

Create the view file 'upload_file_view.php' inside 'application\views' folder. This view file contains a simple upload form with file input and a submit button.

<!DOCTYPE html>
<html>
<head>
    <meta name="viewport" content="width=device-width, initial-scale=1.0">
    <title>CodeIgniter File Upload Form</title>
    <!-- load bootstrap css file -->
    <link href="<?php echo base_url("assets/bootstrap/css/bootstrap.css"); ?>" rel="stylesheet" type="text/css" />
</head>
<body>
<div class="container">
    <div class="row">
        <div class="col-md-6 col-md-offset-3 well">
        <legend>CodeIgniter File Upload Demo</legend>
        <?php echo form_open_multipart('uploadfile/upload');?>

        <fieldset>
            <div class="form-group">
                <div class="row">
                    <div class="col-md-12">
                        <label for="filename" class="control-label">Select File to Upload</label>
                    </div>
                </div>
            </div>

            <div class="form-group">
                <div class="row">
                    <div class="col-md-12">
                        <input type="file" name="filename" size="20" />
                        <span class="text-danger"><?php if (isset($error)) { echo $error; } ?></span>
                    </div>
                </div>
            </div>

            <div class="form-group">
                <div class="row">
                    <div class="col-md-12">
                        <input type="submit" value="Upload File" class="btn btn-primary"/>
                    </div>
                </div>
            </div>
        </fieldset>
        
        <?php echo form_close(); ?>
        <?php if (isset($success_msg)) { echo $success_msg; } ?>
        </div>
    </div>
</div>
</body>
</html>

The above view will produce an upload form like this.

codeigniter-file-upload-demo-form
CodeIgniter File Upload Demo Form

Generally I use bootstrap css framework to design the html forms for all my tutorials. This tutorial is no exception and I have used bootstrap components to give a nice look and feel to our upload form. Also I have set the form type to 'multipart' for the file uploading to work. (If you are a newbie to bootstrap then take a look at this tutorial on using bootstrap with codeigniter php framework to learn more).

When the user submits the form, it will be validated against the preferences set by the $config[] array. If the file is not selected or any other form validation error occurs, it is displayed below the file input like this.

file-upload-validation-error

If the validation succeeds and the file is uploaded successfully to the destination folder, a success message will be displayed at the bottom of the form like this.

file-upload-validation-success

Uploading Images in CodeIgniter

If you want to restrict the user to upload only image files in codeigniter, then you can set the preferences to something like this in the controller file,

<?php
    $config['upload_path'] = './uploads/';
    $config['allowed_types'] = 'png|jpg|gif';
    $config['max_size'] = '150';
    $config['max_width'] = '1024'; /* max width of the image file */
    $config['max_height'] = '768'; /* max height of the image file */
?>

Hence in this way you can restrict the users to upload only images. Moreover all those image files should fall under the maximum file size, width and height set by you :).

Read Also:

And that explains the file and image uploading process in codeigniter. I hope you like this turorial. Meet you in another interesting post. Please don't forget to share this on your social circle. Good Day!!!

CodeIgniter Autocomplete Search from Database using AJAX Example

On 2/09/2018 3 Comments so far

Hi! In this post, let's see how to autocomplete search from database using codeigniter and ajax. We are going to pull in live search thing something similar to Google search. As soon as you start typing in the textbox, the related suggestions will appear from the database. To implement this auto complete feature we need a jquery plugin called 'Select2'.

Select2 is an excellent plug-in that supercharges the regular select box with search functionality. It's really inappropriate to make the end user to skim through hundreds of options to pick just one. With Select2 the entire process is a breeze. It adds up a search filter to the dropdown (select box), thus populating results on fly with the help of ajax.

codeigniter autocomplete search from database ajax

AJAX Autocomplete Search from Database in CodeIgniter:

To implement the live autocomplete search in codeigniter, we need two JavaScript libraries, 1. jquery.js and 2. select2.js. Either download them or use from the cdn library just like I do in this demo.

Just follow the below steps and you'll be good.

Step-1) Create Database

For database, I'm going to use MySQL here. Create a dummy database, a table and some records to use in the example. Below is a sql file. Run the queries on mysql and it will take care of database creation.

CREATE `db_demo`;
USE `db_demo`;
CREATE TABLE IF NOT EXISTS `tbl_language` (
  `id` int(9) NOT NULL AUTO_INCREMENT,
  `lname` varchar(50) NOT NULL,
  `lcode` varchar(2) NOT NULL,
  PRIMARY KEY (`id`)
) ENGINE=MyISAM  DEFAULT CHARSET=latin1 AUTO_INCREMENT=6;

INSERT INTO `tbl_language` (`id`, `lname`, `lcode`) VALUES
(1, 'English', 'en'),
(2, 'Afrikaans', 'af'),
(3, 'Greek', 'el'),
(4, 'Finnish', 'fi'),
(5, 'Spanish', 'es');

Step-2) Create Model

We need a codeigniter model to handle the database transactions. So create a model file inside 'application' > 'models' folder. It contains the function getLanguage() to fetch language names from the database that match the search term entered by the user.

SearchModel.php

<?php
class SearchModel extends CI_Model
{
    function __construct()
    {
        parent::__construct();
    }
    
    function getLanguage($str)
    {
        $this->db->select('id, lname as text');
        $this->db->like('lname', $str);
        $query = $this->db->get('tbl_language');
        return $query->result();
    }
}
?>

Step-3) Create Controller

Next create a controller file inside 'application' > 'controllers' folder. It contains two functions,

  1. index() - this is the default method that just loads the view file.
  2. search() - This function will be triggered during the ajax call. It receives the incoming search term ('q'), communicate with the model and get the results matching the search term, encode them to json and pass it back to the browser.

SearchController.php

<?php
class SearchController extends CI_Controller {
    function __construct()
    {
        parent::__construct();
        $this->load->helper('url');
        $this->load->database();
    }

    function index()
    {
        $this->load->view('SearchView');
    }
    
    function search()
    {
        $q = $this->input->get('q');
        $this->load->model('SearchModel');
        echo json_encode($this->SearchModel->getLanguage($q));
    }
}
?>

Step-4) Create View

This is the final step. Create a view file inside 'application' > 'views' folder. It contains all the front-end logic, including html markup, css and java script. Here is where we need to fire the ajax call. Just load the js libraries and bind the select2() method to the dropdown that requires auto complete feature.

SearchView.php

<!DOCTYPE html>
<html>
<head>
    <title>CodeIgniter Search from Database Example</title>
    <link href="https://cdnjs.cloudflare.com/ajax/libs/select2/4.0.3/css/select2.min.css" rel="stylesheet" type="text/css" />
</head>
<body>
    <h3>CodeIgniter Autocomplete Demo</h3>
    <select id="language" name="language" class="itemName form-control" style="width:300px" ></select>

    <script src="https://code.jquery.com/jquery-2.1.1.min.js" type="text/javascript"></script>
    <script src="https://cdnjs.cloudflare.com/ajax/libs/select2/4.0.3/js/select2.min.js"></script>
    
    <script type="text/javascript">
    $('#language').select2({
        placeholder: '-Select Language-',
        minimumInputLength: 1,
        ajax: {
            url: "<?php echo base_url();?>index.php/SearchController/search",
            dataType: 'json',
            delay: 250,
            processResults: function (data) {
                return {
                    results: data
                };
            },
            cache: true
        }
    });
    </script>
</body>
</html>

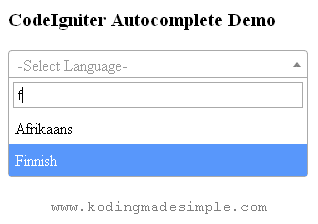
That's it! We have everything in place. It's time to test the search filter. Just run the controller and if everything is okay, you'll see a drop-down box. Start typing in the textbox and you will see the suggestions popping up below in a list.

ajax autocomplete search select2

With the plug-in, you can not only pull in the results from the database, but from other sources such as a remote REST API or just a local JS array.

Read Also:

That explains about implementing search from database in codeigniter and ajax. Most modern web apps uses autocomplete search and is a sure fire way to increase user experience. Every little detail counts! So make sure you implement it on your next project. I hope this tutorial is useful for you. Please share it on your social circle if you like it.

How to Resize Image and Create Thumbnail in CodeIgniter

On 1/29/2018 3 Comments so far

Hi! Today we will see how to resize image and create thumbnail in codeigniter. This comes handy when you want to resize user avatar or profile images. Generally, shopping sites employ this method. Although they upload large product images, they'll create a thumbnail version of them and lists them in several categories. This will not only save bandwidth but load the page faster and listing more items in a limited space. We are going to see how to do this in codeigniter.

CI offers a very useful image manipulation class called image_lib which we are going to use for resizing the image. Using this library you can not only change the size but perform crop, rotate and watermark images. It is compatible with all major image libraries like GD/GD2, ImageMagick and NetPBM and we will use GD2 here.

codeigniter resize image and create thumbnail

CodeIgniter - Image Resizing and Creating Thumbnail Image:

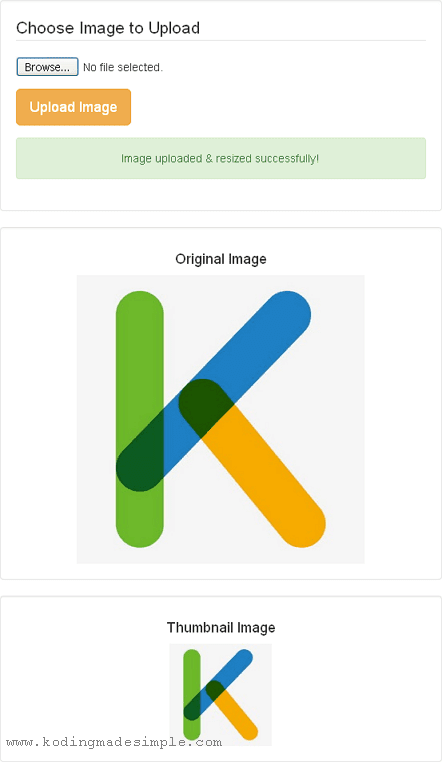
Let's build a CI demo to implement image resizing and the process goes like this. The user uploads images using the upload form provided. The image will be uploaded and moved to the 'uploads' folder on the server. And the same will be resized to a thumbnail size image and stored inside the 'thumbnails' folder. We will add the appropriate notification and error handling to the demo.

As for this example, we need to create two files, a codeigniter controller and a view. Follow the below steps to build demo.

Read: How to Create and Delete Session in CodeIgniter

Step-1) Create Folders to Store Images

You need proper folder structure to store the uploaded and resized images. Go to your application root directory and create two folders, 1. 'uploads' and 2. 'thumbnails' inside the 'uploads' folder. Also make sure you have write permission enabled on the folders.

Step-2) Create View

Next create a view file inside 'application' > 'views' folder. This file will contain the image upload form. The form itself is quite basic, a file input and a submit button.

upload_view.php

<!DOCTYPE html>
<html>
<head>
    <meta name="viewport" content="width=device-width, initial-scale=1.0">
    <title>CodeIgniter Image Resize and Thumbnail Creation Demo</title>
    <link href="https://maxcdn.bootstrapcdn.com/bootstrap/3.3.7/css/bootstrap.min.css" type="text/css" rel="stylesheet" />
</head>
<body>
<div class="container">
    <div class="row well" style="background: none;">
        <?php echo form_open_multipart('upload_controller/upload_image');?>
            <legend>Choose Image to Upload</legend>
            <div class="form-group">
                <input type="file" name="imgfile" />
                <span class="text-danger"><?php if (isset($error)) { echo $error; } ?></span>
            </div>
            <div class="form-group">
                <input type="submit" value="Upload Image" class="btn btn-warning btn-lg"/>
            </div>
        <?php echo form_close(); ?>
        <?php if (isset($success)) { echo $success; } ?>
    </div>
    <?php if(isset($filename)) { ?>
    <div class="row text-center well" style="background: none;">
        <h4>Original Image</h4>
        <img src="<?php echo base_url().'uploads/'.$filename; ?>">
    </div>
    <div class="row text-center well" style="background: none;">
        <h4>Thumbnail Image</h4>
        <img src="<?php echo base_url().'uploads/thumbnails/'.$filename; ?>">
    </div>
    <?php } ?>
</div>
</body>
</html>

Step-3) Create Controller

In this step, create a controller file inside the 'application' > 'controllers' folder. This contains three functions, 1. index() which is the default, 2. upload_image() that verifies the submitted image file and uploads it to the server 3. resize_image() that creates a thumbnail of the uploaded image and saves it inside the 'thumbnails' folder.

upload_controller.php

<?php
class upload_controller extends CI_Controller {

    function __construct()
    {
        parent::__construct();
        $this->load->helper(array('form', 'url'));
    }

    // default function
    function index()
    {
        //load file upload form
        $this->load->view('upload_view');
    }

    // image upload function
    function upload_image()
    {
        // upload settings
        $config = array(
            'upload_path' => './uploads/',
            'allowed_types' => 'png|jpg|jpeg|gif',
            'max_size' => '1024'
        );

        // load upload class
        $this->load->library('upload', $config);

        if (!$this->upload->do_upload('imgfile'))
        {
            // case - failure
            $upload_error = array('error' => $this->upload->display_errors());
            $this->load->view('upload_view', $upload_error);
        }
        else
        {
            // case - success
            $upload_data = $this->upload->data();
            $data['filename'] = $upload_data['file_name'];
            $this->resize_image($data['filename']);
            $data['success'] = '<div class="alert alert-success text-center">Image uploaded & resized successfully!</div>';
            $this->load->view('upload_view', $data);
        }
    }
    
    // image resize function
    function resize_image($filename)
    {
        $img_source = './uploads/' . $filename;
        $img_target = './uploads/thumbnails/';

        // image lib settings
        $config = array(
            'image_library' => 'gd2',
            'source_image' => $img_source,
            'new_image' => $img_target,
            'maintain_ratio' => TRUE,
            'width' => 128,
            'height' => 128
        );
        
        // load image library
        $this->load->library('image_lib', $config);
    
        // resize image
        if(!$this->image_lib->resize())
            echo $this->image_lib->display_errors();
        $this->image_lib->clear();
    }
}
?>

After resizing the image, the controller passes the image filename to the view, where the original and the resized image will be displayed below the upload form.

That's it. We have all the necessary files in place. Now run the controller and choose an image to upload. If everything goes right, you will see the uploaded and thumbnail image at the bottom of the form.

create thumbnail image in codeigniter

Please make sure you have the GD library installed and pass the file path to the source and target image for resizing and not the url of the image files.

Read Also:

That explains about resizing the uploaded image and creating thumbnail in codeigniter. The process is quick and simple. You can also upload multiple images at once in codeigniter and produce thumbnails. It would be easier if you want to resize a large set of images. I hope this tutorial is useful to you. Please share it on social networks if you like it.

How to Export MySQL Table to JSON File in CodeIgniter

On 1/25/2018 Be the first to comment!

Hi! In this tutorial, we will see how to export mysql table to json file in codeigniter. Data portability has become more important than ever and a necessary requirement for modern applications. Almost all web services uses JSON format to migrate data from one location to another. So, as a Web Developer, you must know to handle json and various types of applications like Web, Mobile etc.

Exporting mysql into json allows you to easily port data to different platforms. The whole process is quite simple. Just fetch the data from mysql database, covert the query result to json and then write it in a file.

codeigniter export mysql table to json file

CodeIgniter - Export MySQL Table to JSON File:

Let's create a demo for exporting the database as json. The steps are easy to follow and we possibly need two files, a model and a controller.

Step-1) Create Database

We need a dummy database to use in the example, a database, a table and some sample records.

Run the below sql file in the mysql environment and create them.

CREATE DATABASE `my_demo`;
USE `my_demo`;

CREATE TABLE IF NOT EXISTS `users` (
  `id` int(10) NOT NULL AUTO_INCREMENT,
  `fname` varchar(30) NOT NULL,
  `lname` varchar(30) NOT NULL,
  `email` varchar(60) NOT NULL,
  `city` varchar(50) NOT NULL,
  PRIMARY KEY (`id`)
) ENGINE=MyISAM  DEFAULT CHARSET=latin1 AUTO_INCREMENT=6;

INSERT INTO `users` (`id`, `fname`, `lname`, `email`, `city`) VALUES
(1, 'Jim', 'Connor', 'jimconnor@yahoo.com', 'Las Vegas'),
(2, 'Taylor', 'Fox', 'taylorfox@hotmail.com', 'San Francisco'),
(3, 'Daniel', 'Greyson', 'danielgreyson@hotmail.com', 'New York'),
(4, 'Julia', 'Brown', 'juliabrown@gmail.com', 'Los Angeles'),
(5, 'Rose', 'Harris', 'roseharris@gmail.com', 'New York');

Step-2) Create Model

In this step, create a model file in the 'application/models' folder. This will fetch data from the 'users' table, encode and return it as json to the controller.

UserModel.php

<?php
class UserModel extends CI_Model
{
    function __construct()
    {
        parent::__construct();
    }
    
    function toJSON()
    {
          $query = $this->db->get('users');
          return json_encode($query->result(), JSON_PRETTY_PRINT);
    }
}
?>

Step-3) Create Controller

Finally, create a controller file in the 'application/controllers' folder. This will communicate with the model, retrieve the json data and write in into a file.

UserController.php

<?php
class UserController extends CI_Controller
{
    public function __construct()
    {
        parent::__construct();
        $this->load->helper('file');
        $this->load->database();
    }
    
    public function index()
    {
        $this->load->model('UserModel');
        $result = $this->UserModel->toJSON();
        if(write_file('user_data.json', $result))
             echo 'Successfully exported to json file!';
        else
             echo 'Error exporting mysql data...';
    }
}
?>

Now we have all the required files in place. Run the controller, this will export the mysql data to a json file and show you a success message if all goes well.

You can check for the file 'user_data.json' inside the root directory. This is the exported file I received.

user_data.json

[
    {
        "id": "1",
        "fname": "Jim",
        "lname": "Connor",
        "email": "jimconnor@yahoo.com",
        "city": "Las Vegas"
    },
    {
        "id": "2",
        "fname": "Taylor",
        "lname": "Fox",
        "email": "taylorfox@hotmail.com",
        "city": "San Francisco"
    },
    {
        "id": "3",
        "fname": "Daniel",
        "lname": "Greyson",
        "email": "danielgreyson@hotmail.com",
        "city": "New York"
    },
    {
        "id": "4",
        "fname": "Julia",
        "lname": "Brown",
        "email": "juliabrown@gmail.com",
        "city": "Los Angeles"
    },
    {
        "id": "5",
        "fname": "Rose",
        "lname": "Harris",
        "email": "roseharris@gmail.com",
        "city": "New York"
    }
]
Read Also:

Likewise you can export the mysql table to the json file using codeigniter. The entire process is same as what you do with core php, but some may find it difficult to shift the code to fit with mvc pattern. And I hope this tutorial has clarified it. Please don't forget to share the post in social media if you like it.

PHP CodeIgniter Tutorials for Beginners Step By Step: Learn From Scratch

On 1/21/2018 17 Comments so far

Hi, Welcome to our PHP CodeIgniter Tutorial Series. These step by step tutorials are intended for beginners who want to start learning php codeigniter from scratch. It will start right away from setting up the codeigniter framework working environment and move on to more advanced topics covering codeigniter framework libraries, helpers and active record class for database communication. Another nice perk with this series is you will get to know about the popular twitter bootstrap css framework while learning.

Why You Should Learn CodeIgniter Framework?

CodeIgniter Framework is developed by EllisLab and now it is taken by British Columbia Institute of Technology. It is the simplest and light-weight PHP framework which lets you create robust web applications in no time. It is greatly appreciated for its speedy performance and smaller learning curve and suitable for highly scalable applications. And even though php codeigniter framework loosely follows Model-View-Controller pattern it doesn’t force it on you. While controller classes are required for application development, the models and view files are purely optional.

The Model-View-Controller pattern isolates the application logic from the user interface and the database communication.

Twitter Bootstrap CSS is used in this tutorial series for designing the user interface for codeigniter application and there are some dedicated articles covering the usage of bootstrap framework with codeigniter application. But you are encouraged to write down your own style sheets if you prefer.

Using Twitter Bootstrap with CodeIgniter saves the hassle of writing CSS stylesheets of your own and lets you focus on development. Later you can customize bootstrap styles to suit your need. That is the best part of using MVC pattern as the presentation layer (i.e., view) is separate, you can change the look and feel of the app anytime without disturbing the rest of it.

php-codeigniter-tutorials-for-beginners-step-by-step

PHP CodeIgniter Tutorial for Beginners Step By Step

These CodeIgniter Tutorials are compiled in a way so that it starts from basics to advanced level in a sequential order and you can follow them in the same order to start digging into the framework.

How to Install and Setup PHP CodeIgniter Framework in XAMPP (Localhost)

There is only one way to master new technology quickly and it is to get your hands dirty and start to fiddle with examples. So the first and foremost step in the process of learning codeigniter is to setup the working environment. If you don’t have one and want to start from nil then follow this basic codeigniter tutorial. Likewise it will guide you to,

  • Download & Install CodeIgniter Application in XAMPP Server
  • Setup the basic configuration Details
  • Configure Database Connections
  • Accessing codeigniter url structure

PHP CodeIgniter Framework follows special url structure which is quite intriguing for newbies and this beginners tutorial will lay it out clearly for you to understand it better. By the end of this article you will have the codeigniter development environment up and ready. Read Complete Tutorial Here

How to Remove index.php from CodeIgniter URL using htaccess File

So you are up and ready for the challenge? As we already know codeigniter follows MVC (Model-View-Controller) pattern and demands a structured workflow and unique url structure to access the files. In CodeIgniter, any web page be a static or dynamic one needs controller and view files and the model file is required only in case of database communication.

CodeIgniter generates well-optimized search engine friendly URLs like for e.g., ‘http://mydomain.com/pets/dogs/’.

In general its URL structure looks like this,

<base_url>/index.php/<controller_name>/<controller_function_name>

Even though it uses search engine friendly urls, nobody would have missed the awkward presence of ‘index.php’ in between those codeigniter’s urls. Did you wonder how to get clean urls without ‘index.php’ at the middle of them? Yes it’s possible to get rid of it. This codeigniter tutorial will show you an easy trick to rewrite the urls with htaccess file in an efficient way and boom!!! You get clean urls that search engines love. Read Complete Tutorial Here

How to Connect to Multiple Databases in CodeIgniter

CodeIgniter is constantly upgrading to the industry changes and the older versions 2.x included database drivers like mysql, mysqli, pdo, postgre etc by default. But working with MSSQL Database Management system requires you to manually install the drivers but the latest codeigniter v3.0 includes mssql driver too.

Sticking on to the development standards of codeigniter active records library will provide data abstraction which lets you to migrate your codeigniter application easily to some other database management system later.

At times you may want to connect and work with two different databases in a single application and it is not uncommon for a developer. CodeIgniter is flexible and allows you to communicate with multiple databases at a time. Working with multiple databases in codeigniter is simpler and you have to configure the db settings properly and the active records class will take care of the rest. This tutorial will walk you through step by step to connect multiple databases in codeigniter. Read Complete CodeIgniter Tutorial Here

How to integrate Twitter Bootstrap with PHP CodeIgniter Framework

So you love twitter bootstrap framework and you are a web developer who don’t want to reinvent the wheel but to readily jumpstart into work with the help of bootstrap’s built-in css components and plug-ins. What if you want to take advantage of bootstrap’s responsive layout’s and readymade css in your codeigniter application? Wonder how to use twitter bootstrap in codeigniter framework? This codeigniter tutorial gives you the answers. It will you walk through the steps to integrate bootstrap with php codeigniter framework and let you combine the power of two robust frameworks for responsive application development.

Bootstrap’s powerful JavaScript library is built over jQuery and you will need to include jQuery files for it to work. Well! This post teaches you everything about using bootstrap and codeigniter together. Read Complete CodeIgniter Tutorial Here

Note: The above tutorial will deal only with codeigniter and bootstrap integration part but if you want to know how to build codeigniter forms using bootstrap components then read further through this article for advanced topics in the section.

How to Create Login Form in CodeIgniter, MySQL and Twitter Bootstrap

User registration and login system is one of the basic requirements of any membership driven application and as a web developer often you will find yourself building one. This codeigniter tutorial discusses about building a simple login form in codeigniter with username and password fields and verifies the input user credentials against the one stored in the database.

You will also get a basic idea of working with database, using codeigniter session library and building codeigniter forms using bootstrap css. Read Complete Login System Tutorial Here

Easy Image and File Upload in CodeIgniter with Validations

CodeIgniter provides vast number of libraries and helper classes for rapid web development. ‘Upload’ library is one among them that makes the file uploading process in Codeigniter a breeze. If you want to include file uploading functionality in codeigniter, say a way to upload user avatar or a video then never worry.

This codeigniter tutorial will teach you how efficiently you can implement the file uploading functionality and cut down the development time. Additionally it allows users to set the file uploading preferences which lets you take full control of the uploading task. By customizing these settings one can easily define the file uploading path, allowed file extensions for upload (e.g., only images), maximum file size and much more. Read Complete Tutorial Here

How to Send Email in CodeIgniter via SMTP Server

As mentioned above, codeigniter’s built-in helpers and libraries aids robust application development and ‘email’ library is one among them. This little gem of library supports a variety of mail protocols and makes the email sending process lot easier. Moreover you can configure the email preferences like mail protocol, smtp authorization, html or plain text mail etc. These email preferences can be defined either globally or at the time of sending mails (like inside controllers).

This tutorial shows you a simple example to configure codeigniter mail settings and send email with attachments using smtp protocol. It uses the Gmail Server, but you can use any third party smtp servers. Just get the smtp settings from the service provider and use it instead of the Gmail settings given in the post and you are done. Read Complete CodeIgniter Tutorial Here

CodeIgniter Database CRUD Tutorials for Beginners

CRUD is one of the primitive functions of a Database Management System. It’s an acronym for the four fundamental operations Create, Read, Update and Delete performed on databases. In SQL statements, they refer to INSERT (Create), SELECT (Read), UPDATE (Update) and DELETE (Delete) commands. Knowing the Database CRUD procedure is essential in application development particularly when you need to work with databases. These codeigniter tutorials, discusses about implementing basic database CRUD operations in codeigniter and MySQL Database in detail.

CRUD: Insert Data into Database using CodeIgniter

INSERT is the first Database CRUD process and this CodeIgniter Database Tutorial will teach you How to Insert Form Data into MySQL Database using CodeIgniter, Bootstrap CSS framework and jQuery UI. It’ll walk you through step-by-step, creating a form in codeigniter and insert those form data into database. To design the codeigniter form used in this example, we use twitter bootstrap css framework and it’s one of my all time favorite and saves time from creating style sheets of our own. Read Complete Database Insert Tutorial Here

CRUD: Read and Display Database Data in CodeIgniter

READ is the second Database CRUD operation which fetches the data from database. This CodeIgniter Tutorial discusses about implementing Database READ process in codeigniter. It will walk you through steps about reading data from MySQL Database and display it in a neat HTML Tabular format using bootstrap css. Using bootstrap will save you time from creating custom stylesheets for formatting the displayed data. Read Complete Database Read Tutorial Here

CRUD: Update Database Records in CodeIgniter

UPDATE is the third operation in CRUD and this article demonstrates about updating database record from a html form using codeigniter framework. CodeIgniter’s database update query will let you perform update operation on databases. Here the update process is accomplished by populating the details of a specific database record in form fields and updated to DB when the user edits the details and submits the form. Read Complete Database Update Tutorial Here

CRUD: Delete Database Records in CodeIgniter

DELETE is the last database operation in CRUD and it is used to delete record(s) from database. To implement this delete process in codeigniter you should use its active record delete query which allows deleting one to more records from database table easily. Well! This codeigniter tutorial will teach you everything about implementing the delete process. Read Complete Database Delete Tutorial Here

How to Create CodeIgniter Pagination with Twitter Bootstrap Styles

Pagination refers to the set of numbered links that allows you to navigate from page to page to view a large set of data. For example let’s say you want to fetch and display set of data from database and it contains several hundreds of records. In that case pagination will be very useful to display the database result set in chunks and let the user to skim through the page links which is similar to Google search results.

And this tutorial will teach you about incorporating pagination links using codeigniter’s ‘pagination’ library. However these codeigniter pagination links are pretty plain in nature but we can easily spice them up to decent looking using twitter bootstrap styles. Read Complete CodeIgniter Pagination Tutorial Here

CodeIgniter Contact Form Tutorial with Email Sending Option

Contact forms are an essential component of modern day websites and they provide a way of communication between the site users and the website owner. Incorporating a contact form is relatively easy and this codeigniter tutorial will show you about building a simple and effective contact form with codeigniter, validate the user input and send email using the smtp server. We will build a contact form to collect name, email id, subject and message from the user and send it to the website owner’s email address. Read Complete Contact Form Tutorial Here

Over To You

I hope this codeigniter tutorial for beginners has laid out some strong foundation for absolute newbies to learn from zero. I do intend to update this article regularly whenever I add up some new tutorials about codeigniter. So keep visiting :)

Further Reference: CodeIgniter Manual

CodeIgniter | Remove index.php from URL using htaccess

On 1/21/2018 28 Comments so far

Hi, we’ll see how to remove index.php from url in codeigniter. Even though codeigniter uses search engine friendly urls, nobody would have missed the awkward presence of 'index.php' in between those codeigniter's urls. Have you ever wondered how to get rid of it to get more clean urls in your codeigniter application? Say your app has an url something like http://www.example.com/index.php/contact and you want it to look like http://www.example.com/contact. Yes, you can do it. In codeigniter removing index.php from url should be done by rewriting urls in htaccess file.

How to Remove index.php from URL in CodeIgniter using .htaccess?

Recommended Read: How to Create Login Form in CodeIgniter, MySQL and Twitter Bootstrap

Recommended Read: CodeIgniter/MySQL Tutorial - Read and Display data with Twitter Bootstrap

Step 1: Enable Mod Rewrite Option in your APACHE Server

To rewrite urls in the htaccess file, the mod_rewrite option should be enabled in the apache server. Goto apache's "httpd.conf" file and search for the line,

LoadModule rewrite_module modules/mod_rewrite.so

If the above line is preceded with # (in which case, the module is disabled), then remove the # (hash) symbol to enable url rewriting.

Step 2: Create '.htaccess' File

Next create the .htaccess file at the root directory. To create the htaccess file, open your favourite text editor and create a new text file. Save it as ".htaccess" (make sure you type the filename within quotes to avoid the file to be saved as text file) in the root directory.

htaccess file codeigniter

Now copy paste this code to the htaccess file and save it.

<IfModule mod_rewrite.c>
    RewriteEngine On
    RewriteBase /
    RewriteCond %{THE_REQUEST} ^GET.*index\.php [NC]
    RewriteCond %{REQUEST_URI} !/system/.* [NC]
    RewriteRule (.*?)index\.php/*(.*) /$1$2 [R=301,NE,L]
    RewriteCond %{REQUEST_FILENAME} !-f
    RewriteCond %{REQUEST_FILENAME} !-d
    RewriteRule ^(.*)$ /index.php/$1 [L]
</IfModule>

If you run your codeigniter app as a subdirectory instead of root domain like, http://example.com/cisite/ instead of http://example.com/ then the above code won't work. You have to tweak it little to tell that your site runs as a subdirectory. Add this code to the htaccess file instead of the above one.

<IfModule mod_rewrite.c>
    RewriteEngine On
    RewriteBase /
    RewriteCond %{THE_REQUEST} ^GET.*index\.php [NC]
    RewriteCond %{REQUEST_URI} !/system/.* [NC]
    RewriteRule (.*?)index\.php/*(.*) /$1$2 [R=301,NE,L]
    RewriteCond %{REQUEST_FILENAME} !-f
    RewriteCond %{REQUEST_FILENAME} !-d
    RewriteRule ^(.*)$ index.php/$1 [L]
</IfModule>

Step 3: Modify CodeIgniter Config Settings

Open config.php file under application >> config folder and search for the line,

$config['index_page'] = 'index.php';

Remove index.php from it to look like this,

$config['index_page'] = '';

Now restart apache and check the url. eg., http://www.example.com/contact instead of http://www.example.com/index.php/contact

Recommended Read: How to Upload Files in PHP Securely

Recommended Read: How to Insert JSON into MySQL using PHP

If it doesn't work, you may be having problem with uri protocol. In that case find $config['uri_protocol'] ='AUTO' setting in config file and replace with $config['uri_protocol'] = 'REQUEST_URI'.

Restart apache server again and you can check the codeigniter site to see that index.php has been removed from codeigniter url.

PHP CodeIgniter Pagination with Twitter Bootstrap Styles - Example

On 1/20/2018 24 Comments so far

PHP Codeigniter framework provides a good number of libraries required for building a website with codeigniter and pagination library is one among them. For those who are not familiar with the term pagination, this refers to the set of numbered links that allows you to navigate from page to page to view a large set of data. For example let's say you want to fetch and display some data from database and it contains several hundreds of records. In that case pagination will be very useful to display the database resultset in chunks and let the user to skim through several page links (similar to google search results).

However the pagination links in codeigniter are plain looking in nature and a little customization to codeigniter pagination doesn't hurt. Here we'll see in this tutorial, how to style codeigniter pagination links with twitter bootstrap styles.

Implement Twitter Bootstrap Styles in CodeIgniter Pagination

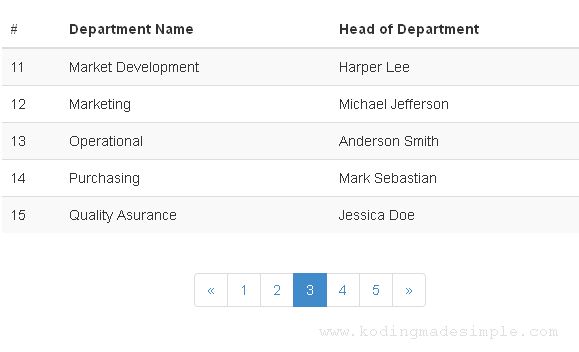
We'll see an example below to fetch and display the list of department names and their department head in a neat table view along with pagination links at the bottom.

MySQL Database Example

As an example I'll use this below 'employee' database for this tutorial.

SET SQL_MODE="NO_AUTO_VALUE_ON_ZERO";
--
-- Database: `employee`
--
CREATE TABLE IF NOT EXISTS `tbl_dept` (
  `int_id` int(4) NOT NULL AUTO_INCREMENT,
  `var_dept_name` varchar(50) NOT NULL,
  `int_hod` int(5) NOT NULL,
  KEY `int_id` (`int_id`)
) ENGINE=MyISAM  DEFAULT CHARSET=latin1 AUTO_INCREMENT=1 ;

CREATE TABLE IF NOT EXISTS `tbl_emp` (
  `int_id` int(5) NOT NULL AUTO_INCREMENT,
  `var_emp_name` varchar(50) NOT NULL,
  `int_dept_id` int(4) NOT NULL,
  PRIMARY KEY (`int_id`)
) ENGINE=MyISAM  DEFAULT CHARSET=latin1 AUTO_INCREMENT=1 ;

The Model ('models/department_model.php')

First we create a model file with a method to fetch and return the entire department details along with the head of the department employee name.

<?php
class department_model extends CI_Model{
    function __construct()
    {
        // Call the Model constructor
        parent::__construct();
    }

    //fetch department details from database
    function get_department_list($limit, $start)
    {
        $sql = 'select var_dept_name, var_emp_name from tbl_dept, tbl_emp where tbl_dept.int_hod = tbl_emp.int_id order by var_dept_name limit ' . $start . ', ' . $limit;
        $query = $this->db->query($sql);
        return $query->result();
    }
}
?>

The Controller ('controllers/department.php')

Next create the controller file and load the codeigniter pagination library and the department model file which we created earlier in the constructor method. Then create the index() function where we configure the behavior of the pagination library with the $config[] array and create the pagination links to be displayed at the bottom of the department table in the view file.

<?php
class department extends CI_Controller
{
    public function __construct()
    {
        parent::__construct();
        $this->load->helper('url');
        $this->load->database();
        $this->load->library('pagination');

        //load the department_model
        $this->load->model('department_model');
    }

    public function index()
    {
        //pagination settings
        $config['base_url'] = site_url('department/index');
        $config['total_rows'] = $this->db->count_all('tbl_dept');
        $config['per_page'] = "5";
        $config["uri_segment"] = 3;
        $choice = $config["total_rows"] / $config["per_page"];
        $config["num_links"] = floor($choice);

        //config for bootstrap pagination class integration
        $config['full_tag_open'] = '<ul class="pagination">';
        $config['full_tag_close'] = '</ul>';
        $config['first_link'] = false;
        $config['last_link'] = false;
        $config['first_tag_open'] = '<li>';
        $config['first_tag_close'] = '</li>';
        $config['prev_link'] = '&laquo';
        $config['prev_tag_open'] = '<li class="prev">';
        $config['prev_tag_close'] = '</li>';
        $config['next_link'] = '&raquo';
        $config['next_tag_open'] = '<li>';
        $config['next_tag_close'] = '</li>';
        $config['last_tag_open'] = '<li>';
        $config['last_tag_close'] = '</li>';
        $config['cur_tag_open'] = '<li class="active"><a href="#">';
        $config['cur_tag_close'] = '</a></li>';
        $config['num_tag_open'] = '<li>';
        $config['num_tag_close'] = '</li>';

        $this->pagination->initialize($config);
        $data['page'] = ($this->uri->segment(3)) ? $this->uri->segment(3) : 0;

        //call the model function to get the department data
        $data['deptlist'] = $this->department_model->get_department_list($config["per_page"], $data['page']);           

        $data['pagination'] = $this->pagination->create_links();

        //load the department_view
        $this->load->view('department_view',$data);
    }
}
?>

As you can see in the above code, we have integrated bootstrap's '.pagination' class to codeigniter pagination links. Using the '.active' css class will highlight the active page in the links.

The View ('views/department_view.php')

Finally create view file to display the department list in a neat striped table with bootstrap pagination links at the bottom.

<!DOCTYPE html>
<html>
<head>
    <meta name="viewport" content="width=device-width, initial-scale=1.0">
    <title>PHP CodeIgniter Pagination with Bootstrap Styles | Example</title>
    <!--link the bootstrap css file-->
    <link rel="stylesheet" href="<?php echo base_url("bootstrap/css/bootstrap.css"); ?>">
</head>
<body>
<div class="container">
    <div class="row">
        <div class="col-md-12">
            <table class="table table-striped table-hover">
                <thead>
                    <tr>
                        <th>#</th>
                        <th>Department Name</th>
                        <th>Head of Department</th>
                    </tr>
                </thead>
                <tbody>
                    <?php for ($i = 0; $i < count($deptlist); ++$i) { ?>
                    <tr>
                        <td><?php echo ($page+$i+1); ?></td>
                        <td><?php echo $deptlist[$i]->var_dept_name; ?></td>
                        <td><?php echo $deptlist[$i]->var_emp_name; ?></td>
                    </tr>
                    <?php } ?>
                </tbody>
            </table>
        </div>
    </div>
    <div class="row">
        <div class="col-md-12 text-center">
            <?php echo $pagination; ?>
        </div>
    </div>
</div>
</body>
</html>

We have used bootstrap table styles such as '.table', '.table-striped', '.table-hover' to display the department list in a neat format and at the bottom with pagination links.

Open the controller in the browser and you get the department details displayed like this.

codeigniter-bootstrap-pagination-example
Read:

I hope now you get a better understanding of integrating twitter bootstrap styles with codeigniter pagination links.

Related Read: CodeIgniter-Bootstrap Pagination with Search Query Filter

Last Modified: Nov-10-2017

Contact Form

Name

Email *

Message *