Showing posts with label JavaScript. Show all posts

How to Print Contents of a Div using JavaScript

On 1/12/2018 Be the first to comment!

Hi! Today let's see how to print contents of a div using javascript. Have you ever tried printing a web page or part of a page programmatically? There is an interesting utility in JavaScript called print(). It is one of the methods of the 'Window' object and is used to trigger your system's printing feature.

In case you want to print part of a page area, the simple solution is to place all the printable content inside a 'div' block and invoke the print action with some user event. Let's see how to do it.

javascript print contents of a div

Print Contents of a Div in JavaScript:

Let's first create a div container to hold the printable part.

<!DOCTYPE html>
<html>
<head>
    <meta charset="utf-8"> 
    <meta name="viewport" content="width=device-width, initial-scale=1.0">
    <title>Print Part of a Webpage with JavaScript</title>
    <link href="https://maxcdn.bootstrapcdn.com/bootstrap/3.3.7/css/bootstrap.min.css" rel="stylesheet" type="text/css" />
</head>
<body>
<div class="container">
    <div id="printableDiv" class="jumbotron">
        <h2>Test Printing</h2>
        <p>Lorem ipsum dolor sit amet, consectetuer adipiscing elit. Aenean commodo ligula eget dolor. Aenean massa. Cum sociis natoque penatibus et magnis dis parturient montes, nascetur ridiculus mus. Donec quam felis, ultricies nec, pellentesque eu, pretium quis, sem. Nulla consequat massa quis enim.</p>
    </div>
</div>
</body>
</html>

In the above markup, we have created a <div> container with an id #printableDiv and placed some text inside. This is the block we need to print.

Next add a button element to trigger the print action when the user clicks on it.

<button type="button" class="btn btn-warning btn-lg" onclick="printIt('printableDiv')">Print this block</button>

Include onclick event to the button and pass the id of the div we have created earlier.

Finally the printing part! Write a simple java script function to print the div contents.

JavaScript:

<script type="text/javascript">
function printIt(divID) {
    var divContent = document.getElementById(divID);
    var WinPrint = window.open('', '', 'width=800,height=600');
    WinPrint.document.write('<link rel="stylesheet" type="text/css" href="https://maxcdn.bootstrapcdn.com/bootstrap/3.3.7/css/bootstrap.min.css">');
    WinPrint.document.write(divContent.innerHTML);
    WinPrint.document.close();
    WinPrint.focus();
    WinPrint.print();
    WinPrint.close();
}
</script>

The js function will open a window of defined width and height, write the contents of the div to it and invokes printing window using the print() function.

Keep in mind that the contents will be printed without any css styles you have in the webpage. To preserve styles, you must link the css file using windowsobject. document.write() method like I did in the JS code.

One good thing about using this method is it will not fire printing immediately, but the print window as a means of confirmation - just leaving the choice to users in case they clicked on it accidentally.

Read Also:

That explains printing div contents using javascript. The method described in this post is very useful to print a portion of a webpage. You just have to keep all the printable contents in a div block and trigger the java script function. I hope you like this tutorial. Please share it in your social circle if you find it useful.

How to Remove a Property from an Object in JavaScript

On 12/07/2017 Be the first to comment!

JSON alias 'JavaScript Object Notation' is the string representation of JavaScript Object and is a popular data-exchange format among web-services. Manipulating those data received from various source is an essential skill required for every developer. With that in mind we have published several json tutorials in the past which discusses about working with json data. And today in this tutorial, we'll see how to remove a property from an object in javascript.

how to remove a property from an object in javascript

Removing a Property from JavaScript Object

Let's say we have a Java Script Object that contains three properties (details) of an employee namely 'name', 'gender' & 'position'.

{"name": "Garrett Winters","gender": "Male","position": "Javascript Developer"}

Now we want to remove one of the properties from the above object and to do this, we have to use java script's delete method. Here's the code snippet for removing the 'gender' property.

<script type="text/javascript">
    var obj = {"name": "Garrett Winters","gender": "Male","position": "Javascript Developer"};

    delete obj.gender;
    console.log(JSON.stringify(obj));
</script>

// produces output

// {"name":"Garrett Winters","position":"Javascript Developer"}

delete obj.gender statement will remove the property 'gender' from the object 'obj'. Alternatively using delete obj['gender'] will also produce the same result.

JSON.stringify will convert the javascript object to string format.

Removing a Property from Array of Objects

The above method works well for a single object, but that would not be the case always. What if you want to remove a particular property from an array of objects like this?

[{"name":"Garrett Winters","gender":"Male","position":"Javascript Developer"},{"name":"Colleen Hurst","gender":"Female","position":"System Architect"},{"name":"Michael Frost","gender":"Male","position":"Marketing Designer"}]

In this case, you should tweak the previous code a little bit to loop through the array and delete the properties one by one. Here's the script for doing it.

<script type="text/javascript">
    var obj = [{"name": "Garrett Winters", "gender": "Male", "position": "Javascript Developer"}, {"name": "Colleen Hurst", "gender": "Female",  "position": "System Architect"}, {"name": "Michael Frost", "gender": "Male", "position": "Marketing Designer"}];

    for (var i = 0; i < obj.length; i++) {
        delete obj[i].gender;
    }
    console.log(JSON.stringify(obj));
</script>

// produces output

// [{"name":"Garrett Winters","position":"Javascript Developer"},{"name":"Colleen Hurst","position":"System Architect"},{"name":"Michael Frost","position":"Marketing Designer"}]
Read Also:

That was all about removing the property from javascript object. You can easily remove properties from complex & nested java script objects similarly with this method.

HTML5 Video Player with Custom Controls using JavaScript

On 12/04/2017 Be the first to comment!

Hi! Today let's see how to build html5 video player with custom controls using javascript. The only way to embed videos on webpages before the introduction of html5 is through the use of add-ons such as flash. But thanks to html5, you can insert video contents using native html markup alone. The <video> </video> element in html5 offers a standard way to include video files on web pages. It is supported by all html5 compatible browsers.

Currently, HTML5 supports three types of video formats and they are MP4, WebM, and Ogg. Among the three, MP4 is compatible with all major browsers.

html5 video player custom controls javascript

Creating Video Player in HTML5:

To embed video in an html page, use the <video> element like this,

<video width="640" height="360" controls>
    <source src="videos/flying-seagull.mp4" type="video/mp4">
    <source src="videos/flying-seagull.ogg" type="video/ogg">
    Your browser does not support HTML5 Videos.
</video>
  • You can provide multiple video sources using the <source> element. The browser will choose the first supported format.
  • The attributes 'width' and 'height' defines the width and height of the video. Providing these values will prevent possible flicker at the time of loading.
  • The 'controls' attribute adds the default media controls, such as play, pause, volume slider, fullscreen, etc. to the video player.
  • Older versions of browsers doesn't support html5, in which case, the text added between the <video> </video> tags will be displayed.

Autoplay Videos:

The 'autoplay' attribute will start the video automatically. Including it, the video will be played automatically on page load.

<video width="640" height="360" controls autoplay>
    <source src="videos/flying-seagull.mp4" type="video/mp4">
    Your browser does not support HTML5 Videos.
</video>

Building Custom Controls to HTML5 Video Player:

Okay. Now let's build some custom controls to the video player in HTML5. If you wonder why we need custom controls at all when the player itself provide default ones. The primary reason is that the default controls depend entirely on the browser and may vary from one browser to another. Therefore, building a common user interface will make the player look the same across different browsers

HTML5 provides several DOM properties, methods, and events for the <video> element. You can use them to define custom video controls. Below I have created markup for video player with controls to play, pause, replay, stop, volume up/down and mute videos.

HTML Markup:

<div id="container">
    <h1>Custom HTML5 Video Player</h1>
    <div id="player-container">
        <video id="myplayer" width="640" height="360">
            <source src="videos/flying-seagull.mp4" type="video/mp4">
            Your browser does not support HTML5 Video.
        </video>
        <div id="controls">
            <button onclick="playPause()">Play/Pause</button>
            <button onclick="stopVideo()">Stop</button>
            <button onclick="replayVideo()">Replay</button>
            <button onclick="increaseVolume()">Volume (+)</button>
            <button onclick="decreaseVolume()">Volume (-)</button>
            <button onclick="muteVolume()">Mute/Unmute</button>
        </div>
    </div>
</div>

Style the Player with CSS:

Next, add some css styles to make the player look good.

<style type="text/css">
#container {
    margin: 0 auto;
    width: 666px;
    text-align: center;
}

#player-container {
    margin: 0 auto;
    background-color:black;
    padding-top: 10px;
    padding-bottom: 10px;
    border: 3px solid #4CC1BE;
    border-radius: 7px;
}

#controls {
    margin-top: 6px;
}
</style>

The demo uses only simple buttons but, it's up to you to style them with images. Using bootstrap glyphicons or icon fonts like font-awesome is better suited. You can scale them according to your liking.

JavaScript for Custom Controls:

Finally we have to bind the events of the buttons to javascript functions. Below I have added separate js function for each button event.

<script type="text/javascript">
var player = document.getElementById("myplayer");

function playPause() {
    if (player.paused)
        player.play();
    else
        player.pause();
}

function stopVideo() {
    player.pause();
    if (player.currentTime) {
        player.currentTime = 0;
    }
}

function replayVideo() {
    player.currentTime = 0;
      player.play();
}

function increaseVolume() {
    if (player.volume < 1)
        player.volume = parseFloat(player.volume + 0.1).toFixed(1);
}

function decreaseVolume() {
    if (player.volume > 0)
        player.volume = parseFloat(player.volume - 0.1).toFixed(1);
}

function muteVolume() {
    if (player.muted)
        player.muted = false;
    else
        player.muted = true;
}
</script>

That's it. We have everything in place. Now run the file and you can see a nice html5 video player with custom control buttons at the bottom.

html5 video player controls

Please note that, the demo is just the place to start with. You can build a much more enhanced video player using the DOM properties of HTML5 video element.

Read Also:

That explains about building an html5 video player with custom controls. With the help of javascript and some css, you can build a robust video player with an attractive user interface. I hope you like this tutorial. Will meet you in another interesting one. Please don't forget to share this post on your social networks.

Create 3D Pie Charts with JavaScript and Google Charts API

On 11/30/2017 Be the first to comment!

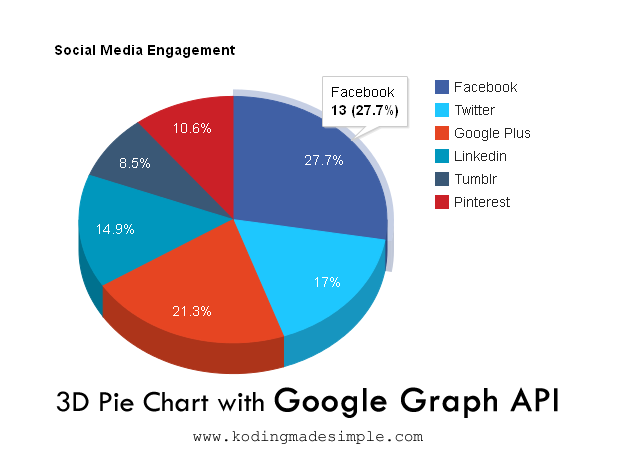
Google Charts API provides you with ready-made charts which you can generate with few lines of java script code. I'll show you here how easy it is to Create 3D Pie Charts with JavaScript and Google Charts API. For this chart tutorial we are going to use Google's Visualization API which is based on pure HTML5/SVH technology, so you don't need extra plug-ins. The pie chart we generate is an interactive chart, which means the user is allowed to interact with them by triggering events like mouse over, clicking, zooming, panning and much more (depends upon the charts we use).

create 3D pie charts with javascript google charts api

This method is relatively simple and does not require any complex server side scripts like PHP or any Databases. Using java script we will make callback to the Google Visualization API with the data set we want to render as a pie chart. The charts will be generated at the time of presentation. So if you want to generate charts from database tables, you can simply make it by querying the data from the DB tables and pass it to the Google API with an AJAX call.

Create 3D Pie Charts with Javascript and Google Charts API

For this Google Charts API example, Let me create a chart showing the user's various social media engagement.

Recommended Read: How to upload files in php securely

First let's include the required Google chart library.

<script type="text/javascript" src="https://www.google.com/jsapi"></script>

Next load the google visualization api with the load() function.

google.load("visualization", "1", {packages:["corechart"]});
  1. The first parameter visualization tells to load the google visualization api.
  2. The second parameter 1 instructs to load the current version of api.
  3. The third parameter {packages:["corechart"]} is an array of visualizations we want to use.

Next we have to set callback to make sure the visualization library is completely loaded.

google.setOnLoadCallback(drawPieChart);

The drawPieChart is the java script function where we'll set up the data and options to be actually rendered as a graph.

function drawPieChart() {
    var data = google.visualization.arrayToDataTable([
        ['Platform','Reach'],
        ['Facebook',13],
        ['Twitter',8],
        ['Google Plus',10],
        ['Linkedin',7],
        ['Tumblr',4],
        ['Pinterest',5]
    ]);

    var options = {
        title: 'Social Media Engagement',
        width: 900,
        height: 500,
        colors: ['#4060A5', '1EC7FE', '#e64522', '#0097BD', '#3a5876', '#cb2027'],
        is3D: true
    };
    var chart = new google.visualization.PieChart(document.getElementById('piechart'));
    chart.draw(data, options);
}

As you can see in the above example, I have set the data table and the options. The options hold the general settings of the chart like the title, the dimensions (width and height) etc. Since I have created a pie chart about various social media reach in the above example, it's only meaningful to set the background colors of those corresponding slices with their brand colors. If it is not set, they will be generated with the default color theme. So I have defined the colors array to generate the chart like I would prefer.

To make the pie chart 3D I have used,

is3D: true

By default this property would be false. You can leave it if you don't want a 3D chart.

Finally used the draw() function to generate the actual graph.

Also in the line,

var chart = new google.visualization.PieChart(document.getElementById('piechart'));

you can see there is a DOM reference to the html element with id piechart which is the actual place holder for our 3D Pie Chart.

<div id="piechart"></div>

Here is the completed code for creating 3d pie charts with javascript and google charts api.

<html>
    <head>
        <title>Create 3D Pie Charts with JavaSript and Google Charts API</title>
        <script type="text/javascript" src="https://www.google.com/jsapi"></script>
        <script type="text/javascript">
        google.load("visualization", "1", {packages:["corechart"]});
        google.setOnLoadCallback(drawPieChart);
        function drawPieChart() {
            var data = google.visualization.arrayToDataTable([
                ['Platform','Reach'],
                ['Facebook',13],
                ['Twitter',8],
                ['Google Plus',10],
                ['Linkedin',7],
                ['Tumblr',4],
                ['Pinterest',5]
            ]);

            var options = {
                title: 'Social Media Engagement',
                width: 900,
                height: 500,
                colors: ['#4060A5', '1EC7FE', '#e64522', '#0097BD', '#3a5876', '#cb2027'],
                is3D: true
            };
            var chart = new google.visualization.PieChart(document.getElementById('piechart'));
            chart.draw(data, options);
        }
        </script>
    </head>
    <body>
        <div id="piechart"></div>
    </body>
</html>

Now run it in the browser and you can see a beautiful 3d pie chart generated.

As I've already said it's an interactive chart, hover the mouse over the pie slices and you can see a nice tooltip appears mentioning the given name and shared percentage of the slice.

Recommended Read: How to get the Status Code from HTTP Response Headers in PHP

Over to you

Do you like this 3D pie charts using java script tutorial? Then what are you waiting for? Go ahead and power up your site's user experience with Google Charts API. Not to mention I would appreciate your kindness to share it your social media circle :)

Delete Data from MySQL with Confirmation Message in PHP OOP

On 11/27/2017 3 Comments so far

Delete is one of the primitive processes performed on database management system. And it’s always a good practice to confirm the delete action of users with a message to avoid accidental clicks and data deletion. In this tutorial we’ll see how to delete row(s) from mysql database with confirmation message in php. Implementing database deletion using procedural style has been discussed a lot but here I want to show you how to achieve it using OOP Method (Object Oriented Programming) in php.

delete-data-from-mysql-with-confirmation-message-in-php

Implementing PHP Delete from MySQL with Confirmation

For better understanding of database deleting task, I go with an example. Consider having user details stored in database. As user interface, we should fetch and display the user records in a neat grid view along with a delete button or link on each row. When the user clicks on the delete button, a message pops up to confirm the delete process. If the user clicks ok, then that particular user record will be deleted and the page refreshes to show up the remaining user records from the database.

Recommended Read: How to do Secure File Upload in PHP

Creating MySQL Database

First we’ll create the database required for the example. Run the below sql statements to create database and required USERS table.

CREATE DATABASE `customers`;
USE `customers`;

CREATE TABLE IF NOT EXISTS `users` (
  `id` int(10) NOT NULL AUTO_INCREMENT,
  `fname` varchar(30) NOT NULL,
  `lname` varchar(30) NOT NULL,
  `email` varchar(60) NOT NULL,
  `city` varchar(50) NOT NULL,
  PRIMARY KEY (`id`)
) ENGINE=MyISAM  DEFAULT CHARSET=latin1 AUTO_INCREMENT=6 ;

INSERT INTO `users` (`id`, `fname`, `lname`, `email`, `city`) VALUES
(1, 'Jim', 'Connor', 'jimconnor@yahoo.com', 'Las Vegas'),
(2, 'Taylor', 'Fox', 'taylorfox@hotmail.com', 'San Francisco'),
(3, 'Julia', 'Brown', 'juliabrown@gmail.com', 'Los Angeles'),
(4, 'Daniel', 'Greyson', 'danielgreyson@hotmail.com', 'New York'),
(5, 'Rose', 'Harris', 'roseharris@gmail.com', 'New York');

Create Class File ‘DeleteClass.class.php’

Next we need to create a php class file where we place all our database transactions. Create a php file ‘DeleteClass.class.php’ and copy paste the below code to it.

<?php
class DeleteClass
{
    // connect to mysql database
    public function __construct($hostname, $username, $password, $database)
    {
        $this->connection = new mysqli($hostname, $username, $password, $database);
        if($this->connection->connect_errno)
            die("Error " . $this->connection->connect_error);
    }
    
    // fetch all the user records from db
    public function select_user()
    {
        $result = $this->connection->query("select * from users");
        return $result->fetch_assoc();
    }
    
    // delete user record for given id
    public function delete_user($id)
    {
        return $this->connection->query("delete from users where id = " . $id);
    }
}
?>

As you can see we have created three methods inside the class,

  • constructor method which establish the connection to mysql database during initialization.
  • select_user() method which fetch and returns all the user records from users table.
  • delete_user($id) method which deletes the user record from mysql with the given id.

Create index.php

Now create another file ‘index.php’ in your working folder and copy paste the below code.

<?php
include_once('DeleteClass.class.php');

// create new object and establish mysql db connection
$con = new DeleteClass('localhost','myusername','mypassword','customers');

// fetch user data
$result = $con->select_user();

// delete user record
if(isset($_GET['id']))
{
    $con->delete_user($_GET['id']);
    header('Location: index.php');
}
?>
<!DOCTYPE html>
<html>
<head>
    <title>PHP Delete MySQL Row with Confirmation Message Example</title>
    <meta content="width=device-width, initial-scale=1.0" name="viewport" >
    <link rel="stylesheet" href="path/to/bootstrap.css" type="text/css" />
    <script type="text/javascript">
    function delete_user(uid)
    {
        if (confirm('Are You Sure to Delete this Record?'))
        {
            window.location.href = 'index.php?id=' + uid;
        }
    }
    </script>
</head>
<body>
<div class="container">
    <div class="row">
        <div class="col-md-8 col-md-offset-2">
            <table class="table table-bordered table-hover">
                <thead>
                    <tr>
                    <th>#</th>
                    <th>First Name</th>
                    <th>Last Name</th>
                    <th>Email ID</th>
                    <th>City</th>
                    <th>Delete</th>
                    </tr>
                </thead>
                <tbody>
                <?php
                $i = 1;
                foreach($result as $row) { ?>
                <tr>
                    <td><?php echo $i++; ?></td>
                    <td><?php echo $row['fname']; ?></td>
                    <td><?php echo $row['lname']; ?></td>
                    <td><?php echo $row['email']; ?></td>
                    <td><?php echo $row['city']; ?></td>
                    <td class="text-center"><a href="javascript: delete_user(<?php echo $row['id']; ?>)"><img src="images/delete_icon.png" alt="Delete" /></a></td>
                </tr>
                <?php } ?>
                </tbody>
            </table>
        </div>
    </div>
</div>
</body>
</html>

First we load the class file we have created earlier with the line include_once('DeleteClass.php'); to callback the methods we have created earlier.

Next we create a new instance (object) of the class with the line,

$con = new DeleteClass('localhost', 'myusername', 'mypassword', 'customers');

The controller function will be invoked when creating new objects and this is where the database connection is established.

Next we fetch the user data by making a callback and store it in an array with this line,

$result = $con->select_user();

Later we loop through the $result array and display its contents in a neat tabular format. To style the html table element we had taken advantage of twitter bootstrap css and used its classes .table .table-bordered .table-hover. Learn more about twitter bootstrap table styles here.

Also there is one javascript function delete_user() which pops up the confirmation message to the users when they click on the delete button, and pass on the id value as an url parameter like this,

window.location.href = 'index.php?id=' + uid;

Then we get the id for the record to delete and make a callback to the delete_user() function like this,

<?php
if(isset($_GET['id']))
{
 $con->delete_user($_GET['id']);
 header('Location: index.php');
}
?>

The statement header('Location: index.php'); will redirect the page to the same url and refreshes the user table list after deletion.

That’s it. Now run the index file and the user details will be displayed in a neat table like this,

delete-row-with-confirmation-php-mysql

When the user clicks on the delete icon (X), the java script function will be invoked and the confirmation message pops up like this,

database-delete-confirmation-message-in php-mysql-javascript

If the user confirms deletion with ok message, then page will be submitted to delete the particular user record from db and once again refresh the table list.

Recommended Read:

And that was all about implementing data deletion process from mysql with confirmation message in PHP.

How to Build a Simple Web Crawler in PHP to GET Links

On 11/26/2017 4 Comments so far

Hi! I’m going to show you how to build a web crawler in php to search all the links from a particular website - and create a downloadable csv file containing those links. Web Crawlers are bots that are used to search for information from websites by scraping their HTML content. These are the same things used by giant search engines like Google, Yahoo and Bing to find and index fresh contents on the web.

Usually these search engines employ their own bots running 24/7 round the clock and search for new contents to update their huge database. This is the reason you are able to Google literally for any sort of queries and get the answer.

simple-php-web-crawler-example

Simple PHP Web Crawler Example

Building a crawler like Big G to scan the whole web will take much time and effort but the underlying concept is same. The simple php web crawler we are going to build will scan for a single webpage and returns its entire links as a csv (comma separated values) file.

You Need Simple HTML DOM Parser Library

In order to crawl a webpage you have to parse through its html content. Though html parsing can be done with good old javascript, using a DOM parser will make our life easier as a developer. So here I’m going to use Simple HTML DOM Parser library. First go to this link and download the library. Extract its contents and move the file ‘simple_html_dom.php’ to your working folder. Now you can use the dom parser by simply including this file in your php crawler script like this.

<?php include_once("simple_html_dom.php"); ?>

Building the Basic Web Crawler in PHP

Before we jump into building the crawler we have to take few things into consideration. The webpage we scrape may contain duplicate links. To avoid repeated links, first we have to stack up all the scraped links in an array and should eliminate duplicated links from the list at the end.

Here is the php script for our basic website crawler.

Crawler.php
<?php
include_once("simple_html_dom.php");

// set target url to crawl
$url = "http://www.example.com/"; // change this

// open the web page
$html = new simple_html_dom();
$html->load_file($url);

// array to store scraped links
$links = array();

// crawl the webpage for links
foreach($html->find("a") as $link){
    array_push($links, $link->href);
}

// remove duplicates from the links array
$links = array_unique($links);

// set output headers to download file
header("Content-Type: text/csv; charset=utf-8");
header("Content-Disposition: attachment; filename=links.csv");

// set file handler to output stream
$output = fopen("php://output", "w");
// output the scraped links
fputcsv($output, $links, "\n");
?>
  • The $url variable contains the target url to scrape. This can be any valid remote url.
  • Also the condition we have used in the foreach statement $html->find("a") will search for any <anchor> links and store the value of href attribute in the $links array.
  • The function array_unique() removes duplicate items in the given array.
  • Also setting the output headers will make the crawler to create a downloadable csv file containing the scraped links from the website.

Done! We have created a basic web crawler in php. Change the $url variable to the target url you want to crawl and run the script in the browser. You will get a csv downloadable file like this,

php-web-crawler-downloadable-csv-file
Read Also:

Likewise you can build a simple php web crawler. This is nothing serious but does the job. If you are serious about developing crawlers I hope this little tutorial has laid out some foundation :)

Check If Internet Connection Exists Or Not Using JavaScript & PHP

On 11/09/2017 Be the first to comment!

Hi! Today let's see how to check if internet connection exists or not using javascript and php. The network connection may fail at times and many web applications require internet connection all the time. Hence, if there is no internet, these apps won't function properly. In such case, checking the status of the network through programming would be useful. There are many ways to do it, but here I'll show you the simplest method of all to detect whether user is online or offline both from client (using javascript) and server side (with PHP).

check if you are connected to internet or not

Check Internet Connection using JavaScript:

JavaScript has a function called navigator.onLine. This browser property can be used to determine if you are connected to the internet. It returns true or false depending on the status of the client's network and says whether the browser is online or offline easily.

Below is the JS function to verify connectivity to the Internet.

JS Function:

<script type="text/javascript">
function chkInternetStatus() {
    if(navigator.onLine) {
        alert("Hurray! You're online!!!");
    } else {
        alert("Oops! You're offline. Please check your network connection...");
    }
}
</script>

Function Usage:

Call the chkInternetStatus() function on button click and it will return the network status.

<button onclick="chkInternetStatus();">Check Internet Connection</button>
detect if browser is online or offline

Using SetInterval Function:

There is an even better method to check internet. You can use the setInterval() function to find the status of the network automatically at a certain time interval. Therefore, as soon as the network gets disconnected, the user will be notified immediately.

<script type="text/javascript">
setInterval(function(){
    var status = navigator.onLine ? 'You are online!' : 'You are offline!';
    console.log(status);
}, 5000);
</script>

Using the above methods you can check internet connection from the client side. Now let's see how to do it on the server side.

Check Online/Offline Status using PHP:

To check the internet connectivity in PHP, you can establish some socket connection and know the network status. If you are able to access specific web resource, it means you are connected to internet and not otherwise.

Here is the php snippet to detect if internet is working or not.

<?php
$host_name = 'www.google.com';
$port_no = '80';

$st = (bool)@fsockopen($host_name, $port_no, $err_no, $err_str, 10);
if ($st) {
    echo 'You are connected to internet.';
} else {
    echo 'Sorry! You are offline.';
}
?>

In the above code, we used a fsockopen() function. This initiates a socket connection to the given host (here it is 'google.com') and returns true if the server is reachable and false if it cannot.

Also Read:

Likewise you can check if the internet connection works or not in javascript and php. When things go wrong just because of net connection, it is better to notify users and let them fix it as soon as possible. This will also help improve the user experience. I hope you like this post. Please don't forget to share it in social networks.

Convert URL Text to Clickable Link using JavaScript

On 11/06/2017 Be the first to comment!

Hi! Today let's see how to convert url text to clickable link using javascript. At times, you may want to turn the plain url text into clickable hyperlink automatically. CMS like Wordpress has this feature integrated by default. Also blog commenting systems such as Disqus use this to convert naked url text posted by users into hyperlinks. This feature is quite useful and allows others to link relevant pages across web easily. If you want to implement this feature on your own, you can do so using regular expressions and java script. Here we go!

Converting Plain URL into Clickable Link

First let's create a form interface with a textarea input and a button. User has to enter a bunch of text and click on 'Convert' button. Then our JS function will detect URLs from the text and replace the plain URLs with clickable links.

index.html

<!doctype html>
<html>
<head>
<title>Convert URL Text into Hyperlink</title>
    <link href="css/bootstrap.min.css" rel="stylesheet" type="text/css" />
</head>
<body>
    <div class="col-xs-8 col-xs-offset-2">
    <h2 class="bg-warning text-center">Convert URL Text to Clickable Link | Demo</h2>
        <form>
            <div class="form-group">
                <textarea id="urltext" placeholder="Please enter url text here..." class="form-control input-lg" rows="5"></textarea>
            </div>
            <div class="form-group">
                <input type="button" value="Convert" class="btn btn-warning btn-block btn-lg" onclick="toHyperlink();" />
            </div>
        </form>
        <div id="result" class="lead"></div>
    </div>
</body>
</html>

Now we get a form like this,

convert url to hyperlink javascript

JavaScript Function

Next we need to write the java script function that takes up the user input, parse, find and replace the text URLs with hyperlinks with the help of regular expression patterns and return the converted text.

<script type="text/javascript">
function toHyperlink()
{
    var str = document.getElementById("urltext").value;
    
    var pattern1 = /(\b(https?|ftp|file):\/\/[-A-Z0-9+&@#\/%?=~_|!:,.;]*[-A-Z0-9+&@#\/%=~_|])/ig;
    var str1 = str.replace(pattern1, "<a href='$1'>$1</a>");
    
    var pattern2 =/(^|[^\/])(www\.[\S]+(\b|$))/gim;
    var str2 = str1.replace(pattern2, '$1<a target="_blank" href="http://$2">$2</a>');
    
    document.getElementById("result").innerHTML = str2;
}
</script>

Add the above script to the index.html file. The function toHyperlink() will do a two-step pattern match. First it will find the links starting with http / https / ftp / file and replace those with hyperlinked texts. Next it looks for urls that start with www and replace those with clickable links.

Now run the file and enter some plain url text in the box provided and click 'Convert'.

Our JS function will do its magic and you will see converted text with clickable links below the form.

javascript url text into clickable link
Also Read:

That was all about converting non-clickable url into hyperlink with java script. Regular expression is a powerful weapon and you must make sure to use it properly. I hope you like this tutorial. Feel free to customize the code according to your preferences. And please don't forget to share it on social networks.

How to Detect and Redirect to Mobile Site using PHP and JavaScript

On 8/02/2017 Be the first to comment!

Hey! In this post, let's see how to detect mobile device and redirect to a mobile site using php (server-side) and javascript (client-side). Since Mobile usage has been exploded these days, every website should be mobile-friendly. Either your site must be responsive or have a separate mobile version.

A mobile website is just the light-weight version of a website specifically designed to view on smaller screens like smartphones and tablets. Usually mobile sites are hosted on sub domains like m.mydomain.com. Popular sites like Gmail, Facebook etc have separate mobile versions and if they are opened on mobile devices, will be redirected respectively.

detect mobile visitors and redirect to mobile site php

How to Detect Mobile Device and Redirect to Mobile Website?

If you have a mobile site, you should redirect mobile visitors to your mobile website. But how do you know if the user accesses the site from a mobile or desktop browser? Well! You can know it through 'user-agent' string. The user-agent string contains information about the browser name, version, operating system etc. We can use these details to determine if the user access site from the mobile or desktop.

Read: Store and Retrieve Image from Database using PHP & MySQL

You can also check for other things like screen size and tell if it is a mobile device or not. You can do this on the client side by using plain old java script. Here is a small snippet to redirect mobile visitors to the mobile site using javascript.

Mobile Site Redirection on Client Side:

Place this script on the landing page of your site and when the visitor access it from the mobile phone, the js code will check the width of the screen and redirect it to the appropriate site.

<script type="text/javascript">
if (screen.width <= 768) {
    window.location = "http://m.yourdomain.com";
}
</script>

The downside of this method is it requires java script. But not all mobile browsers support it or user could disable javascript on the browser. So doing the checking process on the server side with script like php is a much better approach.

Let's see how to do it in php.

Read: How to Lazy Load Images in PHP and JavaScript

Detect and Redirect Mobile Visitors in PHP:

On the server side, you have to use the user agent string to detect the mobile environment and redirect users. Here's the php code to do it.

<?php
$usr_agent=$_SERVER["HTTP_USER_AGENT"];
if(preg_match('/(android|bb\d+|meego).+mobile|avantgo|bada\/|blackberry|blazer|compal|elaine|fennec|hiptop|iemobile|ip(hone|od)|iris|kindle|lge |maemo|midp|mmp|mobile.+firefox|netfront|opera m(ob|in)i|palm( os)?|phone|p(ixi|re)\/|plucker|pocket|psp|series(4|6)0|symbian|treo|up\.(browser|link)|vodafone|wap|windows ce|xda|xiino/i',$usr_agent) || preg_match('/1207|6310|6590|3gso|4thp|50[1-6]i|770s|802s|a wa|abac|ac(er|oo|s\-)|ai(ko|rn)|al(av|ca|co)|amoi|an(ex|ny|yw)|aptu|ar(ch|go)|as(te|us)|attw|au(di|\-m|r |s )|avan|be(ck|ll|nq)|bi(lb|rd)|bl(ac|az)|br(e|v)w|bumb|bw\-(n|u)|c55\/|capi|ccwa|cdm\-|cell|chtm|cldc|cmd\-|co(mp|nd)|craw|da(it|ll|ng)|dbte|dc\-s|devi|dica|dmob|do(c|p)o|ds(12|\-d)|el(49|ai)|em(l2|ul)|er(ic|k0)|esl8|ez([4-7]0|os|wa|ze)|fetc|fly(\-|_)|g1 u|g560|gene|gf\-5|g\-mo|go(\.w|od)|gr(ad|un)|haie|hcit|hd\-(m|p|t)|hei\-|hi(pt|ta)|hp( i|ip)|hs\-c|ht(c(\-| |_|a|g|p|s|t)|tp)|hu(aw|tc)|i\-(20|go|ma)|i230|iac( |\-|\/)|ibro|idea|ig01|ikom|im1k|inno|ipaq|iris|ja(t|v)a|jbro|jemu|jigs|kddi|keji|kgt( |\/)|klon|kpt |kwc\-|kyo(c|k)|le(no|xi)|lg( g|\/(k|l|u)|50|54|\-[a-w])|libw|lynx|m1\-w|m3ga|m50\/|ma(te|ui|xo)|mc(01|21|ca)|m\-cr|me(rc|ri)|mi(o8|oa|ts)|mmef|mo(01|02|bi|de|do|t(\-| |o|v)|zz)|mt(50|p1|v )|mwbp|mywa|n10[0-2]|n20[2-3]|n30(0|2)|n50(0|2|5)|n7(0(0|1)|10)|ne((c|m)\-|on|tf|wf|wg|wt)|nok(6|i)|nzph|o2im|op(ti|wv)|oran|owg1|p800|pan(a|d|t)|pdxg|pg(13|\-([1-8]|c))|phil|pire|pl(ay|uc)|pn\-2|po(ck|rt|se)|prox|psio|pt\-g|qa\-a|qc(07|12|21|32|60|\-[2-7]|i\-)|qtek|r380|r600|raks|rim9|ro(ve|zo)|s55\/|sa(ge|ma|mm|ms|ny|va)|sc(01|h\-|oo|p\-)|sdk\/|se(c(\-|0|1)|47|mc|nd|ri)|sgh\-|shar|sie(\-|m)|sk\-0|sl(45|id)|sm(al|ar|b3|it|t5)|so(ft|ny)|sp(01|h\-|v\-|v )|sy(01|mb)|t2(18|50)|t6(00|10|18)|ta(gt|lk)|tcl\-|tdg\-|tel(i|m)|tim\-|t\-mo|to(pl|sh)|ts(70|m\-|m3|m5)|tx\-9|up(\.b|g1|si)|utst|v400|v750|veri|vi(rg|te)|vk(40|5[0-3]|\-v)|vm40|voda|vulc|vx(52|53|60|61|70|80|81|83|85|98)|w3c(\-| )|webc|whit|wi(g |nc|nw)|wmlb|wonu|x700|yas\-|your|zeto|zte\-/i', substr($usr_agent,0,4))){
    header("Location: http://m.yourdomain.com/");
}
?>

Just place this code at the top of the index/landing page of your website and it will detect and redirect mobile visitors to the appropriate mobile site.

Using Mobile Detect Library:

If you don't want to deal with the long list of user agents by yourself you can use the 'Mobile Detect' library. It is a light-weight php class for detecting mobile devices. It uses a combination of user agent string and http headers to detect the mobile environment.

First download mobile detect class and extract it to the website's root folder. Next you must include the 'Mobile_Detect.php' file in your index file and use the isMobile() function to detect mobile device.

<?php
include_once 'Mobile_Detect.php';
$device = new Mobile_Detect;
 
// check if it is a mobile
if($device->isMobile()){
    header("Location: http://m.yourdomain.com/");
}
?>

The code above checks if the visitor is from a mobile device and redirects to the mobile version of the website.

There is also a separate use case for detecting tablets specifically.

<?php
// check if it is a tablet
if($device->isTablet()){
    // code
}
?>

You can also detect the specific platform like Android or iOS like this.

<?php
include_once 'Mobile_Detect.php';
$mobileos = new Mobile_Detect;

// Check for specific platform
if($mobileos->isiOS()){
    // code
} else if($mobileos->isAndroidOS()){
    // code
} else if($mobileos->isWindowsPhoneOS()){
    // code
}
?>

Keep in mind that mobile detection is a growing platform, as new devices are coming to market every other day. So, make sure you constantly update the script to make it compatible with the latest devices.

Read: Currency Conversion using PHP and Google Finance API

That was all about detecting and redirecting visitors to mobile site using php. The user-agent method relies heavily on HTTP headers to extract device information. Sometimes the results can go wrong as it is easy for someone to tamper the headers. But so far it is better than the rest other methods available. I hope you like this tutorial. Please don't forget to share this post in social platforms.

Select All Div Text On Mouse Click using JavaScript

On 5/01/2017 2 Comments so far

Hi! Let's see how to select all div text on single mouse click using javascript. At times you may let site users to copy block of text or code snippets. In such case users has to click on and drag the mouse to select the entire text. But you can make users to copy complete text with just a single mouse click. Say for example you have a div container with some code snippet. When user clicks anywhere inside div the whole content of the element will be selected. This will drastically improve user experience. And you can achieve it with good old javascript. Here's how to do it.

select all div text on click javascript

Selecting All Div Text on Mouse Click in JavaScript

The method I'm going to show you will not only select text inside div but works with any html element. It can be a paragraph element, textbox or text area.

Read Also

Here's the javascript function to select complete text of a given container.

Create JavaScript Function

<script type="text/javascript">
function selectAllText(id)
{
    if (document.selection)
    {
        var range = document.body.createTextRange();
        range.moveToElementText(document.getElementById(id));
        range.select();
    }
    else if (window.getSelection)
    {
        var range = document.createRange();
        range.selectNode(document.getElementById(id));
        window.getSelection().addRange(range);
    }
}
</script>

Here's how the above javascript function works.

  • The method document.body.createTextRange() will create a text range for the entire document.
  • Next selectNode() will mark the start and end of the text inside the given container.
  • Finally select() method will select the text between the given text range

Function Usage

Create a <div> element and call the function selectAllText() on click event.

<div id="mydiv" onclick="selectAllText(this.id)">Lorem ipsum dolem</div>

Clicking anywhere inside the div will select it's entire text content. This will be very useful to copy paste code snippets or other texts with just a single mouse click.

As I already said you can replace the div container with any other html element. The same function will work for them as well.

If you want to implement something similar with jquery you have to use select() function.

$("#mydiv").focus(function() {
    var $this = $(this);
    $this.select();
});

Likewise you can select all div text with single mouse click in javascript. I hope you find this script useful. Meet you in another interesting tutorial :)

Add/Remove Key Value Pairs (Attributes) from JSON Data using JavaScript

On 4/10/2017 Be the first to comment!

Hi! Let's see how to add and remove key value pairs from json data using javascript. JSON is the string representation of java script object and cross-platform compatible. Using AJAX you can communicate with numerous web services and grab API data in JSON format. Considering the increased popularity of API's, it goes without saying that the ability to read, process and manipulate JSON is a must have skill for developers. In JSON, data is stored as key - value pairs and wrapped within quotes since it's a string. Sometimes the key-value pairs are also referred to as attributes, items or elements. Here I'm going to show you how to append or remove key value pairs from existing json data.

add remove key value pair from json javascript

JSON Attributes - Key Value Pairs:

JSON attributes are represented as key value pairs something similar to associative arrays. The key-value pairs look something like this,

{ "name": "Barbie" }

Here "name" is the key and "Barbie" is the value of that key.

Also Read:

Plus JSON comes in all sorts of representation - simple, nested or arrays. The simple format contains a set of attributes like this.

{
    "fruit": "apple",
    "color": "red"
}

And as for array of items it will look like this,

[
    {
        "name": "Fredie",
        "department": "Finance"
    },
    {
        "name": "Rolland",
        "department": "Sales"
    },
    {
        "name": "Gina",
        "department": "Customer Service"
    }
]

At times json data can be complicated with nested attributes.

{
    "empid": "ABC001X",
    "personal": {
        "name": "Paula Thompson",
        "gender": "Female",
        "age": "34",
        "address": {
            "streetaddress": "12 117th Street",
            "city": "New York",
            "state": "NY",
            "zipcode": "10038"
        }
    },
    "official": {
        "designation": "Vice President",
        "department": "Operations"
    }
}

However it is you can manipulate json easily with native java script. The same can be handled with jquery but unless necessary just the plain old javascript will do. By this way you can reduce server load.

Add Key Value Pair to JSON with JavaScript:

Adding key value pair to json will append the new attribute to the end of the json string. Following is the simplest way to add attributes to existing json data.

var data = {
    "id": "XYZ123",
    "name": "Greg",
    "gender": "Male"
};

data.country = "United States";
console.log(JSON.stringify(data));

// Produce Output
{
    "id":"XYZ123",
    "name":"Greg",
    "gender":"Male",
    "country":"United States"
}

If json has array of items, then you can add key value pairs to each subset like this,

var data = [
    {
        "name": "John Smith",
        "age": "45"
    },
    {
        "name": "Peter Jason",
        "age": "26"
    },
    {
        "name": "Alice Ray",
        "age": "34"
    }
];

for (var i=0; i<data.length; i++) {
    data[i].department = "Administration";
    data[i].company = "ABC Corp";
}
console.log(JSON.stringify(data));

// Produce Output
var data = [
    {
        "name":"John Smith",
        "age":"45",
        "department":"Administration",
        "company":"ABC Corp"
    },
    {
        "name":"Peter Jason",
        "age":"26",
        "department":"Administration",
        "company":"ABC Corp"
    },
    {
        "name":"Alice Ray",
        "age":"34",
        "department":"Administration",
        "company":"ABC Corp"
    }
];

You have to loop through the array of items and add attributes to each one of it.

Remove Key Value Pair from JSON:

Let's say you have the following JSON data,

var data = {
    "id":"XYZ123",
    "name":"Greg",
    "gender":"Male",
    "country":"United States"
};

In order to remove an attribute from json you have to use JS delete method. This will delete the json attribute with the specific key.

delete data.gender;
console.log(JSON.stringify(data));

// Produce Output
{
    "id":"XYZ123",
    "name":"Greg",
    "country":"United States"
}

Likewise you can remove the occurrence of particular attribute from json array.

var data = [
    {
        "name":"John Smith",
        "age":"45",
        "department":"Administration",
        "company":"ABC Corp"
    },
    {
        "name":"Peter Jason",
        "age":"26",
        "department":"Administration",
        "company":"ABC Corp"
    },
    {
        "name":"Alice Ray",
        "age":"34",
        "department":"Administration",
        "company":"ABC Corp"
    }
];

for (var i=0; i<data.length; i++) {
    delete data[i].age;
}
console.log(JSON.stringify(data));

// Produce Output
[
    {
        "name":"John Smith",
        "department":"Administration",
        "company":"ABC Corp"
    },
    {
        "name":"Peter Jason",
        "department":"Administration",
        "company":"ABC Corp"
    },
    {
        "name":"Alice Ray",
        "department":"Administration",
        "company":"ABC Corp"
    }
]

That explains about add and remove key value pairs in json using javascript. Please note that the json you use should be of valid one for the above methods to work. I hope you find this tutorial useful. Meet you in another interesting one.

Lazy Load Images using PHP and JavaScript

On 1/23/2017 Be the first to comment!

Hi! In today's post let's see how to lazy load images using php and javascript. Lazy loading technique has been used by several websites these days especially sites with high graphics content. It just delays the loading process of web page images until the user move on to that specific area of the page. If you have too many images on a page, it takes more time to load. Depending on the graphics size this may take from few to several seconds. Not to say site visitors don't like to be kept waiting and may exit the site without visiting.

Studies show blogs and websites with lesser loading time gets more traffic from search engines. E-commerce sites and gallery pages are the usual victims of longer page loading as they contain so many images. For them lazy loading the images will surely help.

When a visitor lands on a page, lazy loading will only load images that are present in the viewport at start. Rest of the images will start appearing when user scrolls down the page. Let's see how to implement this lazy loading image technique in php and plain JavaScript.

lazy-load-images-php-javascript

How to Lazy Load Images using PHP & JavaScript?

A while back I have shared a tutorial on KMS about creating dynamic image gallery in php. It will load gallery images dynamically from a given folder with the help of php code. I'm going use the same example here and show you how to add lazy loading technique to it.

Let's be clear about one thing. We don't need bloated jquery library here. Just good-old java script is enough. To simplify the process I'm going to use Blazy JavaScript Library which is written completely in javascript.

Blazy is light-weight and less than 1.2KB minified and gzipped. It lets you lazy load and multi-serve images without dwelling into the technical stuff. Follow the below steps to implement lazy loading using b-lazy.

Step 1: First and foremost download the latest blazy javascript library and move the minified js file to your application root.

Step 2: Then create a php file 'gallery.php' and add this basic html markup to it.

<!DOCTYPE html>
<html>
<head>
    <title>Lazy Load Images using PHP & Javascript</title>
    <meta name="viewport" content="width=device-width, initial-scale=1.0">
</head>
<body>
</body>
</html>

Step 3: Next load the blazy Java Script library at the end of the markup.

<script src="js/blazy.min.js" type="text/javascript"></script>

Step 4: Then you have to add a little php script to load the gallery images one by one from a folder.

<?php
$path = "images/"; // set folder path

// count no. of images in folder
$cnt = count(glob($path . "*.{jpg,jpeg}", GLOB_BRACE));

if ($cnt > 0) {
    $fp = opendir($path);
    while ($image = readdir($fp)) {
        $ext = pathinfo($image, PATHINFO_EXTENSION);
        $allowed_ext = ['jpg', 'jpeg'];
        if (in_array($ext, $allowed_ext)) {
            $image_path = $path . $image; ?>
            <img class="b-lazy" src="data:image/gif;base64,R0lGODlhAQABAAAAACH5BAEKAAEALAAAAAABAAEAAAICTAEAOw==" data-src="<?php echo $image_path; ?>" alt="<?php echo $image; ?>" />
        <? }
    }
    closedir($fp);
} else {
    echo "Sorry! No images available in gallery!";
}
?>

Since we have to lazy load images, you should not add the real image source directly to src attribute. Instead you must add it to data-src attribute and add a place holder image to 'src'. As for the place holder image, adding base64 encoded transparent gif will reduce any additional requests to server.

Finally you have to add .b-lazy css selector to <img> tag.

Step 5: Now you have to initialize the 'blazy' library like this.

<script type="text/javascript">
    ;(function() {
        var bLazy = new Blazy();
    })();
</script>

Step 6: This is the final step but optional. Here I would like to add some nice transition effects to lazy loaded images. Blazy doesn't support animations by itself but it doesn't mean you cannot add some css styles to it.

<style type="text/css">
    .b-lazy {
       transform: scale(3);
       transition: all 500ms;
       opacity:0;
    }
    .b-loaded {
       transform: scale(1);
       opacity:1;
    }
</style>

Done! Now you have everything in place and successfully implemented lazy loading images in php & javascript.

Here's the Complete Script for Gallery.php:

<!DOCTYPE html>
<html>
<head>
    <title>Lazy Load Images using PHP & Javascript</title>
    <meta name="viewport" content="width=device-width, initial-scale=1.0">
    <style type="text/css">
    .b-lazy {
       transform: scale(3);
       transition: all 500ms;
       opacity:0;
    }
    .b-loaded {
       transform: scale(1);
       opacity:1;
    }
    </style>
</head>
<body>
    <?php
    // set folder path
    $path = "images/";

    // count no. of images in dir
    $cnt = count(glob($path . "*.{jpg,jpeg}", GLOB_BRACE));

    if ($cnt > 0) {
        $fp = opendir($path);
        while ($image = readdir($fp)) {
            $ext = pathinfo($image, PATHINFO_EXTENSION);
            $allowed_ext = ['jpg', 'jpeg'];
            if (in_array($ext, $allowed_ext)) {
                $image_path = $path . $image; ?>
                <img class="b-lazy" src="data:image/gif;base64,R0lGODlhAQABAAAAACH5BAEKAAEALAAAAAABAAEAAAICTAEAOw==" data-src="<?php echo $image_path; ?>" alt="<?php echo $image; ?>" />
            <? }
        }
        closedir($fp);
    } else {
        echo "Sorry! No images available in gallery!";
    }
    ?>

    <script src="js/blazy.min.js" type="text/javascript"></script>
    <script type="text/javascript">
        ;(function() {
            var bLazy = new Blazy();
        })();
    </script>
</body>
</html>

Lazy loading technique is fairly popular and not limited to images but to any html entity.

What are the Pros of using Lazy Loading?

  1. It improves page loading speed since it only loads images within the user viewport.
  2. Greatly improve user experience by reducing the waiting time to finish loading the entire page content.
  3. Search engines like Google give more importance to page speed these days. So if your website or blog depends on organic traffic then lazy loading would be a boon.
  4. Finally Blazy library is written on pure java script and doesn't need jquery. So no additional baggage on server.

Even though lazy loading has several advantages, the concept is still debatable and has gotten negative press among many developers.

So should you lazy load images in websites? Definitely high graphics pages would benefit by using this technique. In my opinion it's more of a convenience than requirement.

So that's all for lazy loading images in php and javascript. The technique will be suitable for pages with numerous images like gallery or home page. I hope you like this tutorial. Please share your thoughts through comments.

Contact Form

Name

Email *

Message *