Showing posts with label MySQL. Show all posts

How to Change Apache and MySQL Port Number in XAMPP Localhost

On 5/18/2018 Be the first to comment!

Hi! I'm going to show you how to change the apache and mysql port number in xampp localhost. In case you wonder why you should change the port number of a web server, here is the answer. It's not unlikely for you to run multiple PHP versions on a same machine or to run IIS or JBoss simultaneously with Apache.

When you start a web server, it occupies the default HTTP port '80'. If you try to run the second one, it will fail since the port is already occupied. So unless you change the port for the latter, you can't run more than one web server at once. Below we will see the ways to change the port no. for apache and mysql.

xampp change apache port number localhost

To Change Apache Port Number:

Stop Apache server and exit XAMPP control panel if it is already running.

First you must change the HTTP port.

Go to [path-to-xampp-folder]/apache/conf folder and open http.conf file.

The default port for Apache is '80'. Unless you have changed it, this is the port number you must replace.

Now look for the line,

Listen 80

And then change the port no. to some unused port like this,

Listen 8012

Then search for the line,

ServerName localhost:80

And replace '80' with the new port no like this,

ServerName localhost:8012

Save the file.

Next you must change the SSL port.

Open [path-to-xampp-folder]/apache/conf/extra/httpd-ssl.conf file and search for the lines,

Listen 443
<VirtualHost _default_:443>
ServerName localhost:433

Replace '443' port with something else,

Listen 444
<VirtualHost _default_:444>
ServerName localhost:444

Save the file.

Done! Now restart Apache and access the url http://localhost:8012 on browser. If everything goes fine, you will see the xampp home page.

Please remember to use the port number along with local host to access it. This is not required when you leave apache to run on the default port itself.

To Change MySQL Port:

Just like Apache, you can also change the default port used by MySQL Server which is '3306'.

To do this, go to [path-to-xampp-folder]/mysql/bin/ and open the file my.ini.

Locate the line containing '3306' no. and change it to '3310' or something else and save. Please make sure the new port number is not used by any other service.

You can use 'Netstat' to check all used ports on your system.

That's it. You have successfully changed the default port numbers of apache and mysql server on xampp server. The same procedure can be applied for 'WAMP' and 'LAMP' stacks. For LAMP, you can locate the files on 'usr/bin/apache' directory.

Read Also:

How to Import CSV File into MySQL with LOAD DATA INFILE

On 4/18/2018 Be the first to comment!

I tried to import a csv file into mysql with php script. It is a simple solution if you have a small set of data to import. But if you have hundreds of thousands of records, don't even think about it. You need something different to read through a large dataset quickly. MySQL's LOAD DATA INFILE command works like a charm and can be executed from the command line.

Using LOAD DATA INFILE allows you to load csv or any other delimited data file to the mysql table with a single command. It comes with several options and we will see below what they are and how to use them to import the csv data set into the mysql table.

Using LOAD DATA INFILE Command:

The LOAD DATA INFILE command in mysql loads data from a file into the table at high speed. The file path specified must be absolute or relative.

1. Importing CSV File into MySQL:

Let's say we have a mysql table 'customers' with the following structure.

MySQL Table: Customers
CREATE TABLE `customers`(
    `id` INT(8) NOT NULL ,
    `name` VARCHAR(30) NOT NULL ,
    `email` VARCHAR(40) NOT NULL ,
    `location` VARCHAR(25) NOT NULL ,
    PRIMARY KEY (`id`)
);

And a csv file customers.csv with data that we want to insert into the 'customers' table.

CSV File: Customers.csv
csv file to import into mysql

Now to import the csv data into the table, use the following sql statement.

LOAD DATA INFILE 'c:/tmp/customers.csv'
INTO TABL    E customers
FIELDS TERMINATED BY ','
OPTIONALLY ENCLOSED BY '"'
LINES TERMINATED BY '\r\n'
IGNORE 1 LINES;

Executing the above sql will import records to the given 'customers' table.

customers mysql table after running load data infile command

Our csv file has a column header as the first row, so we used the option IGNORE 1 LINES which will skip the first row. If you don't have the column header, don't use it.

Also make sure the file path is correct. You can use the format 'c:/tmp/customers.csv' or 'c:\\tmp\\customers.csv'.

This method will only work when your mysql table has the same sequence of columns as of the csv file.

2. Importing File with Different Column Sequence from Table:

Consider the scenario where your table and csv file column sequence are different. In this case, you must explicitly specify the order of the column name to ensure that the data is imported correctly.

LOAD DATA INFILE 'c:/tmp/customers.csv'
INTO TABLE tbl_customers
FIELDS TERMINATED BY ','
OPTIONALLY ENCLOSED BY '"'
LINES TERMINATED BY '\r\n'
IGNORE 1 LINES
(id,name,email,location);

3. Importing Data to Remote MySQL Database Server:

If you have your file on the local machine and not on the server, use the word LOCAL. This will import file from the client (local system) to a remote mysql database server.

LOAD DATA LOCAL INFILE 'c:/tmp/customers.csv'
INTO TABLE tbl_customers
FIELDS TERMINATED BY ','
OPTIONALLY ENCLOSED BY '"'
LINES TERMINATED BY '\r\n'
IGNORE 1 LINES
(id,name,email,location);

When you include the LOCAL option, the file is expected to be located on the client and not on the server.

You can also use the mysqlimport utility to load csv data into the database. It's very similar to LOAD DATA INFILE, except that mysqlimport supports multiple file loading and the latter does not.

Read Also:

If you have a large dataset to import, go for the LOAD DATA INFILE command, as it is extremely faster than doing it with any other script. I hope this tutorial is useful to you. Please share it on social media if you like it.

Dynamic Treeview Menu using PHP, MySQL and AJAX Example

On 3/26/2018 Be the first to comment!

How to Create Dynamic Treeview Menu using PHP, MySQL and AJAX? Most modern websites use tree view to display the dynamic sidebar menu for easy navigation. In case you don't know, a Treeview is a hierarchical representation of elements in a tree-like structure. You can go for jquery solution in this context, but I would recommend 'Bootstrap Treeview' plug-in if you use the bootstrap framework to build your websites.

The plug-in uses JSON dataset to create a hierarchical tree structure. I have already discussed the creation of static treeview menu using bootstrap treeview. But you can also generate a dynamic tree where you pull off the data elements stored in the database. In this tutorial I'm going to show you about creating dynamic treeview using php, mysql, ajax and bootstrap.

bootstrap dynamic treeview example

How to Create Dymanic Treeview in PHP & MySQL?

For the demo, I'm going to load all the required libraries via CDN. So there's no need to download them to your web server.

Here are the simple steps to build a dynamic tree view structure.

STEP-1) First create the mysql database required for the example. I would suggest you follow the same schema given below to maintain the hierarchy structure.

CREATE DATABASE `my_demo`;
USE `my_demo`;

CREATE TABLE `tbl_categories` (
  `id` int(10) NOT NULL AUTO_INCREMENT,
  `item_name` varchar(50) NOT NULL,
  `parent_id` int(10) NOT NULL,
  PRIMARY KEY (`id`)
) ENGINE=MyISAM DEFAULT CHARSET=latin1 AUTO_INCREMENT=18;

INSERT INTO `tbl_categories` (`id`, `item_name`, `parent_id`) VALUES
(1, 'Electronics', 0),
(2, 'Televisions', 1),
(3, 'Tube', 2),
(4, 'LCD', 2),
(5, 'Plasma', 2),
(6, 'Computers and Laptops', 1),
(7, 'Desktops', 6),
(8, 'Laptops', 6),
(9, 'Netbooks', 6),
(10, 'Tablets', 6),
(11, 'Android', 10),
(12, 'iPad', 10),
(13, 'Mobile Phones', 1),
(14, 'Basic Cell Phones', 13),
(15, 'Smartphones', 13),
(16, 'Android Phones', 15),
(17, 'iPhone', 15);

STEP-2) Next create a php script to be executed by ajax call. This will fetch the menu data from the 'tbl_categories' table, create hierarchical tree structure and return it as JSON data.

fetch_categories.php

<?php
$db = mysqli_connect('localhost', 'mysql_username', 'mysql_password', 'my_demo');
$sql = 'select id, item_name as name, item_name as text, parent_id from tbl_categories';
$result = mysqli_query($db, $sql);

$tree_data = mysqli_fetch_all($result, MYSQLI_ASSOC);

foreach($tree_data as $k => &$v){
    $tmp_data[$v['id']] = &$v;
}

foreach($tree_data as $k => &$v){
    if($v['parent_id'] && isset($tmp_data[$v['parent_id']])){
        $tmp_data[$v['parent_id']]['nodes'][] = &$v;
    }
}

foreach($tree_data as $k => &$v){
    if($v['parent_id'] && isset($tmp_data[$v['parent_id']])){
        unset($tree_data[$k]);
    }
}

echo json_encode($tree_data);
?>

STEP-3) Finally, create an HTML file and add placeholder to show the tree view. Here you have to load all the required libraries such as bootstrap, jquery and bootstrap treeview libraries.

index.html

<!DOCTYPE html>
<html>
<head>
    <title>PHP and MySQl Dynamic Treeview Example</title>
    <link href="https://maxcdn.bootstrapcdn.com/bootstrap/3.3.0/css/bootstrap.min.css" rel="stylesheet" type="text/css" />
    <link href="https://cdnjs.cloudflare.com/ajax/libs/bootstrap-treeview/1.2.0/bootstrap-treeview.min.css" rel="stylesheet" type="text/css" />
</head>

<body>
    <div class="container">
        <div class="row">
            <div class="col-sm-4">
            <h3 class="text-center bg-primary">Dynamic Treeview Example</h3>
                <div id="myTree"></div>
            </div>

            <div class="col-sm-8">
                <!-- here goes other page contents -->
            </div>
        </div>
    </div>
    <script src="https://code.jquery.com/jquery-2.1.1.min.js" type="text/javascript"></script>
    <script src="https://cdnjs.cloudflare.com/ajax/libs/bootstrap-treeview/1.2.0/bootstrap-treeview.min.js" type="text/javascript"></script>
    
    <script type="text/javascript">
    $(document).ready(function(){
        $.ajax({
            url: 'fetch_categories.php',
            method: 'GET',
            dataType: 'json',
            success: function(data){
                $('#myTree').treeview({data: data});
            }
        });
    });
    </script>
</body>
</html>

In the success function of the ajax() call, we have invoked the treeview() method of the 'bootstrap-treeview' library to display the tree structure on the corresponding placeholder.

When you run 'index.html' a tree menu similar to this one will appear,

ajax dynamic treeview php mysql example
Read Also:

Similarly, you can create treeview dynamically using php, mysql and ajax. You can also add icons, check boxes and filters to the nodes of the tree menu. Check the documentation to learn more about it. I hope this tutorial is useful for you. Please share it on social media if you like it.

How to Find the Second Highest Salary with MySQL Query

On 3/01/2018 Be the first to comment!

Hi! Today's post is about a popular interview question, which is the sql query to find the second highest salary. Most freshers would have faced this question in their interviews. There is not one single solution for this. You can approach in different ways to get the second maximum salary from the database. Here I'm going to show you some of the best possible ways you can write the sql query to fetch the salary that is second highest.

I've tried these queries on MySQL but it also works with other relational databases such as MSSQL Server, Oracle etc., that uses SQL.

sql query find second highest salary

Finding the Second Highest Salary:

Consider the following table. It consists of a set of employee records and we are going to use in our queries to get salary that is second largest.

Table Name: Employees

ID Name Designation Salary
1 Colleen Hurst Regional Director 205500
2 Garrett Winters Accountant 170750
3 Quinn Flynn Support Lead 342000
4 Jena Gaines Software Engineer 133600
5 Brielle William Regional Director 372000

1. Using Subquery:

Here is the simple query to find the highest salary from the above 'Employees' table. It uses the max() aggregate function to return the maximum value of a field (or expression).

SELECT MAX(Salary) FROM Employees

// output: 372000

Simply nesting this query will give you the second highest salary. It excludes the maximum salary from the table using subquery and fetches the maximum salary again.

SELECT MAX(Salary) FROM Employees WHERE Salary NOT IN (SELECT MAX(Salary) FROM Employees)

// output: 342000

Below is the slightly different version of this sub query and it uses < (less than) operator instead of NOT IN

SELECT MAX(Salary) FROM Employees WHERE Salary < (SELECT MAX(Salary) FROM Employees)

// output: 342000

2. Using Limit Clause:

To find the second highest salary without sub-query, you can use use LIMIT and ORDER BY clause.

SELECT Salary FROM Employees ORDER BY Salary DESC LIMIT 1,1

// Output: 342000

The query will simply sort the salary field in descending order and fetch the second row (2nd largest) from the result set. If you have duplicate values in salary column, then use DISTINCT to select only unique values.

You can generalize the limit query to find out the n-th highest salary like this,

SELECT DISTINCT(Salary) FROM Employees ORDER BY Salary DESC LIMIT (n-1),1

3. With Self Join:

Another interesting way to write the query is to use self join. It takes up the cross-product of the table with itself, exclude the highest salary from the lot and then get the maximum salary from the remaining rows - which gives you the second-maximum.

Select MAX(Emp1.Salary) FROM Employees Emp1, Employees Emp2 WHERE Emp1.Salary < Emp2.Salary

// output: 342000
Read Also:

Those are some of the popular ways to find the second maximum salary. Not only for salary, but the concept can be generalized to find age or other similar fields. I hope this tutorial is useful to you. Please share this post on social media if you like it.

How to Export MySQL Table to JSON File in CodeIgniter

On 1/25/2018 Be the first to comment!

Hi! In this tutorial, we will see how to export mysql table to json file in codeigniter. Data portability has become more important than ever and a necessary requirement for modern applications. Almost all web services uses JSON format to migrate data from one location to another. So, as a Web Developer, you must know to handle json and various types of applications like Web, Mobile etc.

Exporting mysql into json allows you to easily port data to different platforms. The whole process is quite simple. Just fetch the data from mysql database, covert the query result to json and then write it in a file.

codeigniter export mysql table to json file

CodeIgniter - Export MySQL Table to JSON File:

Let's create a demo for exporting the database as json. The steps are easy to follow and we possibly need two files, a model and a controller.

Step-1) Create Database

We need a dummy database to use in the example, a database, a table and some sample records.

Run the below sql file in the mysql environment and create them.

CREATE DATABASE `my_demo`;
USE `my_demo`;

CREATE TABLE IF NOT EXISTS `users` (
  `id` int(10) NOT NULL AUTO_INCREMENT,
  `fname` varchar(30) NOT NULL,
  `lname` varchar(30) NOT NULL,
  `email` varchar(60) NOT NULL,
  `city` varchar(50) NOT NULL,
  PRIMARY KEY (`id`)
) ENGINE=MyISAM  DEFAULT CHARSET=latin1 AUTO_INCREMENT=6;

INSERT INTO `users` (`id`, `fname`, `lname`, `email`, `city`) VALUES
(1, 'Jim', 'Connor', 'jimconnor@yahoo.com', 'Las Vegas'),
(2, 'Taylor', 'Fox', 'taylorfox@hotmail.com', 'San Francisco'),
(3, 'Daniel', 'Greyson', 'danielgreyson@hotmail.com', 'New York'),
(4, 'Julia', 'Brown', 'juliabrown@gmail.com', 'Los Angeles'),
(5, 'Rose', 'Harris', 'roseharris@gmail.com', 'New York');

Step-2) Create Model

In this step, create a model file in the 'application/models' folder. This will fetch data from the 'users' table, encode and return it as json to the controller.

UserModel.php

<?php
class UserModel extends CI_Model
{
    function __construct()
    {
        parent::__construct();
    }
    
    function toJSON()
    {
          $query = $this->db->get('users');
          return json_encode($query->result(), JSON_PRETTY_PRINT);
    }
}
?>

Step-3) Create Controller

Finally, create a controller file in the 'application/controllers' folder. This will communicate with the model, retrieve the json data and write in into a file.

UserController.php

<?php
class UserController extends CI_Controller
{
    public function __construct()
    {
        parent::__construct();
        $this->load->helper('file');
        $this->load->database();
    }
    
    public function index()
    {
        $this->load->model('UserModel');
        $result = $this->UserModel->toJSON();
        if(write_file('user_data.json', $result))
             echo 'Successfully exported to json file!';
        else
             echo 'Error exporting mysql data...';
    }
}
?>

Now we have all the required files in place. Run the controller, this will export the mysql data to a json file and show you a success message if all goes well.

You can check for the file 'user_data.json' inside the root directory. This is the exported file I received.

user_data.json

[
    {
        "id": "1",
        "fname": "Jim",
        "lname": "Connor",
        "email": "jimconnor@yahoo.com",
        "city": "Las Vegas"
    },
    {
        "id": "2",
        "fname": "Taylor",
        "lname": "Fox",
        "email": "taylorfox@hotmail.com",
        "city": "San Francisco"
    },
    {
        "id": "3",
        "fname": "Daniel",
        "lname": "Greyson",
        "email": "danielgreyson@hotmail.com",
        "city": "New York"
    },
    {
        "id": "4",
        "fname": "Julia",
        "lname": "Brown",
        "email": "juliabrown@gmail.com",
        "city": "Los Angeles"
    },
    {
        "id": "5",
        "fname": "Rose",
        "lname": "Harris",
        "email": "roseharris@gmail.com",
        "city": "New York"
    }
]
Read Also:

Likewise you can export the mysql table to the json file using codeigniter. The entire process is same as what you do with core php, but some may find it difficult to shift the code to fit with mvc pattern. And I hope this tutorial has clarified it. Please don't forget to share the post in social media if you like it.

jQuery Datatables with PHP, MySQL and AJAX Example

On 12/25/2017 2 Comments so far

Hi! In this tutorial let's look at the server-side processing of jquery datatables using php, mysql and ajax. In case you don't know, Datatables is an amazing jquery plugin that converts the simple html table into a feature-rich data grid with additional functions like instant search, pagination, multi-column sorting etc. The table works with multiple data sources like DOM, AJAX etc., and supports both client and server side processing. We have already seen about datatables with json data and here we will see about server side processing.

For the server script, we are going to use PHP and MySQL as a data source.

jQuery Datatables Server-side Processing with PHP and MySQL:

Let's see how to fetch records from the server-side using ajax request and list it in the data tables. To use in this example, we need a dummy database. So let's create it first.

Step 1) Create MySQL Database

The following sql will create a mysql database, a table and some sample records in it. Run this script on phpmyadmin to create the database.

CREATE DATABASE `my_demo`;
USE `my_demo`;

CREATE TABLE `customers` (
  `id` int(8) NOT NULL AUTO_INCREMENT,
  `name` varchar(50) NOT NULL,
  `email` varchar(60) NOT NULL,
  PRIMARY KEY (`id`)
) ENGINE=MyISAM  DEFAULT CHARSET=latin1 AUTO_INCREMENT=14 ;

INSERT INTO `customers` (`id`, `name`, `email`) VALUES
(1, 'Jim Connor', 'jimconnor@yahoo.com'),
(2, 'Mark Higgins', 'mark.higgins21@yahoo.com'),
(3, 'Austin Joseph', 'austin.joseph.boston@gmail.com'),
(4, 'Sean Kennedy', 'seankennedy01@gmail.com'),
(5, 'Rose Harris', 'roseharris@gmail.com'),
(6, 'Lilly Whites', 'lillywhites@outlook.com'),
(7, 'Jennifer Winters', 'jennie.winters001@gmail.com'),
(8, 'Michael Bruce', 'michaelbruce78@yahoo.com'),
(9, 'John Alex', 'johnalex@example.com'),
(10, 'Demi Milan', 'demimilan@gmail.com'),
(11, 'Austin Joseph', 'austin.joseph.boston@gmail.com'),
(12, 'Mark Higgins', 'mark.higgins21@yahoo.com'),
(13, 'Sean Kennedy', 'seankennedy.boss@outlook.com');

Step 2) Load the Required CSS and JS Libraries

Next load the CSS and JS files of the datatables plug-in. And you must also include the 'jquery.js' before loading 'jquery.datatables.js' since it is dependent on jquery.

<link rel="stylesheet" type="text/css" href="//cdn.datatables.net/1.10.12/css/jquery.dataTables.css">
<script src="https://ajax.googleapis.com/ajax/libs/jquery/2.1.3/jquery.min.js" type="text/javascript"></script>
<script src="//cdn.datatables.net/1.10.12/js/jquery.dataTables.js" charset="utf8" type="text/javascript"></script>
Please note that I have loaded the datatables files from the cdn but you can download and use it from your own server though.

Step 3) Create HTML Table

Then create html markup for the table. This will act as a placeholder for data table. Just add the appropriate column headers for the table.

<table id="customersTable" class="display" width="100%" cellspacing="0">
    <thead>
        <tr>
            <th>ID</th>
            <th>Name</th>
            <th>Email</th>
        </tr>
    </thead>
</table>

Step 4) AJAX Call

Next, make ajax request to the php script to get the data from the server-side. You must also map the table columns with the fields in the database to populate the html table.

$(document).ready(function() {
    $('#customersTable').dataTable({
        "processing": true,
        "ajax": "fetch_data.php",
        "columns": [
            {data: 'id'},
            {data: 'name'},
            {data: 'email'}
        ]
    });
});
The method dataTable() will initialize the datatables and comes with various options. By setting different parameters we can control the way it behaves.

Complete index.html File

<!DOCTYPE html>
<html>
<head>
    <title>Datatables Example using PHP and MySQL</title>
    <link rel="stylesheet" type="text/css" href="//cdn.datatables.net/1.10.12/css/jquery.dataTables.css">
</head>
<body>
    <h2 style="text-align:center;">Datatables Server-Side Example</h2>
    <table id="customersTable" class="display" width="100%" cellspacing="0">
        <thead>
            <tr>
                <th>ID</th>
                <th>Name</th>
                <th>Email</th>
            </tr>
        </thead>
    </table>
    
    <script src="https://ajax.googleapis.com/ajax/libs/jquery/2.1.3/jquery.min.js" type="text/javascript"></script>
    <script src="//cdn.datatables.net/1.10.12/js/jquery.dataTables.js" charset="utf8" type="text/javascript"></script>

    <script type="text/javascript">
    $(document).ready(function() {
        $('#customersTable').dataTable({
            "processing": true,
            "ajax": "fetch_data.php",
            "columns": [
                {data: 'id'},
                {data: 'name'},
                {data: 'email'}
            ]
        });
    });
    </script>
</body>
</html>

Step 5) Fetch Records from Database and Return as JSON

Finally the server script. This will communicate with the backend mysql database, retrieve records, encode it to json along with other necessary values and send it back to the front-end.

fetch_records.php

<?php
// db settings
$hostname = 'localhost';
$username = 'root';
$password = '';
$database = 'my_demo';

// db connection
$con = mysqli_connect($hostname, $username, $password, $database) or die("Error " . mysqli_error($con));

// fetch records
$sql = "select id, name, email from customers";
$result = mysqli_query($con, $sql);

while($row = mysqli_fetch_assoc($result)) {
    $array[] = $row;
}

$dataset = array(
    "echo" => 1,
    "totalrecords" => count($array),
    "totaldisplayrecords" => count($array),
    "data" => $array
);

echo json_encode($dataset);
?>

We have all the code in place. Now run the index.html and you can see data grid like this,

jquery datatables php mysql ajax

You can filter the records using the instant search box at the top this way,

jquery datatables server side processing php
Read Also:

That explains about displaying jquery datatables with database records using php and mysql. Although datatables works fairly well with client data sources such as json, JS Array etc., when you want to work with a huge data-set, going with server side processing is the best route. I hope this tutorial is useful for you. Please, share it in your social circle if you like it.

Connect to Multiple Databases with PHP MySQLi and PDO

On 12/18/2017 Be the first to comment!

Hi! In this tutorial, we'll see how to connect to multiple databases using PHP's MySQLi and PDO (PHP Data Object) library. At times you may want to work with multiple mysql databases in the same context. Therefore, you need to connect to two or more databases in the same mysql instance and fetch data from them simultaneously. The old 'MySQL' extension has been deprecated since PHP5.5, so I would recommend you to use 'MySQLi' or even better 'PDO', which provides an additional layer of security and supports multiple databases such as MySQL, MSSQL Server, PostgreSQL, Oracle and much more.

The databases can be on the same server as php script or on different server. No matter what, connecting php to remote mysql server is similar to the one on the same server, except that you must provide permission to access the remote database.

php connect to multiple databases mysqli pdo

Connecting Multiple Databases with PHP MySQLi:

Establishing connection to multiple databases using mysqli api is easier than doing it with pdo. All you need to do is open a single connection to the server, and switch between different databases on go with the mysqli_select_db() method.

Consider this scenario, we have two databases, one is 'mydatabase_1' with a table 'mytable_1' and another is 'mydatabase_2' with a table 'mytable_2'. Now we will connect and fetch data from these two databases with in the same php script.

Step-1) Open the Mysql Connection

Use the mysqli_connect() method to open connection to database server without specifying the name of the database.

<?php
$hostname = 'localhost';
$username = 'my_username';
$password = 'my_password';
$con = mysqli_connect($hostname, $username, $password);
if(!$con){
    die('Error ' . mysqli_connect_error());
}
?>

Step-2) Select and Retrieve Records from the First Database

Next, select the database 'mydatabase_1' with the help of mysqli_select_db() method and display records from it as usual.

<?php
mysqli_select_db($con, 'mydatabase_1');

$sql = 'select id, name, email from mytable_1';
$result = mysqli_query($con, $sql);
if (mysqli_num_rows($result) > 0) {
    while($row = mysqli_fetch_assoc($result)) {
        echo $row['id']. ' - ' . $row['name']. ' - ' . $row['email']. '<br>';
    }
} else {
    echo 'No records found!';
}
?>

Step-3) Select and Retrieve Records from the Second Database

Now switch over to the second database and get records from it in the same way.

<?php
mysqli_select_db($con, 'mydatabase_2');

$sql = 'select id, name, designation from mytable_2';
$result = mysqli_query($con, $sql);
if (mysqli_num_rows($result) > 0) {
    while($row = mysqli_fetch_assoc($result)) {
        echo $row['id']. ' - ' . $row['name']. ' - ' . $row['designation']. '<br>';
    }
} else {
    echo 'No records found!';
}
?>

Step-4) Closing the Connection

When you have finished, you must close the mysql connection in this way.

<?php
mysqli_close($con);
?>

Connecting Multiple Databases with PHP PDO:

With PDO, things work little differently. You can't use the single connection to work with multiple databases here. Because, PDO requires that you provide the name of the database when connecting to the database server. It uses a data source name (DSN) and requires you to select the database via the constructor method.

Step-1) Connect First Database with PDO

We must create different pdo objects for different database connections and include the script inside the try{} catch{} block. It also supports prepared statements with named parameters, thus reducing the possibility of sql injection.

<?php
try {
    $pdo1 = new PDO('mysql:host=localhost;dbname=mydatabase_1', 'my_username', 'my_password');
    $pdo1->setAttribute(PDO::ATTR_ERRMODE, PDO::ERRMODE_EXCEPTION);
    $stmt = $pdo1->prepare('select id, name, email from mytable_1');
    $stmt->execute();
    foreach ($stmt->fetchAll() as $row) {
        echo $row['id']. ' - ' . $row['name']. ' - ' . $row['email']. '<br>';
    }
}
catch(PDOException $e) {
    die('Error ' . $e->getMessage());
}
?>

Step-2) Connect the Second Database

<?php
try {
    $pdo2 = new PDO('mysql:host=localhost;dbname=mydatabase_2', 'my_username', 'my_password');
    $pdo2->setAttribute(PDO::ATTR_ERRMODE, PDO::ERRMODE_EXCEPTION);
    $stmt = $pdo2->prepare('select id, name, designation from mytable_2');
    $stmt->execute();
    foreach ($stmt->fetchAll() as $row) {
        echo $row['id']. ' - ' . $row['name']. ' - ' . $row['designation']. '<br>';
    }
}
catch(PDOException $e) {
    die('Error ' . $e->getMessage());
}
?>

Step-3) Close Connection

While closing the connection, you must close all the opened connection. Since we have created two pdo objects, you have to set both as null.

<?php
$pdo1 = null;
$pdo2 = null;
?>

Although working with pdo seems little complex than mysqli, it is very beneficial to go with it since you can switch over to a different database system in the future with minimal changes.

Read Also:

Likewise you can connect to multiple databases in php using mysqli and pdo extension. Hope this is useful to you. Please share the post on your social circle if you like it. Good day:)

Autocomplete Textbox using HTML5 Datalist, PHP and MySQL Example

On 12/12/2017 7 Comments so far

Autosuggest Textbox is a cool technique to enhance user experience in websites. It's a google like search box which pops up suggestions while you type and lets you choose the word(s) without typing it completely. Usually this feature requires third party tools like jquery plug-ins to implement but thanks to HTML5, you can do it with plain html and php alone. In this tutorial, I'm going to show you, how easy it is to integrate HTML5 auto complete textbox from database using PHP and MySQL.

Autocomplete Textbox from Database using HTML5 and PHP

The HTML5 DATALIST element adds up autocomplete feature to ordinary textboxes and it takes up several options similar to SELECT element. To implement auto suggest from database, we should fetch the data and populate it to the datalist options. Finally integrate this datalist to a textbox element and we are done. Let's see how to do it in php and mysql.

Step-1: Connect to MySQL Database in PHP

First establish the connection to mysql database in php.

<?php
//connect to mysql database
$connection = mysqli_connect("localhost","username","password","store") or die("Error " . mysqli_error($connection));
?>

Step-2: Fetch the Required Data from MySQL Table

Now fetch the required mysql table field data from database. Here I wish to select the list of category names from the 'category' table.

<?php
//fetch data from database
$sql = "select cname from category";
$result = mysqli_query($connection, $sql) or die("Error " . mysqli_error($connection));
?>

Step-3: Create Datalist with MySQL Data

Next create a datalist element, loop through the mysql resultset and add the category names one by one to the datalist options.

<datalist id="categoryname">
    <?php while($row = mysqli_fetch_array($result)) { ?>
        <option value="<?php echo $row['cname']; ?>"><?php echo $row['cname']; ?></option>
    <?php } ?>
</datalist>

Step-4: Integrate Datalist with a Textbox

Next create an input element and set its LIST attribute to datalist's ID.

<input type="text" id="pcategory" autocomplete="off" list="categoryname">

It simply binds the textbox with the datalist OPTIONS and suitable suggestions pops up when the user type something in the box. We also used autocomplete = "off" to disable the browser's default autocomplete feature for proper functioning of our own autosuggest feature.

Step-5: Close the Database Connection

Finally close the mysql database connection we have established earlier.

<?php mysqli_close($connection); ?>

That's it. Now go and check it in your browser and see the auto complete textbox works like a charm (Only in HTML5 supported browsers).

autosuggest-textbox-in-html5-php-mysql-example
Autocomplete Textbox in HTML5 Example

Complete Code for HTML5 Autocomplete Textbox

<?php
//connect to mysql database
$connection = mysqli_connect("localhost","username","password","store") or die("Error " . mysqli_error($connection));

//fetch data from database
$sql = "select cname from category";
$result = mysqli_query($connection, $sql) or die("Error " . mysqli_error($connection));
?>
<!DOCTYPE html>
<html>
<head>
    <title>Autocomplete Textbox in HTML5 PHP and MySQL</title>
</head>
<body>
    <label for="pcategory">Product Category</label>
    <input type="text" list="categoryname" autocomplete="off" id="pcategory">
    <datalist id="categoryname">
        <?php while($row = mysqli_fetch_array($result)) { ?>
            <option value="<?php echo $row['cname']; ?>"><?php echo $row['cname']; ?></option>
        <?php } ?>
    </datalist>
    <?php mysqli_close($connection); ?>
</body>
</html>

Also Read: How to Insert JSON File into MySQL Database using PHP

Don't Miss: How to Insert CSV File into MySQL Database using PHP

And that was all about implementing autocomplete textbox in html5 and php. If you want the auto complete with more styling options, then using jQuery UI plug-in is the best option. Read this tutorial to learn about using jquery ui for autocomplete textbox in php and mysql.

CodeIgniter Database CRUD Tutorial for Beginners with Examples

On 12/11/2017 1 Comment so far

CRUD is one of the primary functions of a Database Management System. It stands for the four basic operations Create, Read, Update and Delete performed on databases. In SQL, it represents INSERT (Create), SELECT (Read), UPDATE (Update) and DELETE (Delete) commands. Learning the Database CRUD process is essential in application development especially when you want to work with databases. In this codeigniter tutorial, we'll see about building database CRUD operations using CodeIgniter and MySQL Database in detail.

Building Database CRUD Operations in CodeIgniter

To understand CRUD in a simple way, let us consider an example say you develop a web application which handles employee details of a business venture. At the minimum level the application should allow to add (Create), list (Read), update and delete the employee records. So to implement a CRUD process in applications, you should develop some user interface for the user to perform the above said tasks.

Codeigniter follows model-view-controller architecture, and building CRUD process in codeigniter is little tricky with those model, view and controller files. But never mind, this article will take you step by step to create basic crud process using codeigniter and mysql.

CodeIgniter CRUD Example

As an example let us assume that we have to build CRUD for employee’s details. First we'll see how many codeigniter controllers, models and views we require.

Obviously you need one controller file with all the four CRUD functions, one model file for database access and different view files for user interface. The create and update process will share a single view file and another to list the employee details in grid and delete don't require separate view file at all.

The controller for Employee CRUD will look something like this,

<?php
class employeeCRUD extends CI_Controller {

    public function __construct() {
        ...
    }

    function index() {
        ...
    }

    function addEmployee() {
        // database insert code
    }

    function fetchEmployee() {
        // database fetch code
    }

    function updateEmployee() {
        // database update code
    }

    function deleteEmployee() {
        // database delete code
    }
}
?>

Now we'll see all the four crud operations one by one in detail.

Create - Insert Record to Database in CodeIgniter

The create method in database crud is performed on table level and is used to create new entity e.g., on employee table, create will add new employee record. It is accomplished by using the SQL ‘INSERT’ command. To implement this crud process in codeigniter we should create a user interface form with input fields which allows the user to enter the required data and insert into the database. Read the complete tutorial on database insert in codeigniter

Read - Fetch and Display Database Records in CodeIgniter

In the read process we fetch all the records from the database table and list them in a grid view using html table element. This process is accomplished using the SQL ‘SELECT’ command. Read the complete tutorial on read and list the records in codeigniter

Update - Update Database Record in CodeIgniter

The update process is where we edit the details of the existing records in a database. For example we may need to modify the address or salary field of an employee. It can be accomplished by using the SQL ‘UPDATE’ command. To update a particular employee record the 'employee-id' should be given along with the modified details. The employee-id will be the primary key field of a DB table. Read the complete tutorial on updating database record in codeigniter

Delete - Delete Database Record in CodeIgniter

The delete process in database crud is used to delete the existing records in a database. This can be performed on record or table level. This is accomplished by using the SQL command ‘DELETE’ and we should provide an id to delete a particular record in the database. Read the complete tutorial on implementing database delete process in codeigniter

Note: All the above four articles uses the twitter bootstrap css for styling the html forms. Though it is not necessary, the css styles are readily available in bootstrap to jump start coding. But you can omit and use your own style sheets. It will not affect the coding flow.

Must Read: How to Integrate Twitter Bootstrap CSS Framework with CodeIgniter

I hope now you have a better understanding of working with database CRUD process in php codeigniter framework.

Inline Editing using PHP MySQL and jQuery AJAX

On 12/08/2017 Be the first to comment!

Hi! Today we will see about ajax inline editing using php and mysql. Inline editing allows users to rapidly modify web page contents in place without the requirement of forms. Popular sites like Facebook, Twitter, etc. employ this technique so that users can change their profile information without having to navigate through separate forms. Using HTML5's 'contenteditable' on page elements will take care of inline editing. For example, you can convert a plain html table into an editable table by setting 'contenteditable = true'.

If you are new to inline editing, take a look at html5 editable table tutorial.

PHP MySQL Inline Editing using jQuery AJAX:

The 'contenteditable' attribute can be used on almost all html elements, but the data edited by user is only temporary. It will be lost when the page is refreshed. Therefore, you must use ajax to send the data back to the server and store it in database for future use.

Here, let's see a demo with editable html table listing records from mysql table. Each time the user makes some changes, the edited data will be sent to the server through an ajax call and will be updated in the database using php.

During editing, the table cell will change to red background and to green when completed.

We'll need the following files for our demo,

  1. Bootstrap.css - To design the user interface
  2. jQuery.js - To post data to server via ajax
  3. dbconnect.php - Takes care of database connection
  4. index.php - Main user interface that contains html table, css and javascript functions.
  5. savecustomer.php - PHP script to update database table.

STEP-1) Create Database

First we need a mysql database and table to use in our example. Run this below sql file on mysql. It will create a database, a table and add some sample records in it.

CREATE DATABASE `mysite`;
USE `mysite`;

CREATE TABLE IF NOT EXISTS `customers` (
  `id` int(8) NOT NULL AUTO_INCREMENT,
  `name` varchar(50) NOT NULL,
  `email` varchar(60) NOT NULL,
  `location` varchar(50) NOT NULL,
  PRIMARY KEY (`id`)
) ENGINE=MyISAM  DEFAULT CHARSET=latin1 AUTO_INCREMENT=11 ;

INSERT INTO `customers` (`id`, `name`, `email`, `location`) VALUES
(1, 'Jim Connor', 'jimconnor@yahoo.com', 'Las Vegas'),
(2, 'Mark Higgins', 'mark.higgins21@yahoo.com', 'San Francisco'),
(3, 'Austin Joseph', 'austin.joseph.boston@gmail.com', 'Boston'),
(4, 'Sean Kennedy', 'seankennedy01@gmail.com', 'Seattle'),
(5, 'Rose Harris', 'roseharris@gmail.com', 'New York'),
(6, 'Lilly Whites', 'lillywhites@outlook.com', 'New York'),
(7, 'Jennifer Winters', 'jennie.winters001@gmail.com', 'Miami'),
(8, 'Michael Bruce', 'michaelbruce78@yahoo.com', 'Los Angeles'),
(9, 'John Alex', 'johnalex@example.com', 'Chicago'),
(10, 'Demi Milan', 'demimilan@gmail.com', 'Austin');

STEP-2) Open Database Connection

Next, we must establish the connection to database. The following script will open a php-mysql connection.

dbconnect.php

<?php
// connection settings
$hostname = 'localhost';
$username = 'root';
$password = '';
$database = 'mysite';

//connect to mysql database
$con = mysqli_connect($hostname, $username, $password, $database) or die("Error " . mysqli_error($con));
?>

STEP-3) Fetch Records from MySQL Table

Next fetch records from the mysql table we have created in step-1.

<?php
include_once 'dbconnect.php';

// fetch records
$sql = "select * from customers order by id";
$result = mysqli_query($con, $sql);
?>

STEP-4) Create HTML5 Editable Table

Then create an html5 table with inline editing enabled. And loop through the mysql resultset and display the records on the table one by one.

<div id="mytable">
    <h3 class="text-center bg-primary">AJAX Inline Editing HTML5 Table - Demo</h3>
    <table class="table table-bordered">
        <tr class="bg-primary">
            <th>ID</th>
            <th>Name</th>
            <th>Email</th>
            <th>Location</th>
        </tr>
        <?php
        while($row = mysqli_fetch_array($result)) { ?>
        <tr>
            <td><?php echo $row['id']; ?></td>
            <td contenteditable="true" onfocus="changeBackground(this);" onblur="saveData(this, '<?php echo $row["id"]; ?>', 'name');"><?php echo $row['name']; ?></td>
            <td contenteditable="true" onfocus="changeBackground(this);" onblur="saveData(this, '<?php echo $row["id"]; ?>', 'email');"><?php echo $row['email']; ?></td>
            <td contenteditable="true" onfocus="changeBackground(this);" onblur="saveData(this, '<?php echo $row["id"]; ?>', 'location');"><?php echo $row['location']; ?></td>
        </tr>
        <?php } ?>
    </table>
</div>

In the above markup, we have added two event functions for each cell in the table. One is to change the background color on focus and the other is to submit edited cell data to the server on blur event.

STEP-5) Change Table Cell Background On Focus

Now it's time to add javascript functions. First let's create the changeBackground() method which will change the background color of the cell to red when it gets focus.

function changeBackground(obj) {
    $(obj).removeClass("bg-success");
    $(obj).addClass("bg-danger");
}

STEP-6) Make AJAX Call to Server

Next is the ajax function saveData(). This function will post the edited data, record id and column name to the server as a json string. Once the database update is complete, the background color of the <td> element will change to green.

function saveData(obj, id, column) {
    var customer = {
        id: id,
        column: column,
        value: obj.innerHTML
    }
    $.ajax({
        type: "POST",
        url: "savecustomer.php",
        data: customer,
        dataType: 'json',
        success: function(data){
            if (data) {
                $(obj).removeClass("bg-danger");
                $(obj).addClass("bg-success");
            }
        }
   });
}

Following is the complete script for the index.php file.

index.php

<?php
include_once 'dbconnect.php';
// fetch records
$sql = "select * from customers order by id";
$result = mysqli_query($con, $sql);
?>

<!DOCTYPE html>
<html>
<head>
    <title>Inline Editing in PHP MySQL</title>
    <meta charset="utf-8"> 
    <meta content="width=device-width, initial-scale=1.0" name="viewport" >
    <link rel="stylesheet" href="css/bootstrap.css" type="text/css" />
    <style type="text/css">
    #mytable {
        margin: 0 auto;
        width: 60%;
    }
    </style>
</head>
<body>
<br/>
    <div id="mytable">
        <h3 class="text-center bg-primary">AJAX Inline Editing HTML5 Table - Demo</h3>
        <table class="table table-bordered">
            <tr class="bg-primary">
                <th>ID</th>
                <th>Name</th>
                <th>Email</th>
                <th>Location</th>
            </tr>
            <?php
            while($row = mysqli_fetch_array($result)) { ?>
            <tr>
                <td><?php echo $row['id']; ?></td>
                <td contenteditable="true" onfocus="changeBackground(this);" onblur="saveData(this, '<?php echo $row["id"]; ?>', 'name');"><?php echo $row['name']; ?></td>
                <td contenteditable="true" onfocus="changeBackground(this);" onblur="saveData(this, '<?php echo $row["id"]; ?>', 'email');"><?php echo $row['email']; ?></td>
                <td contenteditable="true" onfocus="changeBackground(this);" onblur="saveData(this, '<?php echo $row["id"]; ?>', 'location');"><?php echo $row['location']; ?></td>
            </tr>
            <?php } ?>
        </table>
    </div>
    <script src="js/jquery-1.10.2.js"></script>
    <script type="text/javascript">
    function changeBackground(obj) {
        $(obj).removeClass("bg-success");
        $(obj).addClass("bg-danger");
    }

    function saveData(obj, id, column) {
        var customer = {
            id: id,
            column: column,
            value: obj.innerHTML
        }
        $.ajax({
            type: "POST",
            url: "savecustomer.php",
            data: customer,
            dataType: 'json',
            success: function(data){
                if (data) {
                    $(obj).removeClass("bg-danger");
                    $(obj).addClass("bg-success");
                }
            }
       });
    }
    </script>
</body>
</html>

STEP-7) Save Edited Data into MySQL Database

Finally, we need to store the data edited by the user on the database. Here is the php code to do it.

savecustomer.php

<?php
include_once "dbconnect.php";

$sql = "update customers set " . $_POST["column"] . "='" . $_POST["value"] . "' where id=" . $_POST["id"];
if (mysqli_query($con, $sql))
    echo "true";
else
    echo "false";
?>

Done! Now we have all the necessary files in place. Run index.php and you will see a nice table that lists the records from the database. Edit some table cells and the cell color will change to red during editing.

php mysql inline editing ajax

Once you finish editing, the table cell turns green as soon as it lost focus.

inline editing php mysql jquery ajax

Refresh the page and the data you have modified will remain there. It means that we have saved the edited data on the database successfully.

Read Also:

That explains about inline editing using php, mysql and ajax. Inline editing will enhance user experience and also save you from creating multiple web forms. You can apply the technique with any html element. I hope you like this tutorial. Please don't forget to share it on social media. Good day!!!

How to Reset MySQL Auto Increment Counter

On 12/07/2017 Be the first to comment!

Hi! If you are newbie to MySQL, then you will definitely benefit from this tip I’m going to share today. Auto Increment Counter is one of the prominent feature of MySQL Database and it’s a general practiced way to set the primary key columns to auto increment indexing. By this way whenever a new row is inserted, the counter increments automatically by ‘1’. But the method has one limitation to it for the auto-increment counter will not reset the value by itself even if you delete all the entries in the table.

Imagine you have a mysql table with a bunch of data say 10 rows already but you want to delete and start with fresh set of entries. In such case even if you delete all those rows, the new record would start from ‘11’ and not ‘1’ for auto increment column. But this doesn’t mean you can’t reset it by yourself.

Reset Auto Increment Counter in MySQL

Dropping a table and recreating it will reset auto-increment counter to start from ‘1’ but this is not very desirable solution and I’ll tell you the proper way to reset it.

Method 1: Alter Auto Increment Column of the Table

The best solution to reset autoincrement counter is by modifying the value using ALTER command.

ALTER TABLE tblname AUTO_INCREMENT = 1;

One thing to note here is, if there are some records already present in the table, then you cannot reset it to a value less than or equal to any values that are already there.

Suppose the maximum value present in the auto-increment field is ‘10’ then you cannot reset it to anything less than that. But setting it to some greater value like ‘15’ or ‘20’ is acceptable.

Method 2: Truncating the Table

Another method to reset auto increment counter is by using TRUNCATE command. This will delete all the rows from a table and automatically resets the counter to 1.

TRUNCATE TABLE tblname;

Make sure there are no foreign key records present as truncate command tend to delete all records and reset the counter irrelevant to foreign-key constraint.

Read Also:

I hope this mysql tutorial is helpful and you can use the above two methods to easily reset the auto increment value in mysql. The ALTER method is very safe to use as there would be no data-loss but use the latter one with caution.

How to CREATE & DROP INDEX in MySQL Database Table

On 12/07/2017 Be the first to comment!

DATABASE INDEX is used to find, sort and group the data in a fast and efficient way. These indexes can be created using one or more columns and creating index to a column generates an extra hidden column holding the same data sorted with a handle to the original data. Hence it allows the database application to find the data fast without reading the whole table. Today we’ll see how to create and drop index in mysql database table.

create-and-drop-index-in-mysql-database-table

Don’t Miss: How to Read HTTP Headers in PHP

Create Index in MySQL Database Table

To create index in mysql table we should use CREATE INDEX statement like this,

CREATE INDEX bk_index ON books (book_name);

It creates an index with the name ‘bk_index’ for the field (column) ‘book_name’ in the table ‘books’.

Create Index for Multiple Columns

We can also create index for a combination of two or more fields by listing the field names separated by comma inside the parenthesis like this,

CREATE INDEX bk_index ON books (book_name, author_name);

Create Unique Index in MySQL Table

Index allows duplicate values for a column, but if you want to ensure no two rows have the same index value then using the UNIQUE INDEX is the solution.

CREATE UNIQUE INDEX user_index ON users (email_id);

Drop Index in MySQL Database Table

You can also drop an existing index for a mysql table. To delete the index we should use ALTER command with DROP clause like this,

ALTER TABLE books DROP INDEX (bk_index);

Where ‘books’ is the table name and ‘bk_index’ is the index name.

Similarly using ADD clause with the ALTER command, we can create new index like this,

ALTER TABLE books ADD INDEX (bk_index);

If you don’t specify name for an index mysql will assign a default name for the index.

If you don’t know the index name to drop then using the SHOW INDEX statement will list all the indexes associated with a particular table.

SHOW INDEX FROM table_name;
Also Read:

I hope now you have better understanding of creating and dropping index on mysql database table.

How to Backup and Restore MySQL Database using Command Line

On 12/07/2017 Be the first to comment!

It’s a good practice to regularly backup the databases to avoid losing data. And at times you may want to move the database from development to production environment or to some remote server. Either way you have to backup the database, and this mysql tutorial will show you the simple way to backup and restore mysql database using command line. MySQL Database Management System provides a powerful utility called ‘mysqldump’ which is available with the mysql installation and you can find it inside the ‘bin’ directory.

how-to-backup-restore-mysql-database-command-line

How to Backup and Restore MySQL Database using Command Line

You can use the ‘mysqldump’ command line utility to create dumps of one or more mysql databases and even generates the output as csv, sql or xml file. The dumps contains the set of sql commands (like DROP, CREATE, INSERT) required to reproduce the databases from scratch.

Backup MySQL Database using mysqldump Command

Use the mysqldump command to backup the database like this,

$ mysqldump [option] -u [username] -p[password] [database name] > [dump file]

The [option] can be anyone of the mysqldump options. For example using the option ‘--no-data’ will copy only the database structure without the table data.

The [username] is the mysql database username.

The [password] is the mysql database password. (Please note that there is no space between the ‘-p’ and the ‘[password]’).

The [database name] is the name of mysql database to backup.

The [dump file] is the file name where the dump is stored.

Backup A Single MySQL Database

Say for example, to backup a mysql database ‘db_employees’ with mysqldump command use this,

$ mysqldump -u myusername -pmyusername db_employees > employees.sql

Backup Multiple MySQL Databases

To backup more than one databases in mysql, use the ‘--databases’ option followed by the database names separated with space between them like this,

$ mysqldump -u myusername -pmyusername --databases db_employees db_library > two_db_backup.sql

Backup All MySQL Databases

To backup all the available databases in the mysql server use ‘--all-databases’ option along with mysqldump command like this,

$ mysqldump -u myusername -pmyusername --all-databases > all_db_backup.sql

Backup MySQL Database Table

At times you may want to backup only a table instead of an entire database. In that case use the table name following the db name like this,

$ mysqldump -u myusername -pmyusername db_library tbl_books > books.sql

Restore the MySQL Database from the Dump File

The mysqldump utility only creates MySQL dumps and these are nothing but a set of sql commands to be executed. In order to restore the databases from the dumps, you should create the database in mysql with the same name and run the dump file using mysql command.

$ mysql -u [username] -p[password] [database name] < [dump file]

The [username] is the mysql database username.

The [password] is the mysql database password. (Please note that there is no space between the ‘-p’ and the ‘[password]’).

The [database name] is the name of mysql database to be restored.

The [dump file] is the name of the dump file.

To restore the mysql database ‘db_employees’ from the previously created dump file use this,

$ mysql --u myusername -pmyusername db_employees < employees.sql

To restore only a single mysql database from the complete dump file, you have to explicitly mention it like this,

$ mysql -u myusername -pmyusername --one-database db_library < all_db_backup.sql

To restore the mysql database table from the dump file, mention the database name to restore like this,

$ mysql -u myusername -pmyusername db_library < books.sql
Related Read:

I hope now you have a better understanding of backup and restore mysql databases using command line.

How to Connect to Multiple Databases in CodeIgniter

On 12/01/2017 2 Comments so far

Connecting to multiple databases is simpler in CodeIgniter. All you have to do is to establish a separate connection for each database you wish to work. At times you may want to work with multiple databases from same or different servers. In core PHP, you can do it by creating separate connection object. And in codeigniter you have to set up separate connection settings for each database you wish to connect. Here I'll show you how to connect with two MySQL Databases.

Connecting to Mulitiple Databases in CodeIgniter

1. Open the "application/config/database.php" file.

2. You can see a list of default connection settings provided. Now enter the hostname, username, password, database & database prefix (if any) you want to connect.

$db['default']['hostname'] = 'localhost';
$db['default']['username'] = 'mysql_username';
$db['default']['password'] = 'mysql_password';
$db['default']['database'] = 'employee';
$db['default']['dbdriver'] = 'mysql';
$db['default']['dbprefix'] = 'kms';
$db['default']['pconnect'] = TRUE;
$db['default']['db_debug'] = TRUE;
$db['default']['cache_on'] = FALSE;
$db['default']['cachedir'] = '';
$db['default']['char_set'] = 'utf8';
$db['default']['dbcollat'] = 'utf8_general_ci';
$db['default']['swap_pre'] = '';
$db['default']['autoinit'] = TRUE;
$db['default']['stricton'] = FALSE;

Recommended Read: PHP Code to Connect with MySQL DB using MySQL and MySQLi Extensions

3. Make another copy of the connection settings with different name and provide the second database details you want to connect.

$db['ADMINDB']['hostname'] = 'localhost';
$db['ADMINDB']['username'] = 'mysql_username';
$db['ADMINDB']['password'] = 'mysql_password';
$db['ADMINDB']['database'] = 'admin';
$db['ADMINDB']['dbdriver'] = 'mysql';
$db['ADMINDB']['dbprefix'] = 'kms';
$db['ADMINDB']['pconnect'] = TRUE;
$db['ADMINDB']['db_debug'] = TRUE;
$db['ADMINDB']['cache_on'] = FALSE;
$db['ADMINDB']['cachedir'] = '';
$db['ADMINDB']['char_set'] = 'utf8';
$db['ADMINDB']['dbcollat'] = 'utf8_general_ci';
$db['ADMINDB']['swap_pre'] = '';
$db['ADMINDB']['autoinit'] = TRUE;
$db['ADMINDB']['stricton'] = FALSE;

4. Now you can access the databases like this,

//access default database
$this->load->database();
$query = $this->db->get('staff');
foreach ($query->result() as $row)
     echo $row->name;

//access the second database
$admin_db= $this->load->database('ADMINDB', TRUE);
$query = $admin_db->get('members');
foreach ($query->result() as $row)
     echo $row->role;

Note for Newbies: CodeIgniter comes with MySQL Driver by default and if you want to work with other databases like MSSQL Server then you have to install the driver manually and the connection settings will differ accordingly.

Read Also:

You can connect with two or more databases in CodeIgniter in the same way. Follow the same procedure if you want to connect to databases other than MySQL.

How to Fetch Data from Database in CodeIgniter

On 11/30/2017 12 Comments so far

How to fetch data from database in codeigniter? CodeIgniter is the simplest and light PHP framework which lets you create robust web applications in no time. Using Twitter Bootstrap with CodeIgniter saves the hassle of writing CSS Stylesheets for your app and lets you focus on development. Later you can customize bootstrap styles to suit your need. That is the best part of using MVC pattern as the presentation (view) is separate, you can change the look and feel of the app anytime without disturbing the rest of it.

kodingmadesimple.com have good amount of twitter bootstrap tutorials about customizing bootstrap 3 and I recommend you to go through our bootstrap tutorials section.

Fetch Data from Database in CodeIgniter:

Now we'll see how to read data from MySQL Database and display it in a neat table format with Bootstrap. Since we are going to use bootstrap we don't want to write any custom stylesheets for formatting the display. If you are not familiar with using Bootstrap with CodeIgniter, then you must read this tutorial on How to integrate Bootstrap with CodeIgniter.

In this CodeIgniter tutorial, I'm going to read data from the MySQL database and display it in a neat table format using Bootstrap3. For example assume we have a DB called employee which has the below two tables.

tbl_dept (int_id | var_dept_name | int_hod)
tbl_emp (int_id | var_emp_name | int_dept_id)

Now I want to display the entire department list along with the head-of-department employee name.

1. First create the model with name department_model.php in the folder system/application/models. Then add a function to read the department list from the DB.

The Model File (department_model.php)

<?php if ( ! defined('BASEPATH')) exit('No direct script access allowed');
class department_model extends CI_Model{
     function __construct()
     {
          // Call the Model constructor
          parent::__construct();
     }

     //read the department list from db
     function get_department_list()
     {
          $sql = 'select var_dept_name, var_emp_name from tbl_dept, tbl_emp where tbl_dept.int_hod = tbl_emp.int_id';
          $query = $this->db->query($sql);
          $result = $query->result();
          return $result;
     }
}

2. Next create the controller file with name department.php in the folder system/application/controllers. In this controller call the model function to get the department list and pass it to the view file for presentation.

The Controller File (department.php)

<?php
if ( ! defined('BASEPATH')) exit('No direct script access allowed');
 class department extends CI_Controller {
     public function __construct()
     {
          parent::__construct();
          $this->load->helper('url');
          $this->load->database();
     }

     public function index()
     {
          //load the department_model
          $this->load->model('department_model');  
          //call the model function to get the department data
          $deptresult = $this->department_model->get_department_list();           
          $data['deptlist'] = $deptresult;
          //load the department_view
          $this->load->view('department_view',$data);
     }
}

3. Finally create the view file with name department_view.php in the folder system/application/views. Now parse the data received from the controller one by one and display it. In order to display the department lists in a neat table format use the bootstrap built-in classes table, table-striped & table-hover.

The View File (department_view.php)

<html>
     <head>
          <title>Department Master</title>
          <meta name="viewport" content="width=device-width, initial-scale=1.0">
          <!--link the bootstrap css file-->
          <link rel="stylesheet" href="<?php echo base_url("assets/css/bootstrap.css"); ?>">
     </head>
     <body>
          <div class="container">
          <div class="row">
          <div class="col-lg-12 col-sm-12">
               <table class="table table-striped table-hover">
                    <thead>
                         <tr>
                              <th>#</th>
                              <th>Department Name</th>
                              <th>Head of Department</th>
                         </tr>
                    </thead>
                    <tbody>
                         <?php for ($i = 0; $i < count($deptlist); ++$i) { ?>
                              <tr>
                                   <td><?php echo ($i+1); ?></td>
                                   <td><?php echo $deptlist[$i]->var_dept_name; ?></td>
                                   <td><?php echo $deptlist[$i]->var_emp_name; ?></td>
                              </tr>
                         <?php } ?>
                    </tbody>
               </table>
          </div>
          </div>
          </div>
     </body>
</html>

Related: CodeIgniter Pagination using Twitter Bootstrap CSS

Here is the table view of the above example

codeigniter fetch data from database

As I've said earlier in this tutorial we haven't written any CSS styles of our own, yet we get a neatly formatted table list by using bootstrap classes (Nice isn't it?).

Read:

That explains about fetching data from database in codeigniter and display it in html table using bootstrap.

CodeIgniter Bootstrap: Insert Form Data into Database

On 11/29/2017 30 Comments so far

Hi, this CodeIgniter Bootstrap Tutorial will teach you How to Insert Form Data into MySQL Database using CodeIgniter, Bootstrap CSS framework and jQuery UI. I'm going to walk you through step-by-step, creating a form in codeigniter and insert those form data into database. To design the said php codeigniter form, we use twitter boostrap css framework and it's one of my all time favorite and saves time from creating style sheets of our own. If you wonder how to use bootstrap in codeigniter, then read this tutorial on Integrating Bootstrap with CodeIgniter.

MySQL Database Example

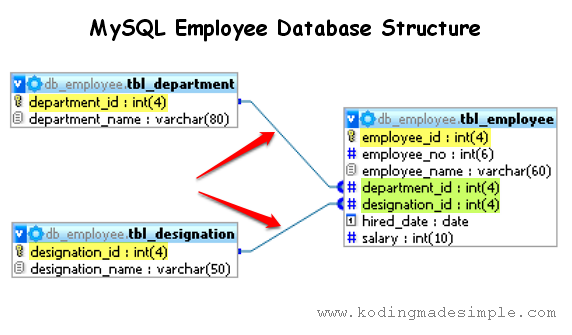
I'm going to use mysql database as an example for this tutorial. Here, take a look at the sample employee database I have.

mysql employee database structure example

The fields that are highlighted in yellow color are primary keys and those ones in green are foreign keys.

Now run this sql query in mysql to create the above database.

SET SQL_MODE="NO_AUTO_VALUE_ON_ZERO";

CREATE TABLE IF NOT EXISTS `tbl_department` (
  `department_id` int(4) NOT NULL AUTO_INCREMENT,
  `department_name` varchar(80) NOT NULL,
  PRIMARY KEY (`department_id`)
) ENGINE=MyISAM  DEFAULT CHARSET=latin1 AUTO_INCREMENT=6 ;

INSERT INTO `tbl_department` (`department_id`, `department_name`) VALUES
(1, 'Finance'),
(2, 'HQ'),
(3, 'Operations'),
(4, 'Marketing'),
(5, 'Sales');

CREATE TABLE IF NOT EXISTS `tbl_designation` (
  `designation_id` int(4) NOT NULL AUTO_INCREMENT,
  `designation_name` varchar(50) NOT NULL,
  PRIMARY KEY (`designation_id`)
) ENGINE=MyISAM  DEFAULT CHARSET=latin1 AUTO_INCREMENT=6 ;

INSERT INTO `tbl_designation` (`designation_id`, `designation_name`) VALUES
(1, 'VP'),
(2, 'Manager'),
(3, 'Executive'),
(4, 'Trainee'),
(5, 'Senior Executive');

CREATE TABLE IF NOT EXISTS `tbl_employee` (
  `employee_id` int(4) NOT NULL AUTO_INCREMENT,
  `employee_no` int(6) NOT NULL,
  `employee_name` varchar(60) NOT NULL,
  `department_id` int(4) NOT NULL,
  `designation_id` int(4) NOT NULL,
  `hired_date` date NOT NULL,
  `salary` int(10) NOT NULL,
  PRIMARY KEY (`employee_id`)
) ENGINE=MyISAM  DEFAULT CHARSET=latin1 AUTO_INCREMENT=6 ;

Recommended Read: How to Connect to Multiple Databases in CodeIgniter

The Model ('models/employee_model.php')

First create the model file 'employee_model.php' with two functions. One is to fetch all the records from department table and other one to fetch all the records from the designation table.

<?php
/* 
 * File Name: employee_model.php
 */
if ( ! defined('BASEPATH')) exit('No direct script access allowed');

class employee_model extends CI_Model
{
    function __construct()
    {
        // Call the Model constructor
        parent::__construct();
    }

    //get department table to populate the department name dropdown
    function get_department()     
    { 
        $this->db->select('department_id');
        $this->db->select('department_name');
        $this->db->from('tbl_department');
        $query = $this->db->get();
        $result = $query->result();

        //array to store department id & department name
        $dept_id = array('-SELECT-');
        $dept_name = array('-SELECT-');

        for ($i = 0; $i < count($result); $i++)
        {
            array_push($dept_id, $result[$i]->department_id);
            array_push($dept_name, $result[$i]->department_name);
        }
        return $department_result = array_combine($dept_id, $dept_name);
    }

    //get designation table to populate the designation dropdown
    function get_designation()     
    { 
        $this->db->select('designation_id');
        $this->db->select('designation_name');
        $this->db->from('tbl_designation');
        $query = $this->db->get();
        $result = $query->result();

        $designation_id = array('-SELECT-');
        $designation_name = array('-SELECT-');

        for ($i = 0; $i < count($result); $i++)
        {
            array_push($designation_id, $result[$i]->designation_id);
            array_push($designation_name, $result[$i]->designation_name);
        }
        return $designation_result = array_combine($designation_id, $designation_name);
    }
}
?>

Populate the Drop Down List from Database in CodeIgniter Form

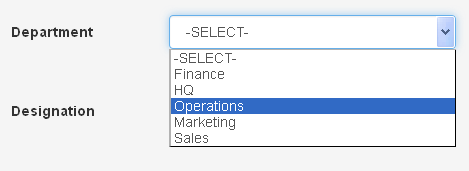
If you wonder why we need to fetch data from the above said tables, well the employee table consists of two dependant fields department_id and designation_id for which their values should be derived from tbl_department and tbl_designation respectively. So in our codeigniter form, we should use dropdown list pre-populated with the list of available department and designation names like this.

codeigniter form populate dropdown from database

The Controller ('controllers/employee.php')

Next create the controller file 'employee.php' and load the required libraries and helpers.

<?php
/*
* File Name: employee.php
*/
if ( ! defined('BASEPATH')) exit('No direct script access allowed');

class employee extends CI_Controller
{
public function __construct()
{
    parent::__construct();
    $this->load->library('session');
    $this->load->helper('form');
    $this->load->helper('url');
    $this->load->database();
    $this->load->library('form_validation');
    //load the employee model
    $this->load->model('employee_model');
}
?>

We require the 'database' library as we have to connect and fetch and insert data into database. Also loaded the session library for displaying notification. Learn more about using codeigniter sessions in our tutorial create login form in codeigniter and bootstrap.

Note: When developing a complete codeigniter application, you have to load the session library in each and every controller module for which you want only the logged in user to access.

Next add index() function which is the default function of any codeigniter controllers. As I have mentioned earlier we have to populate the drop down list in the view with values from database. It's time to callback our employee model functions to fetch the department and designation table data.

<?php
//index function
function index()
{
    ...

    //fetch data from department and designation tables
    $data['department'] = $this->employee_model->get_department();
    $data['designation'] = $this->employee_model->get_designation();
}
?>

Add CodeIgniter Form Validation Rules

Next we have to validate the form input data posted by the user for database insert. Using the codeigniter form validation library, let's set the required validation rules for each and every field present in our employee form.

<?php
//index function
function index()
{
    ...

    //set validation rules
    $this->form_validation->set_rules('employeeno', 'Employee No', 'trim|required|numeric');
    $this->form_validation->set_rules('employeename', 'Employee Name', 'trim|required|xss_clean|callback_alpha_only_space');
    $this->form_validation->set_rules('department', 'Department', 'callback_combo_check');
    $this->form_validation->set_rules('designation', 'Designation', 'callback_combo_check');
    $this->form_validation->set_rules('hireddate', 'Hired Date', 'required');
    $this->form_validation->set_rules('salary', 'Salary', 'required|numeric');
}
?>

Add Custom Form Validation Callback in CodeIgniter

Next create two codeingiter custom validation callback functions, one to make sure the user selects valid department and designations in the drop down list and the other one to restrict the employee name field to contain only alphabets and space.

<?php
//custom validation function for dropdown input
function combo_check($str)
{
    if ($str == '-SELECT-')
    {
        $this->form_validation->set_message('combo_check', 'Valid %s Name is required');
        return FALSE;
    }
    else
    {
        return TRUE;
    }
}

//custom validation function to accept only alpha and space input
function alpha_only_space($str)
{
    if (!preg_match("/^([-a-z ])+$/i", $str))
    {
        $this->form_validation->set_message('alpha_only_space', 'The %s field must contain only alphabets or spaces');
        return FALSE;
    }
    else
    {
        return TRUE;
    }
}
?>

Run Form Validation on CodeIgniter Bootstrap Form Data

Next we run the form validation on the form data we received upon submission. If the submitted form contains valid data then we insert the form data into database else display the error message in the codeigniter view. Add this code to controller's index() function.

<?php
//index function
function index()
{
    ...
    
    if ($this->form_validation->run() == FALSE)
    {
        //fail validation
        $this->load->view('employee_view', $data);
    }
    else
    {
        //pass validation
        $data = array(
            'employee_no' => $this->input->post('employeeno'),
            'employee_name' => $this->input->post('employeename'),
            'department_id' => $this->input->post('department'),
            'designation_id' => $this->input->post('designation'),
            'hired_date' => @date('Y-m-d', @strtotime($this->input->post('hireddate'))),
            'salary' => $this->input->post('salary'),
        );

        //insert the form data into database
        $this->db->insert('tbl_employee', $data);

        //display success message
        $this->session->set_flashdata('msg', '<div class="alert alert-success text-center">Employee details added to Database!!!</div>');
        redirect('employee/index');
    }
}
?>

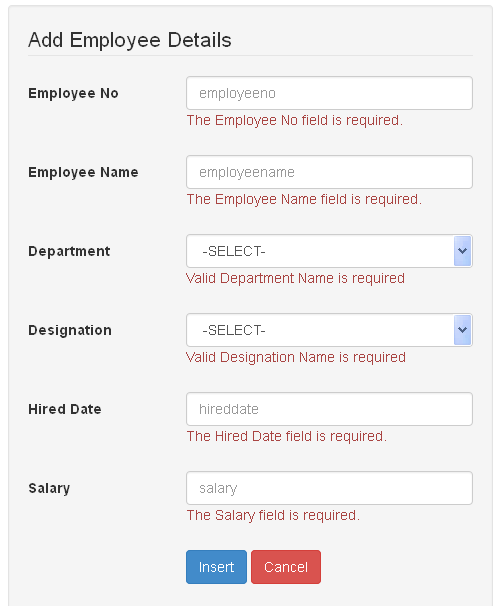
As you can see in the above code, codeigniter provides very easy way of running form validations. Upon setting the validation rules we have to run $this->form_validation->run() statement, which will return true if all our validation rule passes else returns false. In case of failure, we reload the form and display the corresponding error messages in the view.

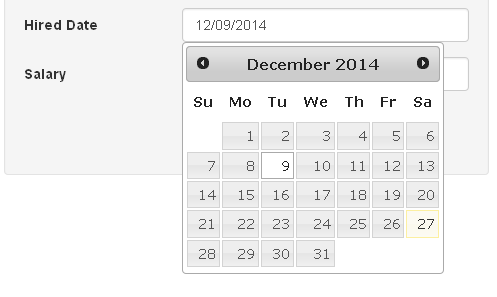
On successful validation check, we get all the form field values in an array and insert into database using the codeigniter statement, $this->db->insert('tbl_employee', $data). The first parameter of the insert() function should be the database table name and the second parameter is of an array of field name and their values. As you can see above, I have converted the date format into 'Y-m-d' with the date() function because mysql uses the very same date format. If you try to insert date in some other format, then the provided date will not be properly inserted into mysql.

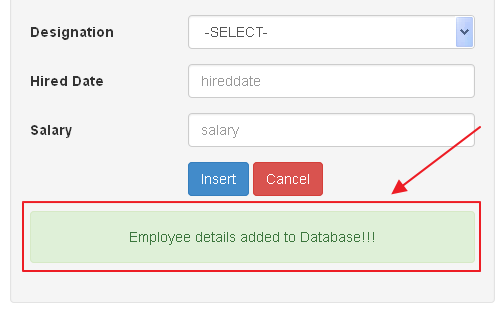
After inserting into database we should display some sort of notification for which we use $this->session->set_flashdata(). The flashdata() will display the message immediately after page redirection.

Here is the complete code for the controller file.
<?php
/* 
 * File Name: employee.php
 */
if ( ! defined('BASEPATH')) exit('No direct script access allowed');

class employee extends CI_Controller
{
    public function __construct()
    {
        parent::__construct();
        $this->load->library('session');
        $this->load->helper('form');
        $this->load->helper('url');
        $this->load->database();
        $this->load->library('form_validation');
        //load the employee model
        $this->load->model('employee_model');
    }

    //index function
    function index()
    {
        //fetch data from department and designation tables
        $data['department'] = $this->employee_model->get_department();
        $data['designation'] = $this->employee_model->get_designation();

        //set validation rules
        $this->form_validation->set_rules('employeeno', 'Employee No', 'trim|required|numeric');
        $this->form_validation->set_rules('employeename', 'Employee Name', 'trim|required|xss_clean|callback_alpha_only_space');
        $this->form_validation->set_rules('department', 'Department', 'callback_combo_check');
        $this->form_validation->set_rules('designation', 'Designation', 'callback_combo_check');
        $this->form_validation->set_rules('hireddate', 'Hired Date', 'required');
        $this->form_validation->set_rules('salary', 'Salary', 'required|numeric');

        if ($this->form_validation->run() == FALSE)
        {
            //fail validation
            $this->load->view('employee_view', $data);
        }
        else
        {    
            //pass validation
            $data = array(
                'employee_no' => $this->input->post('employeeno'),
                'employee_name' => $this->input->post('employeename'),
                'department_id' => $this->input->post('department'),
                'designation_id' => $this->input->post('designation'),
                'hired_date' => @date('Y-m-d', @strtotime($this->input->post('hireddate'))),
                'salary' => $this->input->post('salary'),
            );

            //insert the form data into database
            $this->db->insert('tbl_employee', $data);

            //display success message
            $this->session->set_flashdata('msg', '<div class="alert alert-success text-center">Employee details added to Database!!!</div>');
            redirect('employee/index');
        }

    }
    
    //custom validation function for dropdown input
    function combo_check($str)
    {
        if ($str == '-SELECT-')
        {
            $this->form_validation->set_message('combo_check', 'Valid %s Name is required');
            return FALSE;
        }
        else
        {
            return TRUE;
        }
    }

    //custom validation function to accept only alpha and space input
    function alpha_only_space($str)
    {
        if (!preg_match("/^([-a-z ])+$/i", $str))
        {
            $this->form_validation->set_message('alpha_only_space', 'The %s field must contain only alphabets or spaces');
            return FALSE;
        }
        else
        {
            return TRUE;
        }
    }
}
?>

The View ('views/employee_view.php')

The codeigniter view is the interface between the application and the user and contains the html markup for our employee form.

<!DOCTYPE html>
<html>
<head>
    <meta charset="utf-8">
    <meta name="viewport" content="width=device-width, initial-scale=1.0">
    <title>CodeIgniter | Insert Employee Details into MySQL Database</title>
    <!--link the bootstrap css file-->
    <link href="<?php echo base_url("assets/bootstrap/css/bootstrap.css"); ?>" rel="stylesheet" type="text/css" />
    <!-- link jquery ui css-->
    <link href="<?php echo base_url('assets/jquery-ui-1.11.2/jquery-ui.min.css'); ?>" rel="stylesheet" type="text/css" />
    <!--include jquery library-->
    <script src="<?php echo base_url('assets/js/jquery-1.10.2.js'); ?>"></script>
    <!--load jquery ui js file-->
    <script src="<?php echo base_url('assets/jquery-ui-1.11.2/jquery-ui.min.js'); ?>"></script>
        
    <style type="text/css">
    .colbox {
        margin-left: 0px;
        margin-right: 0px;
    }
    </style>
    
    <script type="text/javascript">
    //load datepicker control onfocus
    $(function() {
        $("#hireddate").datepicker();
    });
    </script>
    
</head>
<body>
<div class="container">
    <div class="row">
        <div class="col-sm-offset-3 col-lg-6 col-sm-6 well">
        <legend>Add Employee Details</legend>
        <?php 
        $attributes = array("class" => "form-horizontal", "id" => "employeeform", "name" => "employeeform");
        echo form_open("employee/index", $attributes);?>
        <fieldset>
            
            <div class="form-group">
            <div class="row colbox">
            
            <div class="col-lg-4 col-sm-4">
                <label for="employeeno" class="control-label">Employee No</label>
            </div>
            <div class="col-lg-8 col-sm-8">
                <input id="employeeno" name="employeeno" placeholder="employeeno" type="text" class="form-control"  value="<?php echo set_value('employeeno'); ?>" />
                <span class="text-danger"><?php echo form_error('employeeno'); ?></span>
            </div>
            </div>
            </div>

            <div class="form-group">
            <div class="row colbox">
            <div class="col-lg-4 col-sm-4">
                <label for="employeename" class="control-label">Employee Name</label>
            </div>
            <div class="col-lg-8 col-sm-8">
                <input id="employeename" name="employeename" placeholder="employeename" type="text" class="form-control"  value="<?php echo set_value('employeename'); ?>" />
                <span class="text-danger"><?php echo form_error('employeename'); ?></span>
            </div>
            </div>
            </div>
            
            <div class="form-group">
            <div class="row colbox">
            <div class="col-lg-4 col-sm-4">
                <label for="department" class="control-label">Department</label>
            </div>
            <div class="col-lg-8 col-sm-8">
            
                <?php
                $attributes = 'class = "form-control" id = "department"';
                echo form_dropdown('department',$department,set_value('department'),$attributes);?>
                <span class="text-danger"><?php echo form_error('department'); ?></span>
            </div>
            </div>
            </div>

            <div class="form-group">
            <div class="row colbox">
            <div class="col-lg-4 col-sm-4">
                <label for="designation" class="control-label">Designation</label>
            </div>
            <div class="col-lg-8 col-sm-8">
            
                <?php
                $attributes = 'class = "form-control" id = "designation"';
                echo form_dropdown('designation',$designation, set_value('designation'), $attributes);?>
                
                <span class="text-danger"><?php echo form_error('designation'); ?></span>
            </div>
            </div>
            </div>
            
            <div class="form-group">
            <div class="row colbox">
            <div class="col-lg-4 col-sm-4">
                <label for="hireddate" class="control-label">Hired Date</label>
            </div>
            <div class="col-lg-8 col-sm-8">
                <input id="hireddate" name="hireddate" placeholder="hireddate" type="text" class="form-control"  value="<?php echo set_value('hireddate'); ?>" />
                <span class="text-danger"><?php echo form_error('hireddate'); ?></span>
            </div>
            </div>
            </div>
            
            <div class="form-group">
            <div class="row colbox">
            <div class="col-lg-4 col-sm-4">
                <label for="salary" class="control-label">Salary</label>
            </div>
            <div class="col-lg-8 col-sm-8">
                <input id="salary" name="salary" placeholder="salary" type="text" class="form-control" value="<?php echo set_value('salary'); ?>" />
                <span class="text-danger"><?php echo form_error('salary'); ?></span>
            </div>
            </div>
            </div>
            
            <div class="form-group">
            <div class="col-sm-offset-4 col-lg-8 col-sm-8 text-left">
                <input id="btn_add" name="btn_add" type="submit" class="btn btn-primary" value="Insert" />
                <input id="btn_cancel" name="btn_cancel" type="reset" class="btn btn-danger" value="Cancel" />
            </div>
            </div>
        </fieldset>
        <?php echo form_close(); ?>
        <?php echo $this->session->flashdata('msg'); ?>
        </div>
    </div>
</div>
</body>
</html>

This is how our employee form looks like.

codeigniter bootstrap form example

As already said, I have used twitter bootstrap css framework with codeigniter to design this user input form. Bootstrap provides all the necessary css components to design a website and let you jump start immediately into application development without worrying about the stylesheet. Here are some of our codeigniter tutorials for you which uses Twitter Bootstrap framework for front end development.

Add Date Picker to CodeIgniter Form using jQuery UI

The employee form contains a date input field named 'hired date'. To enhance the user experience, I have used jQuery UI plug-in to add date picker calendar. And this date picker calendar pops up when the 'hired date' input field got focus and let the user to pick up the date without typing.

codeigniter bootstrap form date picker example

To add the date picker control to codeigniter form with jquery ui plug-in add the javascript line,

$("#hireddate").datepicker();

"#hireddate" is the form element id. To add date picker to more than one input field, use comma (,) to separate the id's like this $("#id1, #id2, #id3").datepicker();

Also using echo form_error() below every input element will display the corresponding form validation error messages under the input elements like this.

codeigniter bootstrap form validation error message

The functions form_open() and form_close() are used to add html form element to the codeigniter view. Finally the line echo $this->session->flashdata('msg') displays the success message when the form values are inserted into database without error.

codeigniter form insert db success msg
Also Read:

Hope you have liked this CodeIgniter Database Tutorial on inserting form data into database. If you want to learn the complete basics of the framework, then check this guide on codeigniter beginners tutorial.

Contact Form

Name

Email *

Message *